BODY PANEL FIT STANDARD / ADJUSTMENT METHOD ADJUSTMENT
INSPECT HOOD SUB-ASSEMBLY (for TMT Made)
Check that the clearance measurements are within the standard ranges.
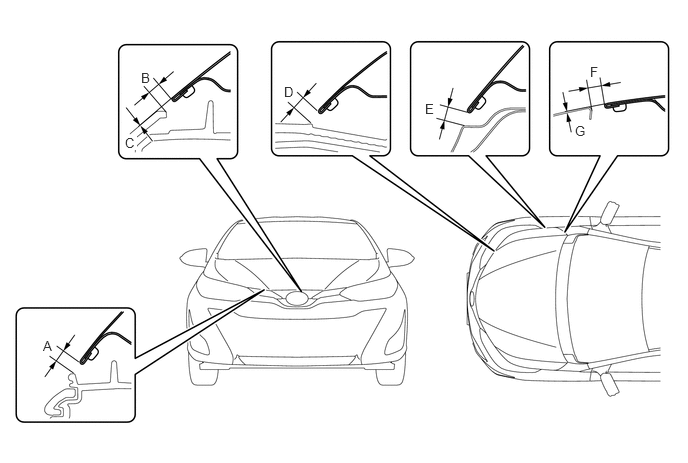
- Standard Clearance:
Area Measurement Area Measurement A 2.8 to 6.8 mm (0.110 to 0.268 in.) B 2.9 to 6.9 mm (0.114 to 0.272 in.) C -2.0 to 2.0 mm (-0.080 to 0.079 in.) D 3.3 to 7.3 mm (0.130 to 0.287 in.) E 3.8 to 6.8 mm (0.150 to 0.268 in.) F 3.5 to 6.5 mm (0.138 to 0.256 in.) G -1.5 to 1.5 mm (-0.060 to 0.059 in.) - -
- HINT:
-
Centering bolts are used to mount the hood hinge and the hood lock. The hood and the hood lock cannot be adjusted with the centering bolts installed. Substitute the centering bolts with standard bolts when making adjustments.
ADJUST HOOD SUB-ASSEMBLY (for TMT Made)
Adjust hood front/back position and left/right position of hood rear edge.
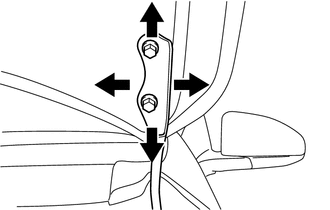
Loosen the 4 hood side hinge bolts.
Move the hood to adjust the clearance to within the standard range.
Tighten the 4 hood side hinge bolts after the adjustment.
- Torque:
- 13 N*m (133 kgf*cm, 10 ft.*lbf)
Adjust up/down position of hood front left and front right corners.
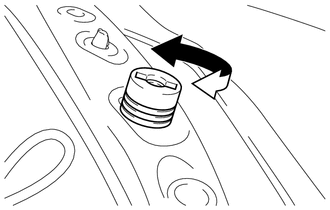
Turn the 2 cushion rubbers.
- HINT:
-
The cushion rubber can be raised and lowered by turning it.
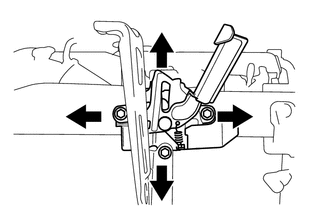
Adjust up/down and left/right position of hood front edge.
Loosen the 3 hood lock assembly bolts.
Adjust the hood lock position so that the striker can enter it smoothly.
Tighten the 3 hood lock assembly bolts after the adjustment.
- Torque:
- 7.5 N*m (76 kgf*cm, 66 in.*lbf)
INSPECT HOOD SUB-ASSEMBLY (for TMMIN Made)
Check that the clearance measurements are within the standard ranges.
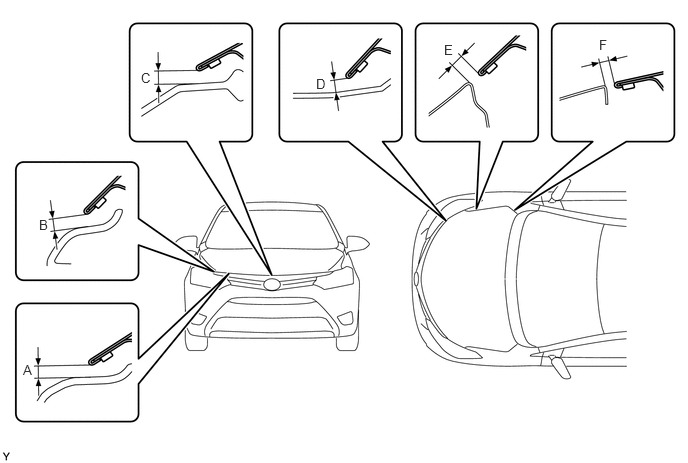
- Standard Clearance:
Area Measurement Area Measurement A 4.0 to 8.0 mm (0.157 to 0.315 in.) B 4.0 to 8.0 mm (0.157 to 0.315 in.) C 4.0 to 8.0 mm (0.157 to 0.315 in.) D 4.0 to 8.0 mm (0.157 to 0.315 in.) E 3.4 to 6.4 mm (0.134 to 0.252 in.) F 2.5 to 5.5 mm (0.0984 to 0.217 in.)
- HINT:
-
Centering bolts are used to mount the hood hinge and the hood lock. The hood and the hood lock cannot be adjusted with the centering bolts installed. Substitute the centering bolts with standard bolts when making adjustments.
ADJUST HOOD SUB-ASSEMBLY (for TMMIN Made)
Adjust hood front/back position and left/right position of hood rear edge.
Loosen the 4 hood side hinge bolts.
Move the hood to adjust the clearance to within the standard range.
Tighten the 4 hood side hinge bolts after the adjustment.
- Torque:
- 13 N*m (133 kgf*cm, 10 ft.*lbf)
Adjust up/down position of hood front left and front right corners.
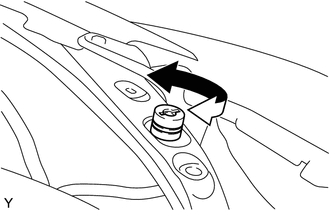
Turn the 2 cushion rubbers.
- HINT:
-
The cushion rubber can be raised and lowered by turning it.
Adjust up/down and left/right position of hood front edge.
Loosen the 3 hood lock assembly bolts.
Adjust the hood lock position so that the striker can enter it smoothly.
Tighten the 3 hood lock assembly bolts after the adjustment.
- Torque:
- 7.5 N*m (76 kgf*cm, 66 in.*lbf)
INSPECT FRONT DOOR PANEL SUB-ASSEMBLY (for TMT Made)
Check that the clearance measurements are within the standard ranges.
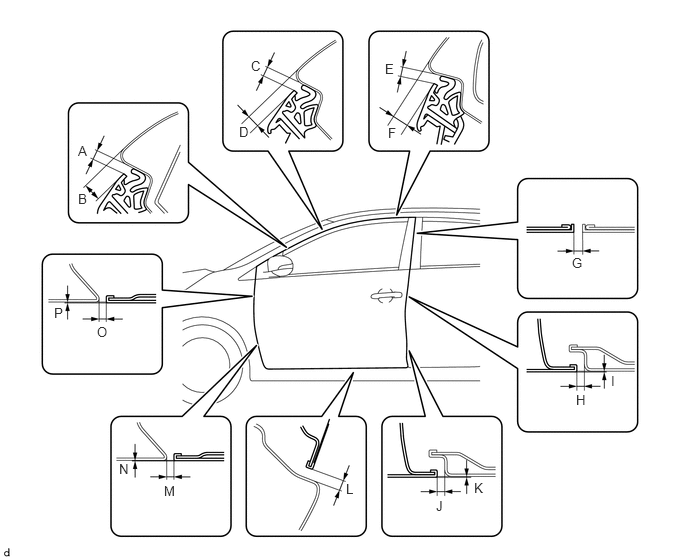
- Standard Clearance:
Area Measurement Area Measurement A 4.0 to 7.0 mm (0.157 to 0.276 in.) B 9.9 to 12.9 mm (0.390 to 0.508 in.) C 4.0 to 7.0 mm (0.157 to 0.276 in.) D 5.1 to 8.1 mm (0.201 to 0.319 in.) E 4.0 to 7.0 mm (0.157 to 0.276 in.) F 6.6 to 9.6 mm (0.260 to 0.378 in.) G 4.4 mm (0.173 in.) H 3.2 to 5.6 mm (0.126 to 0.220 in.) I -1.2 to 1.2 mm (-0.0472 to 0.0472 in.) J 3.2 to 5.6 mm (0.126 to 0.220 in.) K -1.2 to 1.2 mm (-0.0472 to 0.0472 in.) L 4.5 to 7.5 mm (0.177 to 0.295 in.) M 2.9 to 5.9 mm (0.114 to 0.232 in.) N -1.5 to 1.5 mm (-0.0591 to 0.0591 in.) O 2.9 to 5.9 mm (0.114 to 0.232 in.) P -1.5 to 1.5 mm (-0.0591 to 0.0591 in.)
- HINT:
- ·
Use the same procedure for the RH side and LH side.
·The procedure listed below is for the LH side.
·Centering bolts are used to mount the door hinge to the vehicle body and the door. The door cannot be adjusted with the centering bolts installed. Substitute the centering bolts with standard bolts when making adjustments.
INSPECT FRONT DOOR PANEL SUB-ASSEMBLY (for TMMIN Made)
Check that the clearance measurements are within the standard ranges.
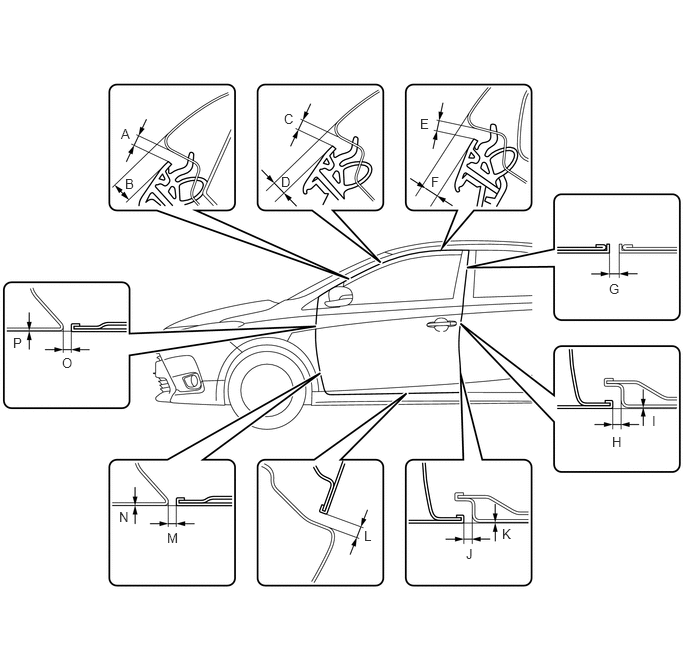
- Standard Clearance:
Area Measurement Area Measurement A 4.0 to 7.0 mm (0.157 to 0.276 in.) B 9.6 to 12.6 mm (0.378 to 0.496 in.) C 4.0 to 7.0 mm (0.157 to 0.276 in.) D 5.1 to 8.1 mm (0.201 to 0.319 in.) E 4.0 to 7.0 mm (0.157 to 0.276 in.) F 6.6 to 9.6 mm (0.260 to 0.378 in.) G 4.4 mm (0.173 in.) H 3.2 to 5.6 mm (0.126 to 0.220 in.) I -1.2 to 1.2 mm (-0.0472 to 0.0472 in.) J 3.2 to 5.6 mm (0.126 to 0.220 in.) K -1.2 to 1.2 mm (-0.0472 to 0.0472 in.) L 4.5 to 7.5 mm (0.177 to 0.295 in.) M 2.9 to 5.9 mm (0.114 to 0.232 in.) N -1.5 to 1.5 mm (-0.0591 to 0.0591 in.) O 2.9 to 5.9 mm (0.114 to 0.232 in.) P -1.5 to 1.5 mm (-0.0591 to 0.0591 in.)
- HINT:
- ·
Use the same procedure for the RH side and LH side.
·The procedure listed below is for the LH side.
·Centering bolts are used to mount the door hinge to the vehicle body and the door. The door cannot be adjusted with the centering bolts installed. Substitute the centering bolts with standard bolts when making adjustments.
ADJUST FRONT DOOR PANEL SUB-ASSEMBLY
- HINT:
-
Use the same procedure for both sides.
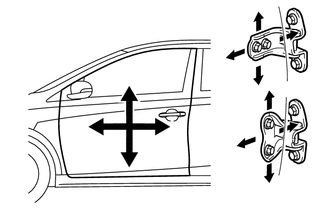
Using SST, adjust the door horizontally and vertically by loosening the 4 body side hinge bolts.
- SST
- 09812-00010
Tighten the 4 body side hinge bolts after the adjustment.
- Torque:
- 26 N*m (265 kgf*cm, 19 ft.*lbf)
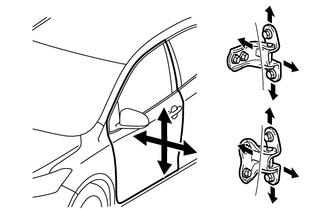
Using SST, adjust the door horizontally and vertically by loosening the 4 door side hinge bolts.
- SST
- 09812-00010
Tighten the 4 door side hinge bolts after the adjustment.
- Torque:
- 26 N*m (265 kgf*cm, 19 ft.*lbf)
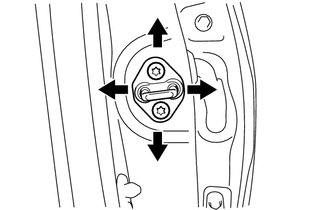
Using a T40 "TORX" socket wrench, slightly loosen the 2 striker mounting screws.
Using a plastic-faced hammer, hit the striker to adjust its position.
Using a T40 "TORX" socket wrench, tighten the 2 striker mounting screws after the adjustment.
- Torque:
- 23 N*m (235 kgf*cm, 17 ft.*lbf)
INSPECT REAR DOOR PANEL SUB-ASSEMBLY (for TMT Made, for Sedan)
Check that the clearance measurements are within the standard ranges.
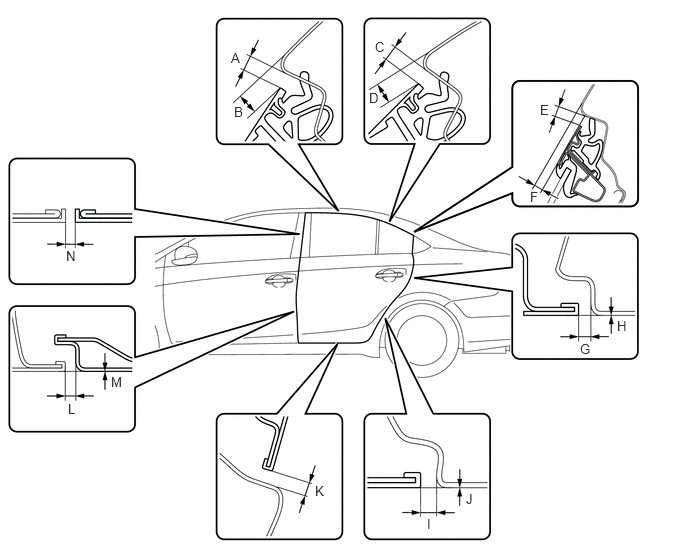
- Standard Clearance:
Area Measurement Area Measurement A 4.0 to 7.0 mm (0.157 to 0.276 in.) B 5.5 to 8.5 mm (0.217 to 0.335 in.) C 4.0 to 7.0 mm (0.157 to 0.276 in.) D 5.2 to 8.2 mm (0.205 to 0.323 in.) E 4.0 to 7.0 mm (0.157 to 0.276 in.) F 5.9 to 8.9 mm (0.232 to 0.350 in.) G 2.9 to 5.9 mm (0.114 to 0.232 in.) H -1.5 to 1.5 mm (-0.0591 to 0.0591 in.) I 2.9 to 5.9 mm (0.114 to 0.232 in.) J -1.5 to 1.5 mm (-0.059 to 0.059 in.) K 4.5 to 7.5 mm (0.177 to 0.295 in.) L 3.2 to 5.6 mm (0.126 to 0.220 in.) M -1.2 to 1.2 mm (-0.047 to 0.047 in.) N 4.4 mm (0.173 in.)
- HINT:
- ·
Use the same procedure for the LH side and RH side.
·The procedure listed below is for the LH side.
·Centering bolts are used to mount the door hinge to the vehicle body and the door. The door cannot be adjusted with the centering bolts installed. Substitute the centering bolts with standard bolts when making adjustments.
INSPECT REAR DOOR PANEL SUB-ASSEMBLY (for TMT Made, for Hatchback)
Check that the clearance measurements are within the standard ranges.
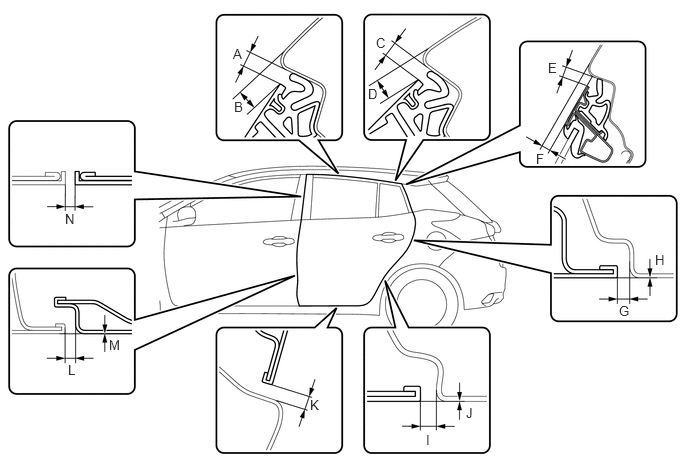
- Standard Clearance:
Area Measurement Area Measurement A 4.0 to 7.0 mm (0.157 to 0.276 in.) B 4.7 to 7.7 mm (0.185 to 0.303 in.) C 4.0 to 7.0 mm (0.157 to 0.276 in.) D 3.9 to 6.9 mm (0.154 to 0.272 in.) E 4.8 to 7.8 mm (0.189 to 0.307 in.) F 3.6 to 6.6 mm (0.142 to 0.260 in.) G 2.9 to 5.9 mm (0.114 to 0.232 in.) H -1.5 to 1.5 mm (-0.0591 to 0.0591 in.) I 2.9 to 5.9 mm (0.114 to 0.232 in.) J -1.5 to 1.5 mm (-0.0590 to 0.0590 in.) K 4.5 to 7.5 mm (0.177 to 0.295 in.) L 3.2 to 5.6 mm (0.126 to 0.220 in.) M -1.2 to 1.2 mm (-0.047 to 0.047 in.) N 4.4 mm (0.173 in.)
- HINT:
- ·
Use the same procedure for the LH side and RH side.
·The procedure listed below is for the LH side.
·Centering bolts are used to mount the door hinge to the vehicle body and the door. The door cannot be adjusted with the centering bolts installed. Substitute the centering bolts with standard bolts when making adjustments.
ADJUST REAR DOOR PANEL SUB-ASSEMBLY (for TMT Made)
- HINT:
-
Use the same procedure for both sides.
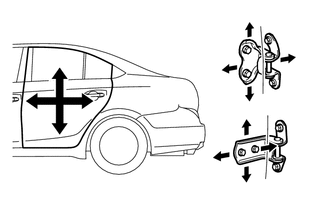
Using SST, adjust the door horizontally and vertically by loosening the 4 body side hinge bolts.
- SST
- 09812-00010
Tighten the 4 body side hinge bolts after the adjustment.
- Torque:
- 26 N*m (265 kgf*cm, 19 ft.*lbf)
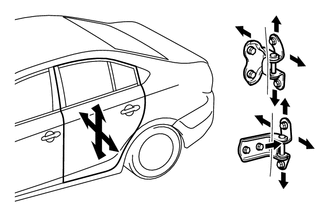
Using SST, adjust the door horizontally and vertically by loosening the 4 door side hinge bolts.
- SST
- 09812-00010
Tighten the 4 door side hinge bolts after the adjustment.
- Torque:
- 26 N*m (265 kgf*cm, 19 ft.*lbf)
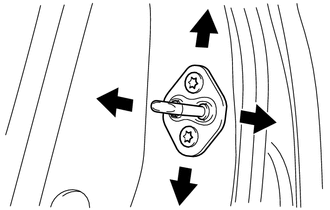
Using a T40 "TORX" socket wrench, slightly loosen the 2 striker mounting screws.
Using a plastic-faced hammer, hit the striker to adjust its position.
Using a T40 "TORX" socket wrench, tighten the striker mounting 2 screws after the adjustment.
- Torque:
- 23 N*m (235 kgf*cm, 17 ft.*lbf)
INSPECT REAR DOOR PANEL SUB-ASSEMBLY (for TMMIN Made)
Check that the clearance measurements are within the standard ranges.
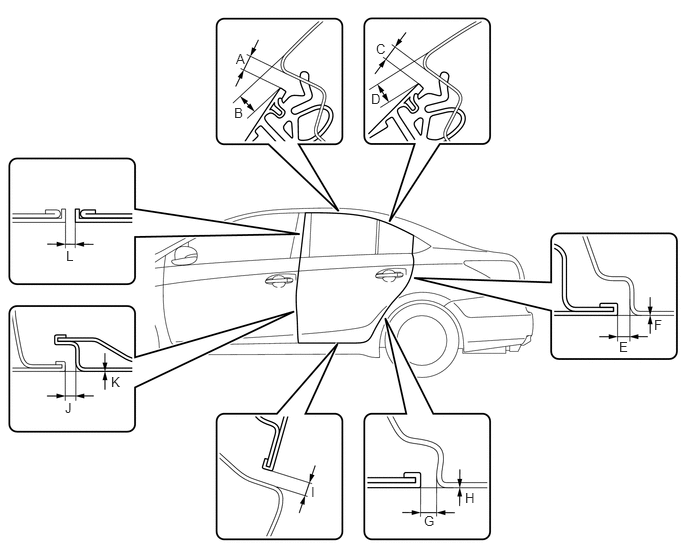
- Standard Clearance:
Area Measurement Area Measurement A 4.0 to 7.0 mm (0.157 to 0.276 in.) B 6.3 to 9.3 mm (0.248 to 0.366 in.) C 4.9 to 7.9 mm (0.193 to 0.311 in.) D 5.3 to 8.3 mm (0.209 to 0.327 in.) E 2.9 to 5.9 mm (0.114 to 0.232 in.) F -1.5 to 1.5 mm (-0.0591 to 0.0591 in.) G 2.9 to 5.9 mm (0.114 to 0.232 in.) H -1.5 to 1.5 mm (-0.0591 to 0.0591 in.) I 4.5 to 7.5 mm (0.177 to 0.295 in.) J 3.2 to 5.6 mm (0.126 to 0.220 in.) K -1.2 to 1.2 mm (-0.0472 to 0.0472 in.) L 4.4 mm (0.173 in.)
- HINT:
- ·
Use the same procedure for the LH side and RH side.
·The procedure listed below is for the LH side.
·Centering bolts are used to mount the door hinge to the vehicle body and the door. The door cannot be adjusted with the centering bolts installed. Substitute the centering bolts with standard bolts when making adjustments.
ADJUST REAR DOOR PANEL SUB-ASSEMBLY (for TMMIN Made)
- HINT:
-
Use the same procedure for both sides.
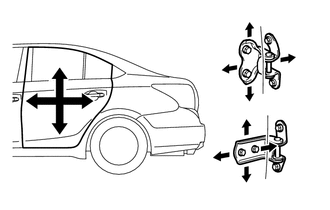
Using SST, adjust the door horizontally and vertically by loosening the 4 body side hinge bolts.
- SST
- 09812-00010
Tighten the 4 body side hinge bolts after the adjustment.
- Torque:
- 26 N*m (265 kgf*cm, 19 ft.*lbf)
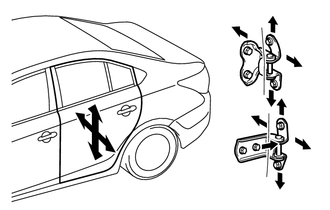
Using SST, adjust the door horizontally and vertically by loosening the 4 door side hinge bolts.
- SST
- 09812-00010
Tighten the 4 door side hinge bolts after the adjustment.
- Torque:
- 26 N*m (265 kgf*cm, 19 ft.*lbf)
Using a T40 "TORX" socket wrench, slightly loosen the 2 striker mounting screws.
Using a plastic-faced hammer, hit the striker to adjust its position.
Using a T40 "TORX" socket wrench, tighten the striker mounting 2 screws after the adjustment.
- Torque:
- 23 N*m (235 kgf*cm, 17 ft.*lbf)
INSPECT LUGGAGE COMPARTMENT DOOR PANEL SUB-ASSEMBLY (for TMT Made)
Check that the clearance measurements are within the standard ranges.
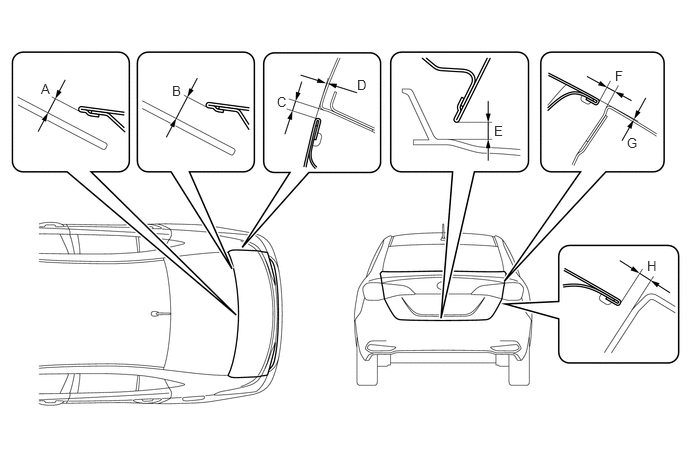
- Standard Clearance:
Area Measurement Area Measurement A 8.8 mm (0.346 in.) B 11.1 mm (0.437 in.) C 2.3 to 5.3 mm (0.091 to 0.209 in.) D -1.5 to 1.5 mm (-0.060 to 0.059 in.) E 5.0 to 9.0 mm (0.197 to 0.354 in.) F 2.8 to 5.8 mm (0.110 to 0.228 in.) G -1.5 to 1.5 mm (-0.060 to 0.059 in.) H 3.5 to 7.5 mm (0.138 to 0.295 in.)
- HINT:
-
Centering bolts are used to mount the door hinge to the door. The door cannot be adjusted with the centering bolts installed. Substitute the centering bolts with standard bolts when making adjustments.
INSPECT LUGGAGE COMPARTMENT DOOR PANEL SUB-ASSEMBLY (for TMMIN Made)
Check that the clearance measurements are within the standard ranges.
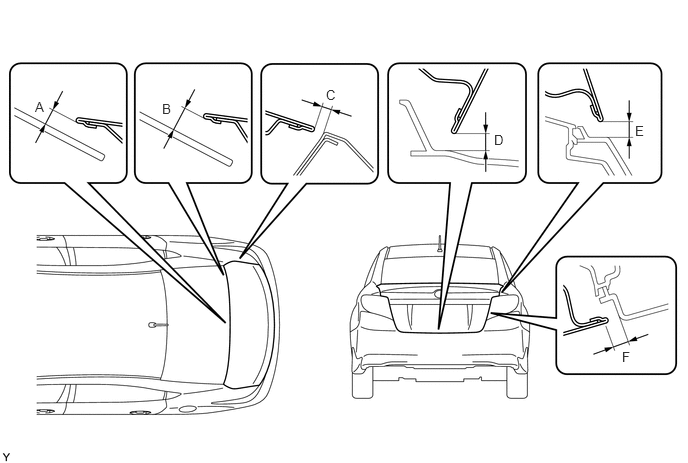
- Standard Clearance:
Area Measurement Area Measurement A 8.0 mm (0.315 in.) B 11.9 mm (0.469 in.) C 2.8 to 5.8 mm (0.111 to 0.228 in.) D 6.4 to 10.4 mm (0.252 to 0.409 in.) E 5.1 to 9.1 mm (0.201 to 0.358 in.) F 3.7 to 7.7 mm (0.146 to 0.303 in.)
- HINT:
-
Centering bolts are used to mount the door hinge to the door. The door cannot be adjusted with the centering bolts installed. Substitute the centering bolts with standard bolts when making adjustments.
ADJUST LUGGAGE COMPARTMENT DOOR PANEL SUB-ASSEMBLY
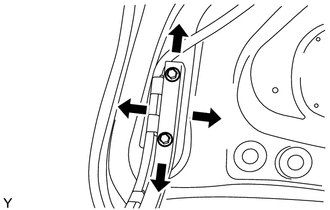
Adjust the door position.
Horizontally and vertically adjust the door by loosening the 4 luggage compartment door side hinge bolts.
Tighten the 4 luggage compartment door side hinge bolts after the adjustment.
- Torque:
- 8.0 N*m (82 kgf*cm, 71 in.*lbf)
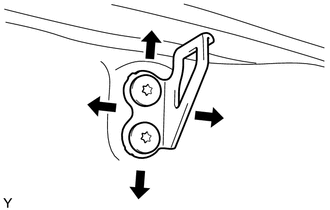
Adjust the striker position.
Using a T40 "TORX" socket wrench, slightly loosen the 2 striker mounting screws.
Using a plastic-faced hammer, hit the striker to adjust its position.
Using a T40 "TORX" socket wrench, tighten the 2 striker mounting screws after the adjustment.
- Torque:
- 23 N*m (235 kgf*cm, 17 ft.*lbf)
INSPECT BACK DOOR PANEL SUB-ASSEMBLY
Check that the clearance measurements are within the standard ranges.
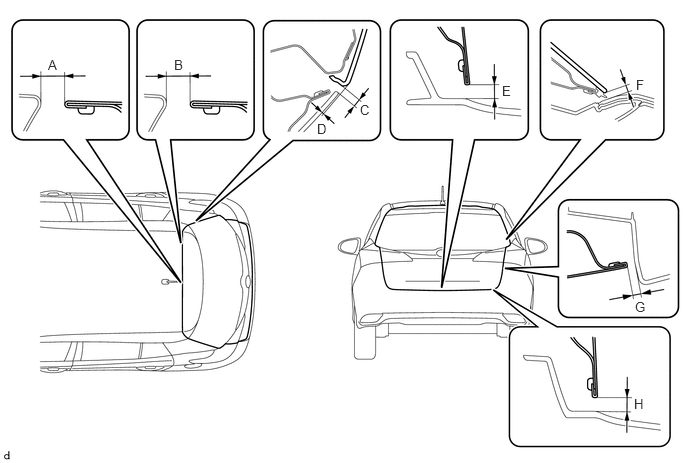
- Standard Clearance:
Area Measurement Area Measurement A 6.0 to 9.0 mm (0.236 to 0.354 in.) B 6.0 to 9.0 mm (0.236 to 0.354 in.) C 3.8 to 7.8 mm (0.150 to 0.307 in.) D -1.0 to 4.0 mm (-0.040 to 0.157 in.) E 4.0 to 8.0 mm (0.157 to 0.315 in.) F 3.8 to 8.8 mm (0.150 to 0.346 in.) G 3.7 to 7.7 mm (0.146 to 0.303 in.) H 4.0 to 8.0 mm (0.157 to 0.315 in.)
- HINT:
-
Centering bolts are used to mount the door hinge to the door. The door cannot be adjusted with the centering bolts installed. Substitute the centering bolts with standard bolts when making adjustments.
ADJUST BACK DOOR PANEL SUB-ASSEMBLY
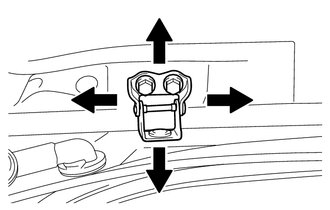
Adjust the door position.
Horizontally and vertically adjust the door by loosening the 4 back door side hinge bolts.
Tighten the 4 back door side hinge bolts after the adjustment.
- Torque:
- 19 N*m (194 kgf*cm, 14 ft.*lbf)
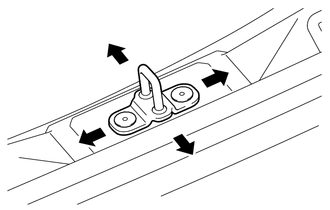
Adjust the striker position.
Using a T40 "TORX" socket wrench, slightly loosen the 2 striker mounting screws.
Using a plastic hammer, hit the striker to adjust its position.
Using a T40 "TORX" socket wrench, tighten the 2 striker mounting screws after the adjustment.
- Torque:
- 23 N*m (235 kgf*cm, 17 ft.*lbf)