RM30M0E
_58
Vehicle Interior
_017118
HEATING / AIR CONDITIONING
_0090074
SOLAR SENSOR
G
HEATING / AIR CONDITIONING SOLAR SENSOR INSPECTION
PROCEDURE

 88625H
1.INSPECT COOLER (SOLAR SENSOR) THERMISTOR
a.
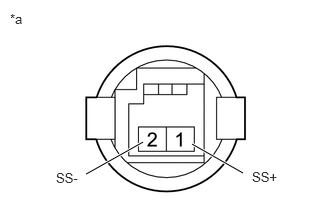
Check the resistance.
i.
0.896,1.813 1.49,1.479
true
2,1.5 2.531,1.802
true
0.104,0.115 0.417,0.313
0.313,0.198
10
false
*a
2.625,1.76 3.083,1.958
0.458,0.198
10
false
SS+
0.583,1.771 1.042,1.969
0.458,0.198
10
false
SS-
| *a | Component without harness connected
(Cooler (Solar Sensor) Thermistor) |
Measure the resistance according to the value(s) in the table below.
- Standard Voltage:
Tester Connection Condition Specified Condition 1 (SS+) - 2 (SS-) Without direct light exposure (Sensor covered) ∞ Ω 1 (SS+) - 2 (SS-) When exposed to sunlight or an inspection light Except ∞ Ω
- NOTICE:
-
The connection procedure for using a digital tester such as an electrical tester is shown above. When using an analog tester, connect the positive (+) lead to terminal 2 (SS-) and the negative (-) lead to terminal 1 (SS+) of the cooler (solar sensor) thermistor.
- HINT:
- ·
As the inspection light is moved away from the cooler (solar sensor) thermistor, the voltage decreases.
- ·
Use an incandescent light for the inspection. Position it about 30 cm (11.8 in.) from the cooler (solar sensor) thermistor.
If the result is not as specified, replace the cooler (solar sensor) thermistor.