U340E AUTOMATIC TRANSMISSION / TRANSAXLE AUTOMATIC TRANSAXLE SYSTEM P0973 Shift Solenoid "A" Control Circuit Low (Shift Solenoid Valve S1) P0974 Shift Solenoid "A" Control Circuit High (Shift Solenoid Valve S1)
DESCRIPTION
Shifting from 1st to 4th is performed in combination with the ON and OFF operations of shift solenoid valves S1 and S2 which are controlled by the ECM. If an open or short circuit occurs in either of the shift solenoid valves, the ECM controls the remaining normal shift solenoid valve to allow the vehicle to be driven smoothly.
(If an open or short circuit occurs, the ECM stops sending current to the affected circuit.)
Fail-safe function.
Click hereDrivetrain>U340E AUTOMATIC TRANSMISSION / TRANSAXLE>AUTOMATIC TRANSAXLE SYSTEM>FAIL-SAFE CHART
| DTC No. | Detection Item | DTC Detection Condition | Trouble Area | MIL | Memory |
|---|---|---|---|---|---|
| P0973 | Shift Solenoid "A" Control Circuit Low (Shift Solenoid Valve S1) | ECM detects short in solenoid valve S1 circuit 4 times when solenoid valve S1 is operated (1 trip detection logic). | ·
Wire harness or connector ·
Transmission wire ·
Shift solenoid valve S1 ·
ECM |
Comes on | DTC stored |
| P0974 | Shift Solenoid "A" Control Circuit High (Shift Solenoid Valve S1) | ECM detects open in solenoid valve S1 circuit 4 times when solenoid valve S1 is not operated (1 trip detection logic). | ·
Wire harness or connector ·
Transmission wire ·
Shift solenoid valve S1 ·
ECM |
Comes on | DTC stored |
MONITOR DESCRIPTION
The ECM commands gear shifts by turning the shift solenoid valves ON/OFF. When there is an open or short circuit in the shift solenoid valve S1 circuit, the ECM detects the problem and the MIL comes on. Illuminating the MIL, the ECM performs the fail-safe and turns the other functioning shift solenoid valve ON/OFF.
(If an open or short circuit occurs, the ECM stops sending current to the affected circuit.)
WIRING DIAGRAM
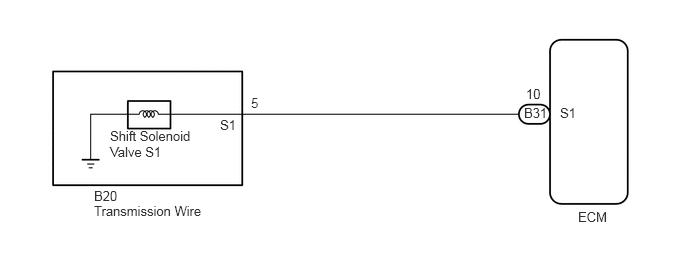
CAUTION / NOTICE / HINT
- HINT:
-
The shift solenoid valve S1 is turned on/off normally when the shift lever is in D:
| Gearshift controlled by ECM | 1st | 2nd | 3rd | 4th |
| Shift solenoid valve S1 | ON | ON | OFF | OFF |
PROCEDURE
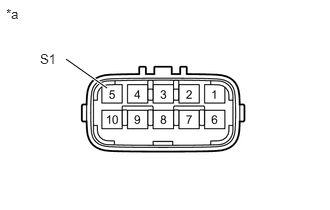
| *a | Component without harness connected
(Transmission Wire) |
Disconnect the B20 transmission wire connector from the transaxle.
Measure the resistance according to the value(s) in the table below.
- Standard Resistance:
Tester Connection Condition Specified Condition 5 (S1) - Body ground 20°C (68°F) 11 to 15 Ω
- Result:
Proceed to OK NG
OK
NG
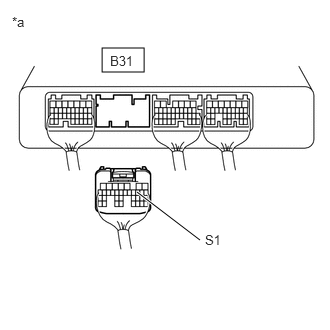
| *a | Rear view of wire harness connector
(to ECM) |
Connect the B20 transmission wire connector to the transaxle.
Disconnect the ECM connector.
Measure the resistance according to the value(s) in the table below.
- Standard Resistance:
Tester Connection Condition Specified Condition B31-10 (S1) - Body ground 20°C (68°F) 11 to 15 Ω
- Result:
Proceed to OK NG
OK
NG
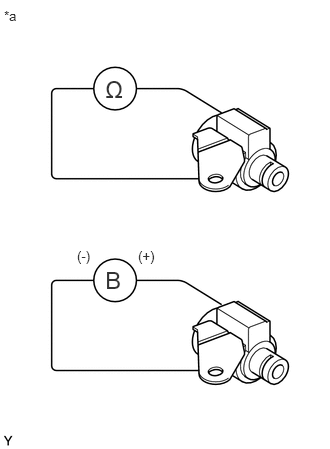
| *a | Component without harness connected
(Shift Solenoid Valve S1) |
Remove the shift solenoid valve S1.
Measure the resistance according to the value(s) in the table below.
- Standard Resistance:
Tester Connection Condition Specified Condition Solenoid Connector (S1) - Solenoid Body (S1) 20°C (68°F) 11 to 15 Ω
Connect the positive (+) lead to the terminal of the solenoid connector and the negative (-) lead to the solenoid body to check the solenoid valve operation.
- OK:
The solenoid makes operating sounds.
- Result:
Proceed to OK NG
OK
NG