EXTERIOR PANELS / TRIM SIDE MUDGUARD INSTALLATION
CAUTION / NOTICE / HINT
- HINT:
- ·
Use the same procedure for the LH and RH sides.
·The procedure described below is for the LH side.
PROCEDURE

 76926D
1.INSTALL SIDE MUDGUARD PROTECTOR
Clean the attachment surface.
Using a piece of cloth, rub off any double-side tape that remains on the front side mudguard.
- NOTICE:
-
Installing the side mudguard protector while any double-sided tape remains on the front side mudguard may cause adhesion failure. Therefore, completely remove the double-sided tape.
Using a non-residue solvent, clean the attachment surface.
On the front side mudguard, coat the attachment surface for the side mudguard protector with primer.
- NOTICE:
-
Do not apply the primer too thickly.
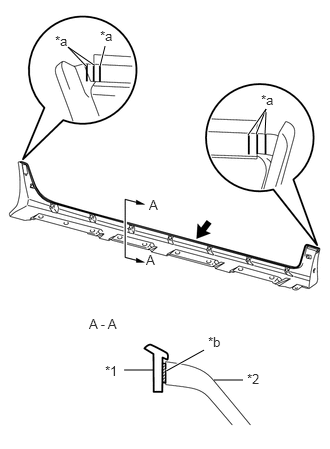
| *1 | Side Mudguard Protector |
| *2 | Front Side Mudguard |
| *a | Marking |
| *b | Double-sided Tape |
Peel off the backing paper of a new side mudguard protector, and install it using sufficient pressure.
- NOTICE:
-
Install the side mudguard protector after the primer has dried (approximately 3 minutes).
75895F
2.INSTALL NO. 1 MOULDING TAPE
Clean the attachment surface.
Using an infrared light, heat the vehicle body surface.
| Item | Temperature |
|---|---|
| Front Side Mudguard | 40 to 60°C (104 to 140°F) |
- CAUTION:
-
Do not burn yourself on the hot front side mudguard or with the infrared light.
- NOTICE:
-
Do not heat the front side mudguard excessively.
Using a piece of cloth, rub the remaining No. 1 moulding tape off the front side mudguard while it is hot from the infrared light.
Using a non-residue solvent, clean the attachment surface.
On the front side mudguard, coat the attachment surface for the No. 1 moulding tape with primer.
- NOTICE:
-
Do not apply the primer too thickly.
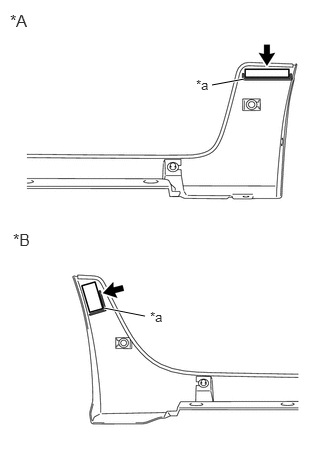
| *A | for Front Side |
| *B | for Rear Side |
| *a | Marking |
Peel off the backing paper of 2 new No. 1 moulding tapes, and install them using sufficient pressure.
- NOTICE:
-
Install the No. 1 moulding tape after the primer has dried (approximately 3 minutes).
76916F
3.INSTALL FRONT SIDE MUDGUARD
Clean the attachment surface.
Using an infrared light, heat the vehicle body surface.
| Item | Temperature |
|---|---|
| Vehicle Body | 40 to 60°C (104 to 140°F) |
- CAUTION:
-
Do not burn yourself on the hot vehicle body or with the infrared light.
- NOTICE:
-
Do not heat the vehicle body excessively.
Using a piece of cloth, rub the remaining No. 1 moulding tape off the vehicle body while it is hot from the infrared light.
Using a non-residue solvent, clean the attachment surface.
On the vehicle body, coat the attachment surface for the No. 1 moulding tape with primer.
- NOTICE:
-
Do not apply the primer too thickly.
Peel off the backing paper of 2 new No. 1 moulding tapes, and engage the 9 clips and install the front side mudguard using sufficient pressure.
- NOTICE:
-
Install the front side mudguard after the primer has dried (approximately 3 minutes).
Install the 9 retainers.
Install the 3 screws.