1NR-FE COOLING RADIATOR ON-VEHICLE INSPECTION
PROCEDURE

 16401
1.INSPECT RADIATOR CAP SUB-ASSEMBLY
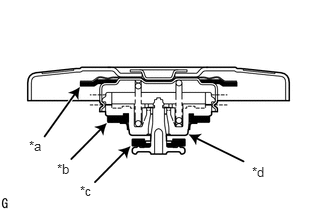
| *a | Rubber Packing (1) |
| *b | Rubber Packing (2) |
| *c | Rubber Packing (3) |
| *d | Valve Seat |
Visually check the radiator cap sub-assembly.
If there are water stains or foreign matter on rubber packing (1), (2) or (3), clean the part(s) with water and finger scouring.
Check that rubber packings (1), (2) and (3) are not deformed, cracked or swollen.
Check that rubber packings (3) and valve seat are not stuck together.
If necessary, replace the radiator cap sub-assembly.
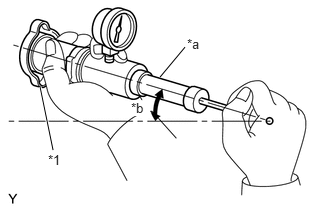
| *1 | Radiator Cap Sub-assembly |
| *a | Radiator Cap Tester |
| *b | 30° or more |
Measure the valve opening pressure.
Apply engine coolant to rubber packings 2 and 3.
Install the radiator cap sub-assembly to the radiator cap tester.
Pump the radiator cap tester several times, and check the maximum pressure.
- Pumping speed:
1 pump per second
- NOTICE:
-
Using the radiator cap tester, tilt it to more than 30 degrees.
- HINT:
-
Even if the radiator cap sub-assembly cannot maintain the maximum pressure, it is not a defect.
- Judgment Criteria:
Item Specified Condition Standard value
(for brand-new radiator cap sub-assembly)93.3 to 122.7 kPa (0.95 to 1.25 kgf/cm2, 13.5 to 17.8 psi) Minimum standard value
(after using radiator cap sub-assembly)78.5 kPa (0.8 kgf/cm2, 11.4 psi)
If the maximum pressure is less than the specified pressure for the minimum standard value, replace the radiator cap sub-assembly.