SEAT FRONT SEAT ASSEMBLY INSTALLATION
CAUTION / NOTICE / HINT
- NOTICE:
-
Always use E10 "TORX" socket wrench when installing the front seat assembly.
- HINT:
- ·
The procedure described below is for the LHD side. Use the same procedure for both the LHD and RHD side, unless otherwise specified.
·The procedure described below is for the driver side. Use the same procedure for both the driver and front passenger sides, unless otherwise specified.
PROCEDURE

 1.INSTALL FRONT SEAT ASSEMBLY
Place the front seat assembly in the cabin.
- NOTICE:
- ·
Follow the procedure described below in order to prevent the seat tracks from locking separately.
·Be careful not to damage the vehicle body.
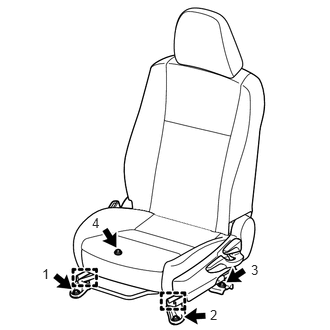
Insert the 2 location pins of the front seat assembly through the 2 body holes, place the front seat assembly in the rearmost position and make sure that the inner and outer seat tracks are locked securely.
Using an E10 "TORX" socket wrench, install bolt 1 and then bolt 2 onto the front side.
- Torque:
- 37 N*m (377 kgf*cm, 27 ft.*lbf)
- NOTICE:
-
Tighten the bolts in the order indicated in the illustration.
Move the front seat assembly to the foremost position, and then make sure that the inner and outer seat tracks are securely locked.
Using an E10 "TORX" socket wrench, install bolt 3 and then bolt 4 onto the rear side.
- Torque:
- 37 N*m (377 kgf*cm, 27 ft.*lbf)
Make sure that the inner and outer seat tracks lock simultaneously after the front seat assembly is moved.
- HINT:
-
If the inner and outer seat tracks do not lock simultaneously, loosen the bolts and adjust the seat tracks.
w/ Front Seat Side Airbag:
Connect the front seat side airbag connector.
Connect the buckle switch connector.
72138
2.INSTALL REAR OUTER SEAT TRACK BRACKET COVER
Engage the 4 claws to install the rear outer seat track bracket cover.