STEERING COLUMN STEERING COLUMN ASSEMBLY(for TMT Made) REASSEMBLY
CAUTION / NOTICE / HINT
- HINT:
-
Refer to Service Bulletin for the installation position of the transponder key ECU assembly.
PROCEDURE

 80960
1.INSTALL POWER STEERING MOTOR ASSEMBLY
- NOTICE:
- ·
Do not drop the power steering motor assembly, strike it with tools or subject it to impacts.
·If the power steering motor assembly is subjected to an impact, replace it with a new one.
·Do not pull the wire harness of the power steering motor assembly.
·Do not allow any moisture to come into contact with the power steering motor assembly.
·Do not allow any foreign objects to contaminate the steering column assembly and the power steering motor assembly.
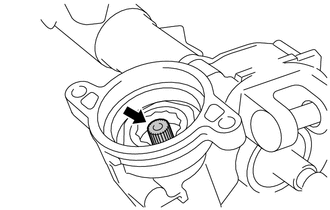

|
Grease |
Apply the grease that is supplied with a new steering column assembly or power steering motor assembly to the serrated part of the steering column assembly.
- NOTICE:
-
Be sure to use the supplied grease only.
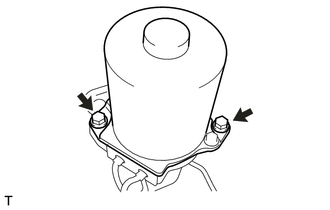
Temporarily install the power steering motor assembly to the steering column assembly with the 2 bolts.
- NOTICE:
-
When temporarily installing the 2 bolts to the power steering motor assembly, do not tighten them all the way down.
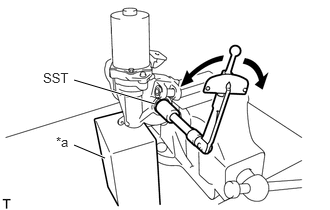
| *a | Wooden Block |
Secure the steering column assembly in a vise using aluminum plates and wooden blocks.
- NOTICE:
-
Do not overtighten the vise.
Using SST, turn the steering main shaft once 180 degrees to the left and then 180 degrees to the right at a speed of 60 rpm, and repeat 2 to 3 times to adjust the axis centering of the power steering motor assembly.
- SST
- 09616-00011
Tighten the 2 bolts.
- Torque:
- 18.5 N*m (189 kgf*cm, 14 ft.*lbf)
Using SST, measure the turning torque of the steering main shaft.
- Standard preload:
0.72 to 1.42 N*m (8 to 14 kgf*cm, 7 to 12 in.*lbf)
- NOTICE:
-
Ensure that there is no abnormal resistance during rotation.
If the turning torque is not as specified, readjust the axis centering of the power steering motor assembly.
for LHD:
Apply new tape and install a new clamp to the wire harness as shown in the illustration.
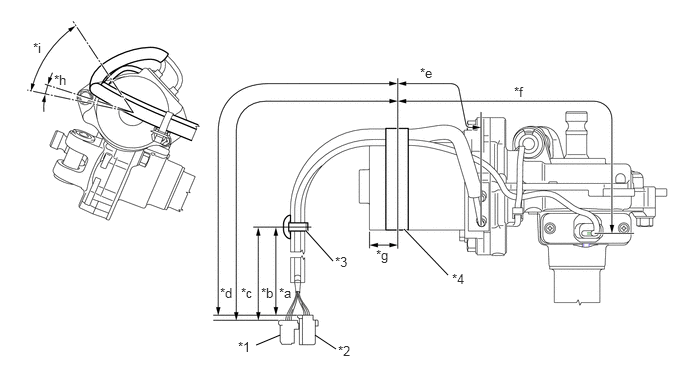
| *1 | Torque Sensor Wire Harness | *2 | Power Steering Motor Wire Harness |
| *3 | Wire Harness Clamp | *4 | Tape |
| *a | 95 to 115 mm (3.74 to 4.53 in.) | *b | 110 to 130 mm (4.33 to 5.12 in.) |
| *c | 240 to 260 mm (9.45 to 10.24 in.) | *d | 225 to 245 mm (8.86 to 9.65 in.) |
| *e | 125 mm (4.92 in.) | *f | 230 mm (9.06 in.) |
| *g | 14 to 34 mm (0.55 to 1.34 in.) | *h | 5° |
| *i | 45° or less | - | - |
- NOTICE:
- ·
Wrap the tape at least 2 turns.
·Secure the power steering motor wire harness and torque sensor wire harness to the power steering motor assembly within the range indicated by *i.
for RHD:
Apply new tape and install a new clamp to the wire harness as shown in the illustration.
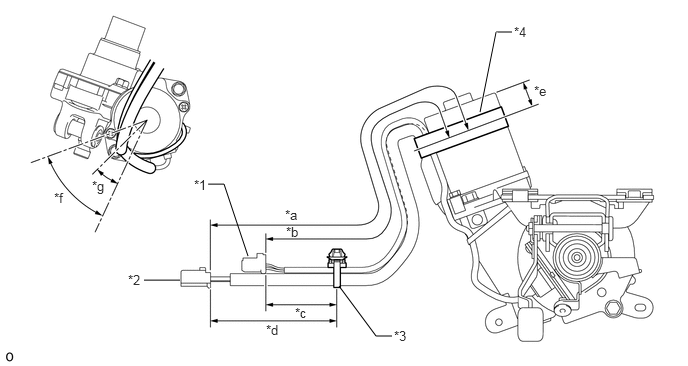
| *1 | Torque Sensor Wire Harness | *2 | Power Steering Motor Wire Harness |
| *3 | Wire Harness Clamp | *4 | Tape |
| *a | 250 to 270 mm (9.84 to 10.63 in.) | *b | 220 to 240 mm (8.66 to 9.45 in.) |
| *c | 80 to 100 mm (3.15 to 3.94 in.) | *d | 110 to 130 mm (4.33 to 5.12 in.) |
| *e | 14 to 34 mm (0.55 to 1.34 in.) | *f | 45° or less |
| *g | 20° | - | - |
- NOTICE:
- ·
Wrap the tape at least 2 turns.
·Secure the power steering motor wire harness and torque sensor wire harness to the power steering motor assembly within the range indicated by *f.
84450
2.INSTALL IGNITION OR STARTER SWITCH ASSEMBLY (w/o Smart Entry and Start System)
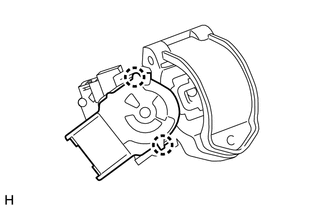
Engage the 2 claws and install the ignition or starter switch assembly to the upper steering column bracket assembly.
85432
3.INSTALL KEY INTERLOCK SOLENOID (for CVT without Smart Entry and Start System)
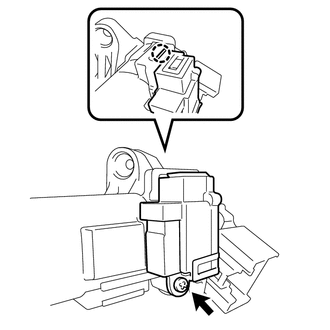
Engage the claw to install the key interlock solenoid to the upper steering column bracket assembly.
Install the screw.
84052
4.INSTALL UNLOCK WARNING SWITCH ASSEMBLY (w/o Smart Entry and Start System)
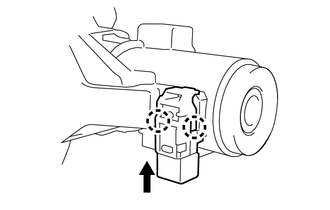
Engage the 2 claws and install the unlock warning switch assembly.
- HINT:
-
Slide the unlock warning switch assembly in the direction shown by the arrow in the illustration to install it.
69057A
5.INSTALL IGNITION SWITCH LOCK CYLINDER AND KEY SET (w/o Smart Entry and Start System)
Secure the steering column assembly in a vise using aluminum plates.
- NOTICE:
-
Do not overtighten the vise.
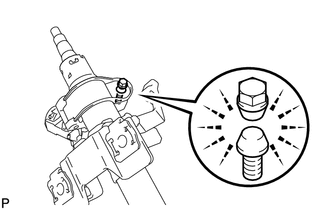
Install the ignition switch lock cylinder and key set with a new steering lock set bolt, and then tighten the bolt until its head comes off.
45020A
6.INSTALL STEERING LOCK ACTUATOR ASSEMBLY (w/ Smart Entry and Start System)
Secure the steering column assembly in a vise using aluminum plates.
- NOTICE:
-
Do not overtighten the vise.
Install the steering lock actuator assembly with a new steering lock set bolt, and then tighten the bolt until its head comes off.
45260
7.INSTALL NO. 2 STEERING INTERMEDIATE SHAFT ASSEMBLY
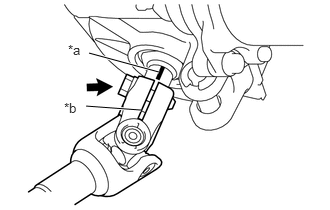
| *a | Alignment mark |
| *b | Slit |
Align the slit of the No. 2 steering intermediate shaft assembly with the alignment mark of the steering column assembly.
Install the No. 2 steering intermediate shaft assembly to the steering column assembly with the bolt.
- Torque:
- 35.3 N*m (360 kgf*cm, 26 ft.*lbf)
45209
8.INSTALL STEERING SLIDING YOKE SUB-ASSEMBLY
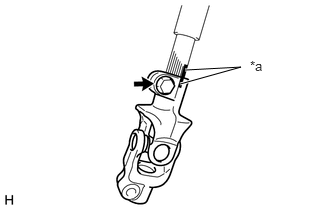
| *a | Matchmark |
Align the matchmarks on the No. 2 steering intermediate shaft assembly and the steering sliding yoke sub-assembly and temporarily install them with the bolt.