DOOR LOCK POWER DOOR LOCK CONTROL SYSTEM Power Source Circuit
DESCRIPTION
This circuit provides power to operate the body computer.
WIRING DIAGRAM
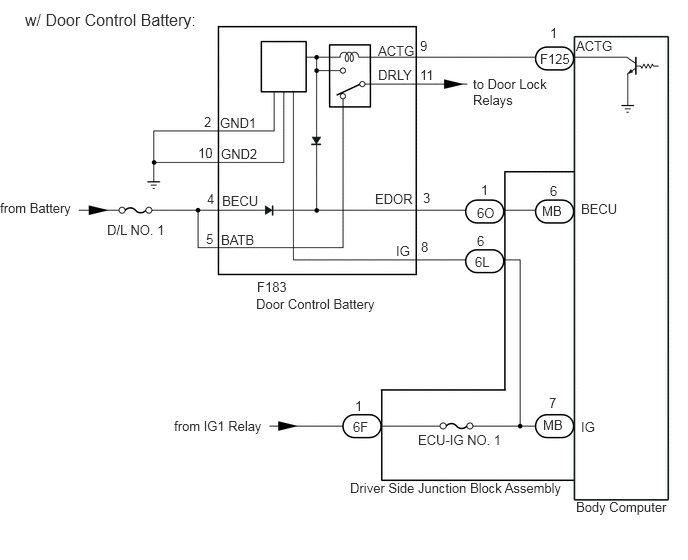
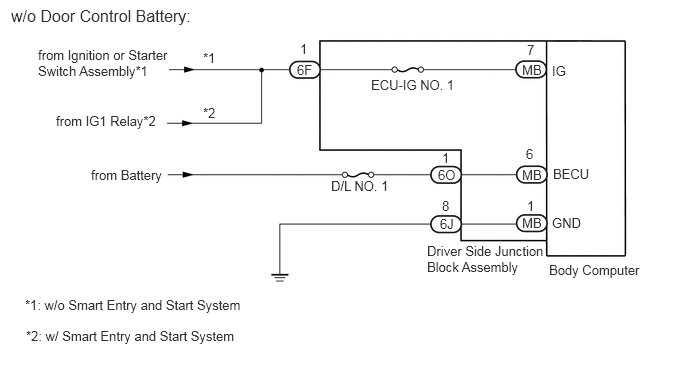
CAUTION / NOTICE / HINT
- NOTICE:
- ·
As the door control battery is installed between the vehicle battery and body computer, first perform the inspections to confirm that there are no malfunctions in the power source circuit for the body computer before performing this troubleshooting procedure.*1
·Inspect the fuses for circuits related to this system before performing the following procedure.
*1: w/ Door Control Battery
PROCEDURE
Check vehicle type.
- Result:
Result Proceed to w/ Door Control Battery A w/o Door Control Battery B
A
B
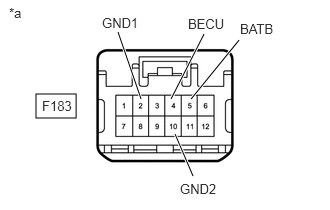
| *a | Front view of wire harness connector
(to Door Control Battery) |
Disconnect the door control battery connector.
Measure the voltage according to the value(s) in the table below.
- Standard Voltage:
Tester Connection Condition Specified Condition F183-4 (BECU) - Body ground Always 11 to 14 V F183-5 (BATB) - Body ground Always 11 to 14 V
Measure the resistance according to the value(s) in the table below.
- Standard Resistance:
Tester Connection Condition Specified Condition F183-2 (GND1) - Body ground Always Below 1 Ω F183-10 (GND2) - Body ground Always Below 1 Ω
- Result:
Proceed to OK NG
OK
NG
Disconnect the F183 door control battery connector.
Disconnect the 6O driver side junction block assembly connector.
Measure the resistance according to the value(s) in the table below.
- Standard Resistance:
Tester Connection Condition Specified Condition F183-3 (EDOR) - 6O-1 (BECU) Always Below 1 Ω F183-3 (EDOR) or 6O-1 (BECU) - Body ground Always 10 kΩ or higher
- Result:
Proceed to OK NG
OK
NG
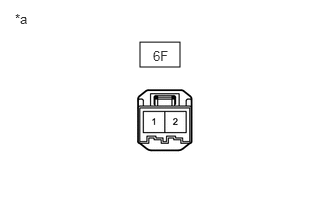
| *a | Front view of wire harness connector
(to Driver Side Junction Block Assembly) |
Disconnect the driver side junction block assembly connector.
Measure the voltage according to the value(s) in the table below.
- Standard Voltage:
Tester Connection Condition Specified Condition 6F-1 - Body ground Ignition switch ON 11 to 14 V
- Result:
Proceed to OK NG
OK
NG
Remove the driver side junction block assembly.
Click herePower Source / Network>POWER DISTRIBUTION>MAIN BODY ECU(for TMT Made)>REMOVAL
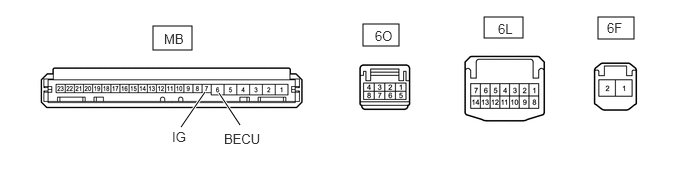
| *a | Component without harness connected
(Driver side Junction Block Assembly) |
- | - |
Remove the body computer from the driver side junction block assembly.
Click herePower Source / Network>POWER DISTRIBUTION>MAIN BODY ECU(for TMT Made)>REMOVAL
Measure the resistance according to the value(s) in the table below.
- Standard Resistance:
Tester Connection Condition Specified Condition MB-6 (BECU) - 6O-1 Always Below 1 Ω MB-7 (IG) - 6L-6 Always Below 1 Ω MB-7 (IG) - 6F-1 Always Below 1 Ω
- Result:
Proceed to OK NG
OK
NG
Turn the ignition switch off.
Remove the D/L NO. 1 fuse from the engine room relay block.
Leave the vehicle as is for 30 minutes (wait until the door control battery is discharged).
- HINT:
-
Discharge time is reduced when the door control battery is not fully charged.
Measure the voltage according to the value(s) in the table below.
- Standard Voltage:
Tester Connection Switch Condition Specified Condition F183-3 (EDOR) - Body ground Ignition switch off Below 2 V
Install the D/L NO. 1 fuse to the engine room relay block.
Measure the voltage according to the value(s) in the table below.
- Standard Voltage:
Tester Connection Switch Condition Specified Condition F183-3 (EDOR) - Body ground Ignition switch off 11 to 14 V
- Result:
Proceed to OK NG
OK
NG
Disconnect the driver side junction block assembly connectors.
Measure the resistance according to the value(s) in the table below.
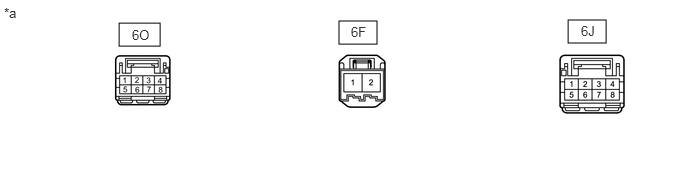
| *a | Front view of wire harness connector
(to driver Side Junction Block Assembly) |
- | - |
- Standard Resistance:
Tester Connection Condition Specified Condition 6J-8 - Body ground Always Below 1 Ω
Measure the voltage according to the value(s) in the table below.
- Standard Voltage:
Tester Connection Condition Specified Condition 6F-1 - Body ground Ignition switch ON 11 to 14 V 6O-1 - Body ground Always 11 to 14 V
- Result:
Proceed to OK NG
OK
NG
Remove the body computer.
Click herePower Source / Network>POWER DISTRIBUTION>MAIN BODY ECU(for TMT Made)>REMOVAL
Disconnect the driver side junction block assembly connectors.
Measure the resistance according to the value(s) in the table below.
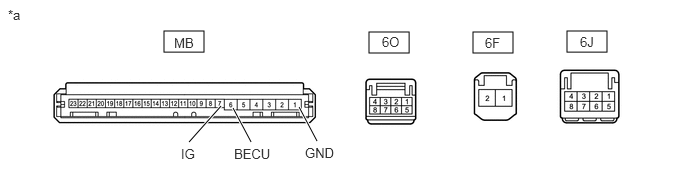
| *a | Component without harness connected (Driver Side Junction Block Assembly) | - | - |
- Standard Resistance:
Tester Connection Switch Condition Specified Condition 6J-8 - MB-1 (GND) Always Below 1 Ω 6F-1 - MB-7 (IG) Always Below 1 Ω 6O-1 - MB-6 (BECU) Always Below 1 Ω
- Result:
Proceed to OK NG
OK
NG