EXTERIOR PANELS / TRIM FRONT BUMPER(for Sedan with Rear Light) REASSEMBLY
PROCEDURE

 52021
1.INSTALL FRONT BUMPER REINFORCEMENT SUB-ASSEMBLY
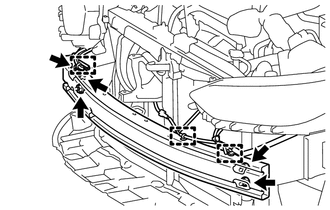
Install the front bumper reinforcement sub-assembly with the 5 nuts.
- Torque:
- 50 N*m (510 kgf*cm, 37 ft.*lbf)
Engage the 3 clamps to install the wire harness.
52618
2.INSTALL FRONT BUMPER LOWER ABSORBER (w/ Energy Absorber)
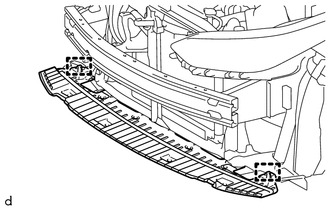
Engage the 3 hooks and install the front bumper lower absorber.
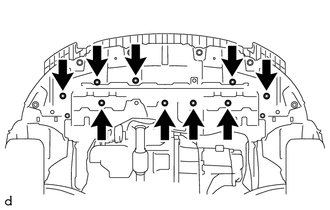
Install the 4 clips.
Install the 5 bolts.
52611
3.INSTALL FRONT BUMPER ENERGY ABSORBER (w/ Energy Absorber)
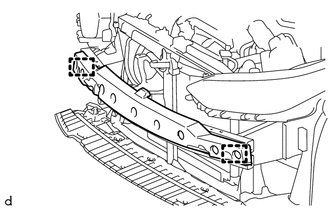
Engage the 2 hooks and install the front bumper energy absorber.
53288B
4.INSTALL RADIATOR SUPPORT EXTENSION LH
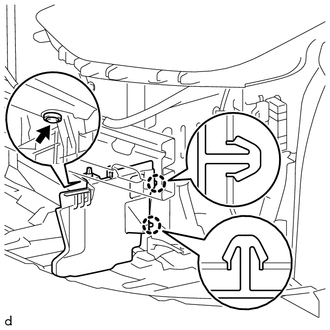
Engage the 2 claws to install the radiator support extension LH.
Install the clip.
53287B
5.INSTALL RADIATOR SUPPORT EXTENSION RH
- HINT:
-
Use the same procedure as for the LH side.
53286B
6.INSTALL NO. 2 RADIATOR SIDE AIR SEAL
w/o Energy Absorber:
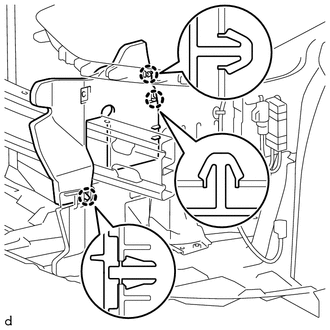
Engage the 3 claws to install the No. 2 radiator side air seal.
w/ Energy Absorber:
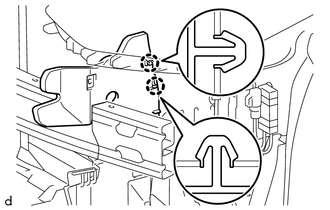
Engage the 2 claws to install the No. 2 radiator side air seal.
w/o Projector Headlight:
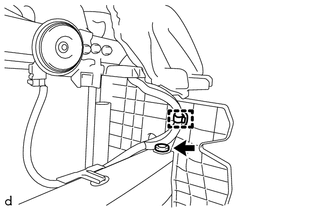
Install the clip.
Engage the clamp to install the wire harness.
w/ Projector Headlight:
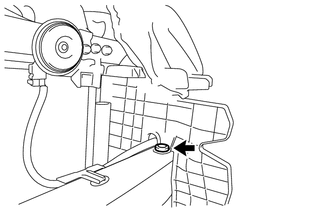
Install the clip.
53285B
7.INSTALL NO. 1 RADIATOR SIDE AIR SEAL
- HINT:
-
Use the same procedure as for the No. 2 radiator side air seal.
88790B
8.INSTALL THERMISTOR ASSEMBLY
88891H
9.INSTALL NO. 1 COOLER COVER
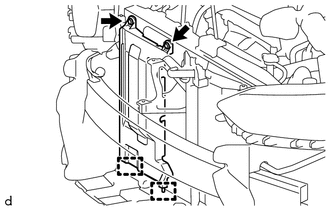
Engage the 2 guides to install the No. 1 cooler cover.
Install the 2 clips.
52536
10.INSTALL FRONT BUMPER SIDE RETAINER LH
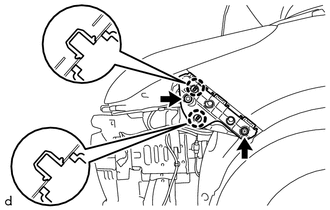
Engage the claws to install the front bumper side retainer LH.
Install the screw.
Install the bolt.
- Torque:
- 5.4 N*m (55 kgf*cm, 48 in.*lbf)
52535
11.INSTALL FRONT BUMPER SIDE RETAINER RH
- HINT:
-
Use the same procedure as for the LH side.
53113E
12.INSTALL LOWER NO. 2 RADIATOR GRILLE
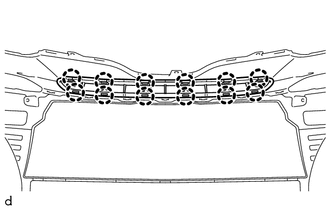
Engage the 12 claws to install the lower No. 2 radiator grille.
53122E
13.INSTALL LOWER RADIATOR GRILLE MOULDING
- HINT:
-
When installing the lower radiator grille moulding, heat the lower No. 1 radiator grille using a heat light.
- CAUTION:
- ·
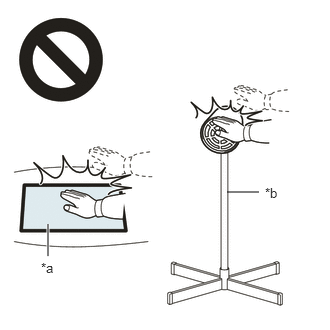 2.365,2 2.698,2 false 0.5,2.333 0.5,2.667 true 0.427,2.708 0.74,2.865 0.313,0.156 10 false *a 2.76,1.927 3.073,2.083 0.313,0.156 10 false *b
*a Heated Part *b Heat Light
Do not touch the heat light and heated parts, touching the heat light may result in burns.
·Touching heated parts for a long time may result in burns.
- Standard:
Item Temperature lower No. 1 radiator grille 20 to 30°C (68 to 86°F)
- NOTICE:
-
Do not heat the lower No. 1 radiator grille excessively.
Clean the lower radiator grille moulding installation surface with a non-residue solvent.
Apply primer to the lower radiator grille moulding installation area on lower No. 1 radiator grille.
- NOTICE:
-
Apply primer evenly so that there are no uncoated areas.
Remove the peeling paper on a new lower radiator grille moulding while making sure not to touch the adhesive surface.
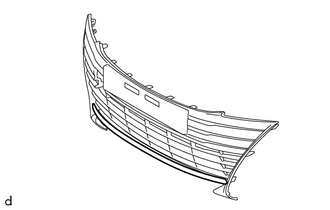
Install the lower radiator grille moulding as shown in the illustration.
- NOTICE:
- ·
Press the double-sided tape on the lower radiator grille moulding firmly to ensure proper adhesion.
·After the primer dries (3 minutes or more), install the lower radiator grille moulding.
·After applying primer, reapply primer after 24 hours elapse.
53112E
14.INSTALL LOWER NO. 1 RADIATOR GRILLE
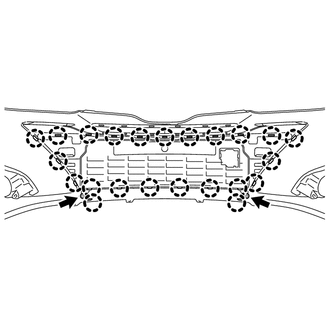
Engage the 23 claws to install the lower No. 1 radiator grille.
Install the 2 screws.
81440B
15.INSTALL DAYTIME RUNNING LIGHT ASSEMBLY LH (w/ Daytime Running Light)
81430C
16.INSTALL DAYTIME RUNNING LIGHT ASSEMBLY RH (w/ Daytime Running Light)
- HINT:
-
Use the same procedure as for the LH side.
81484F
17.INSTALL DAYTIME RUNNING LIGHT COVER LH (w/o Daytime Running Light)
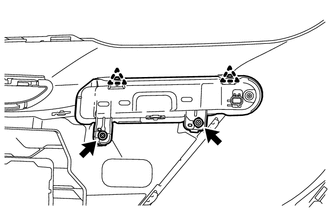
Install the daytime running light cover LH with the 2 screws.
Install the 2 clips.
81483J
18.INSTALL DAYTIME RUNNING LIGHT COVER RH (w/o Daytime Running Light)
- HINT:
-
Use the same procedure as for the LH side.
52128B
19.INSTALL FRONT BUMPER HOLE COVER LH
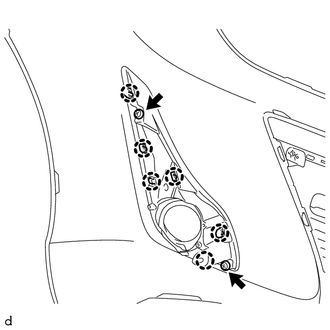
Engage the 6 claws to install the front bumper hole cover LH.
Install the 2 screws.
52127D
20.INSTALL FRONT BUMPER HOLE COVER RH
- HINT:
-
Use the same procedure as for the LH side.
81220
21.INSTALL FOG LIGHT ASSEMBLY LH (w/ Fog Light)
81210A
22.INSTALL FOG LIGHT ASSEMBLY RH (w/ Fog Light)
- HINT:
-
Use the same procedure as for the LH side.
52127C
23.INSTALL FRONT BUMPER HOLE COVER
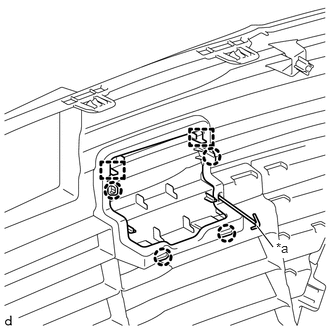
| *a | Claw A |
Engage the claw A.
Engage the 4 claws and 2 guides to install the front bumper hole cover.
53119B
24.INSTALL RADIATOR GRILLE PROTECTOR
- HINT:
-
When installing the radiator grille protector, heat the radiator grill using a heat light.
- CAUTION:
- ·
2.365,2 2.698,2 false 0.5,2.333 0.5,2.667 true 0.427,2.708 0.74,2.865 0.313,0.156 10 false *a 2.76,1.927 3.073,2.083 0.313,0.156 10 false *b
*a Heated Part *b Heat Light
Do not touch the heat light and heated parts, touching the heat light may result in burns.
·Touching heated parts for a long time may result in burns.
- Standard:
Item Temperature Radiator Grille Protector 20 to 30°C (68 to 86°F)
- NOTICE:
-
Do not heat the radiator grill excessively.
Clean the radiator grill protector installation surface with a non-residue solvent.
Apply primer to the radiator grill protector installation area on radiator grill.
- NOTICE:
-
Apply primer evenly so that there are no uncoated areas.
Remove the peeling paper on a new radiator grill protector while making sure not to touch the adhesive surface.
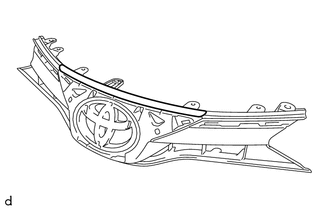
Install the radiator grill protector as shown in the illustration.
- NOTICE:
- ·
Press the double-sided tape on the radiator grill protector firmly to ensure proper adhesion.
·After the primer dries (3 minutes or more), install the radiator grill protector.
·After applying primer, reapply primer after 24 hours elapse.
53114A
25.INSTALL RADIATOR INNER GRILLE
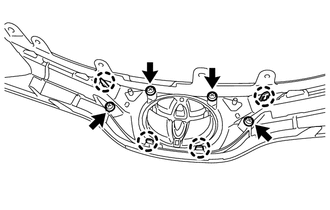
Engage the 4 claws to install the radiator inner grille.
Install the 4 screws.
53124C
26.INSTALL UPPER RADIATOR GRILLE MOULDING LH
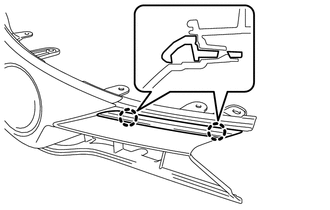
Engage the 2 claws to install the upper radiator grille moulding LH.
53123B
27.INSTALL RADIATOR GRILLE SIDE MOULDING RH
- HINT:
-
Use the same procedure as for the upper radiator grille moulding LH.
75311
28.INSTALL RADIATOR GRILLE (OR FRONT PANEL) EMBLEM
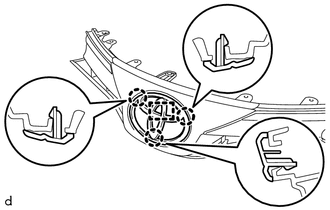
Engage the 3 claws and guide to install the radiator grille (or front panel) emblem.
53879H
29.INSTALL FRONT FENDER LINER RETAINER
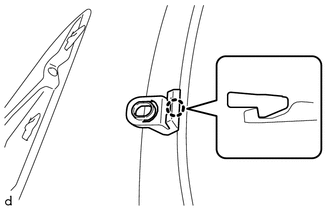
Engage the claw to install the front fender liner retainer.
- HINT:
-
Use the same procedure for the RH side and LH side.
52521A
30.INSTALL FRONT BUMPER RETAINER CLIP
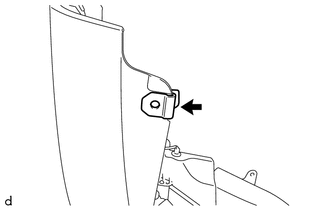
Install the front bumper retainer clip.
- HINT:
-
Use the same procedure for the RH side and LH side.
31.INSTALL CLIP
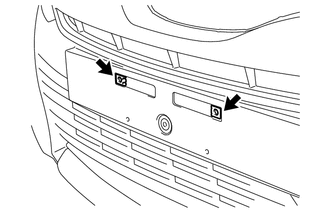
Install the 2 clips.