THEFT DETERRENT / KEYLESS ENTRY THEFT DETERRENT SYSTEM Some Alarm Functions do not Operate
DESCRIPTION
When the alarm sounds, the following alarm functions operate: the hazard lights flash, and the security horn and vehicle horn sound intermittently.
WIRING DIAGRAM
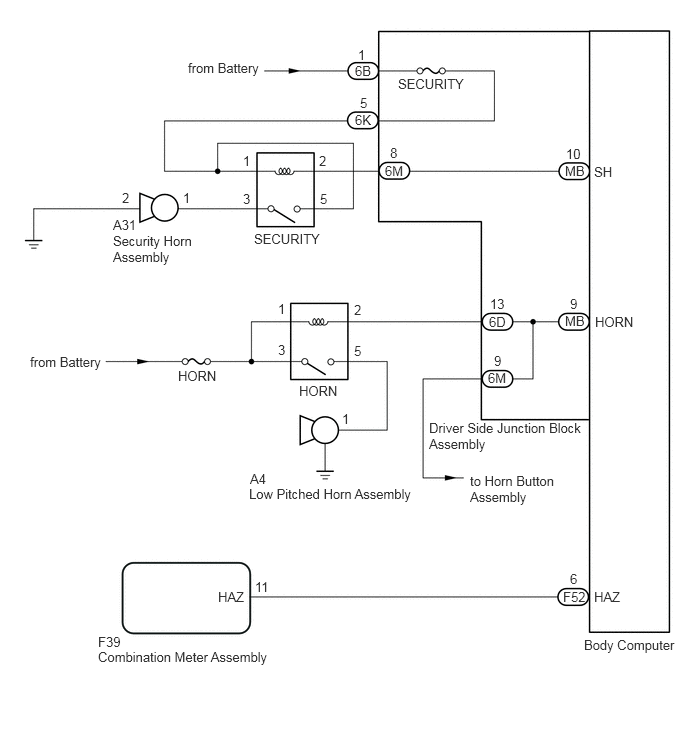
CAUTION / NOTICE / HINT
- NOTICE:
-
Inspect the fuses for circuits related to this system before performing the following procedure.
PROCEDURE
Open the driver side window.
Set the theft deterrent system.
Close all doors, the luggage compartment door*1 and the engine hood.
*1: for Sedan
Lock the doors using wireless operation or entry operation*2.
*2: w/ Smart Entry and Start System
Wait for 30 seconds or more.
Unlock the driver door using the door lock knob.
After 30 seconds have elapsed, check that the security indicator light changes from illuminated to flashing.
Check that each alarm component operates correctly.
- Result:
Result Proceed to Security horn is not activated A Hazard lights are not activated B Vehicle horn is not activated C
A
B
C
Remove the security horn assembly.
Click hereVehicle Interior>THEFT DETERRENT / KEYLESS ENTRY>SECURITY HORN ASSEMBLY>REMOVAL
Inspect the security horn assembly.
Click hereVehicle Interior>THEFT DETERRENT / KEYLESS ENTRY>SECURITY HORN ASSEMBLY>INSPECTION
- Result:
Proceed to OK NG
OK
NG
Disconnect the driver side junction block assembly connector.
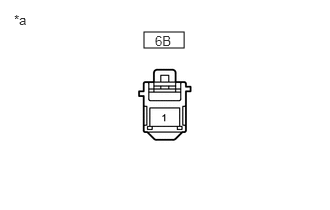
| *a | Front view of wire harness connector
(to Driver Side Junction Block Assembly) |
Measure the voltage according to the value(s) in the table below.
- Standard Voltage:
Tester Connection Condition Specified Condition 6B-1 - Body ground Always 11 to 14 V
- Result:
Proceed to OK NG
OK
NG
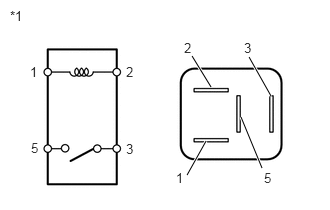
| *1 | SECURITY Relay |
Remove the SECURITY relay.
Measure the resistance according to the value(s) in the table below.
- Standard Resistance:
Tester Connection Condition Specified Condition 3 - 5 When battery voltage is not applied between terminals 1 and 2 10 kΩ or higher 3 - 5 When battery voltage is applied between terminals 1 and 2 Below 1 Ω
- Result:
Proceed to OK NG
OK
NG
Remove the SECURITY relay.
Disconnect the security horn assembly connector.
Measure the resistance according to the value(s) in the table below.
- Standard Resistance:
Tester Connection Condition Specified Condition A31-1 - Relay terminal 3 Always Below 1 Ω A31-2 - Body ground Always Below 1 Ω A31-1 or Relay terminal 3 - Body ground Always 10 kΩ or higher
- Result:
Proceed to OK NG
OK
NG
Remove the SECURITY relay.
Disconnect the driver side junction block assembly connectors.
Measure the resistance according to the value(s) in the table below.
- Standard Resistance:
Tester Connection Condition Specified Condition Relay terminal 1 - 6K-5 Always Below 1 Ω Relay terminal 2 - 6M-8 Always Below 1 Ω Relay terminal 1 - Relay terminal 5 Always Below 1 Ω Relay terminal 1 or 6K-5 - Body ground Always 10 kΩ or higher Relay terminal 2 or 6M-8 - Body ground Always 10 kΩ or higher Relay terminal 1 or Relay terminal 5 - Body ground Always 10 kΩ or higher
- Result:
Proceed to OK NG
OK
NG
Remove the driver side junction block assembly.
Click herePower Source / Network>POWER DISTRIBUTION>MAIN BODY ECU(for TMT Made)>REMOVAL
Remove the body computer.
Click herePower Source / Network>POWER DISTRIBUTION>MAIN BODY ECU(for TMT Made)>REMOVAL
Measure the resistance according to the value(s) in the table below.
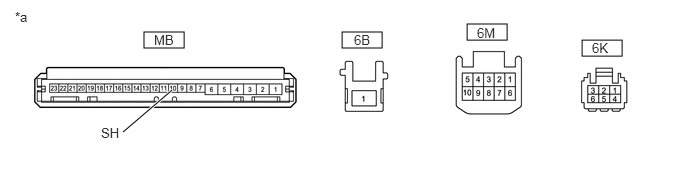
| *a | Component without harness connected
(Driver Side Junction Block Assembly) |
- | - |
- Standard Resistance:
Tester Connection Condition Specified Condition 6B-1 - 6K-5 Always Below 1 Ω 6M-8 - MB-10 (SH) Always Below 1 Ω
- Result:
Proceed to OK NG
OK
NG
Check that the hazard warning lights blink when the hazard warning signal switch is pressed.
- OK:
Hazard warning lights blink
- Result:
Proceed to OK NG
OK
NG
Disconnect the F39 combination meter assembly connector.
Disconnect the F52 body computer connector.
Measure the resistance according to the value(s) in the table below.
- Standard Resistance:
Tester Connection Condition Specified Condition F39-11 (HAZ) - F52-6 (HAZ) Always Below 1 Ω F39-11 (HAZ) or F52-6 (HAZ) - Body ground Always 10 kΩ or higher
- Result:
Proceed to OK NG
OK
NG
Press the horn switch and check if the horn sounds.
- OK:
Horn sounds
- Result:
Proceed to OK NG
OK
NG
Remove the body computer.
Click herePower Source / Network>POWER DISTRIBUTION>MAIN BODY ECU(for TMT Made)>REMOVAL
Disconnect the driver side junction block assembly connector.
Measure the resistance according to the value(s) in the table below.
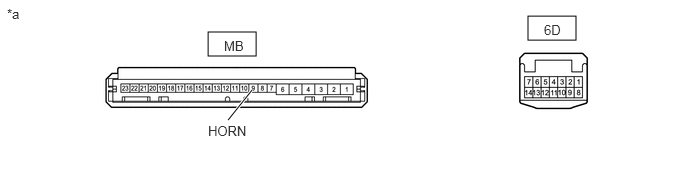
| *a | Component without harness connected
(Driver Side Junction Block Assembly) |
- | - |
- Standard Resistance:
Tester Connection Condition Specified Condition 6D-13 - MB-9 (HORN) Always Below 1 Ω
- Result:
Proceed to OK NG
OK
NG