2NR-FE EMISSION CONTROL CANISTER REMOVAL
CAUTION / NOTICE / HINT
- NOTICE:
-
After turning the ignition switch off, waiting time may be required before disconnecting the cable from the negative (-) battery terminal. Therefore, make sure to read the disconnecting the cable from the negative (-) battery terminal notice before proceeding with work.
-
Click hereGeneral>INTRODUCTION>REPAIR INSTRUCTION>PRECAUTION
PROCEDURE

 73707
1.REMOVE CHILD RESTRAINT SEAT ANCHOR INNER BRACKET SUB-ASSEMBLY
2. DISCHARGE FUEL SYSTEM PRESSURE
58325E
3.REMOVE REAR FLOOR SERVICE HOLE COVER
for TMMIN Made:
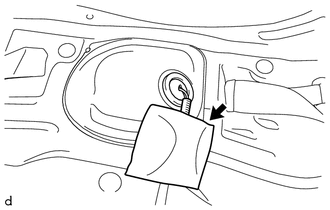
Remove the wiring harness protector from the rear floor service hole cover and vehicle floor.
for TMT Made:
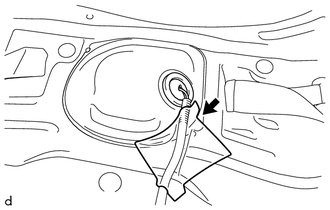
Remove the wiring harness protector from the rear floor service hole cover and vehicle floor.
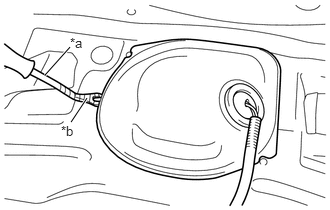
| *a | Clip Remover |
| *b | Protective Tape |
Using a clip remover with its tip wrapped in protective tape, remove the rear floor service hole cover from the vehicle floor.
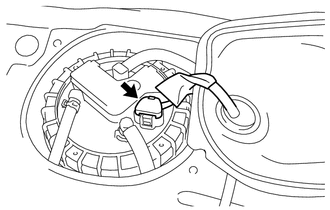
Disconnect the fuel suction tube with pump and gauge assembly connector.
77209F
4.DISCONNECT FUEL TANK MAIN TUBE SUB-ASSEMBLY
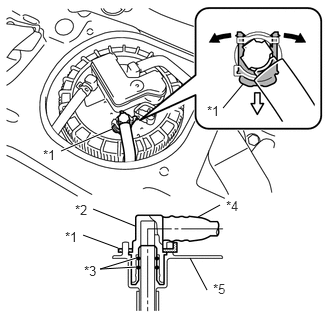
| *1 | Tube Joint Clip |
| *2 | Fuel Tube Joint |
| *3 | O-ring |
| *4 | Nylon Tube |
| *5 | Fuel Suction Plate |

|
Widen |

|
Pull Out |
Spread the tip of the tube joint clip and pull it out in the direction of the arrow.
Disconnect the fuel tank main tube sub-assembly from the fuel suction tube with pump and gauge assembly.
- NOTICE:
- ·
Remove any dirt or foreign matter on the fuel tube joint before performing this work.
·Do not allow any scratches or foreign matter to get on the parts when disconnecting them as the fuel tube joint has O-rings that seal the fuel pipe.
·Only disconnect the fuel tube joint by hand.
·Do not forcibly bend, twist or turn the fuel tank main tube sub-assembly.
·Protect the disconnected part by covering it with a plastic bag after disconnecting the fuel tube joint.
·If the fuel tube joint and fuel suction plate are stuck, push and pull to release them.
77028F
5.DISCONNECT NO. 2 FUEL EMISSION TUBE SUB-ASSEMBLY
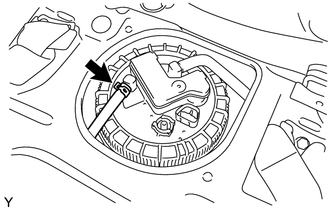
Slide the hose clip and disconnect the No. 2 fuel emission tube sub-assembly from the fuel suction tube with pump and gauge assembly.
77701W
6.DISCONNECT NO. 1 CANISTER OUTLET HOSE SUB-ASSEMBLY
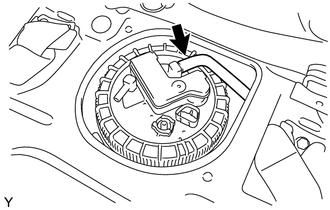
Disconnect the No. 1 canister outlet hose sub-assembly from the fuel suction tube with pump and gauge assembly.
7.REMOVE FUEL PUMP GAUGE RETAINER
- CAUTION:
-
Due to swelling of the fuel tank assembly, the tightening torque of the fuel pump gauge retainer may be as high as 200 N*m (2039 kgf*cm, 148 ft.*lbf), so perform the procedure with at least 2 people.
- NOTICE:
-
Before performing these procedures, first cover the connectors and tube joints of the fuel suction tube with pump and gauge assembly with vinyl tape and then clean away any mud or other substances that may be adhering in order to prevent foreign matter from contaminating the fuel system.
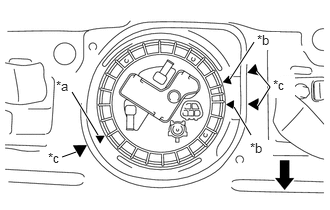
| *a | Fuel Tank Assembly Start of Threads Mark |
| *b | Fuel Tank Assembly Fully Tightened Mark |
| *c | Marks Copied to Vehicle Floor |
|
|
Front Side of Vehicle |
Copy the 3 marks from the fuel tank assembly to the vehicle floor as shown in the illustration.
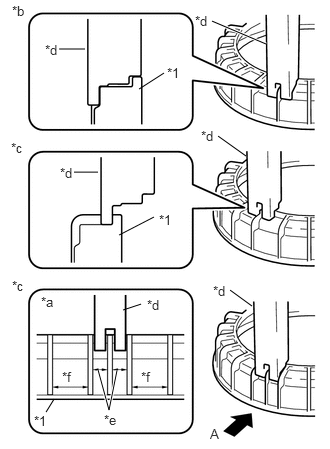
| *1 | Fuel Pump Gauge Retainer |
| *a | View A |
| *b | Correct |
| *c | Incorrect |
| *d | SST (Claw) |
| *e | Narrow |
| *f | Wide |
Temporarily install SST (plate) and SST (claw) to the fuel pump gauge retainer.
- SST
- 09808-14030 (09808-01030, 09808-01040, 09808-01050)
- NOTICE:
- ·
Install SST (claw) to the correct location.
·Do not install SST (claw) to a location where the pitch between ribs of the fuel pump gauge retainer is narrow.
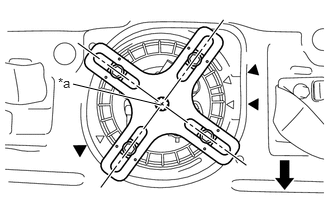
| *a | Center Point of Fuel Pump Gauge Retainer |
|
|
Front Side of Vehicle |
Adjust the position of SST (claw) so that the hole in SST (plate) for installing SST (handle) is in the center of the fuel pump gauge retainer.
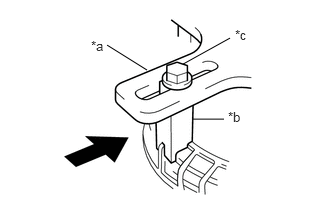
| *a | SST (Plate) |
| *b | SST (Claw) |
| *c | SST (Bolt) |
|
|
Press |
Press SST (claw) against the rib of the fuel pump gauge retainer and tighten SST (bolt).
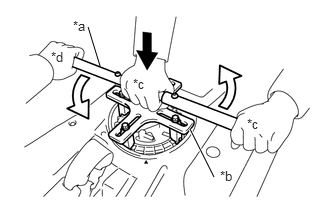
| *a | SST (Handle) |
| *b | SST (Plate) |
| *c | Worker A |
| *d | Worker B |
|
|
Hold Down |
|
|
Slowly Rotate |
Install SST (handle) to SST (plate).
- SST
- 09808-14030 (09808-01010, 09808-01020, 09808-01030, 09808-01040, 09808-01050)
To make sure SST does not separate from the fuel pump gauge retainer, one person should hold down the center of SST from above while at the same time both people slowly rotate SST (handle), and slowly loosen the fuel pump gauge retainer by approximately 90°.
- NOTICE:
- ·
Be careful not to apply excessive downward force to SST, as this may damage the fuel suction tube with pump and gauge assembly or fuel tank assembly.
·Turning SST at an angle may cause it to slip off of the fuel pump gauge retainer, so be sure SST is horizontal when turning.
·To prevent damage to parts, do not turn SST too vigorously.
·If SST slips off of the fuel pump gauge retainer, loosen SST (bolt) and install SST again.
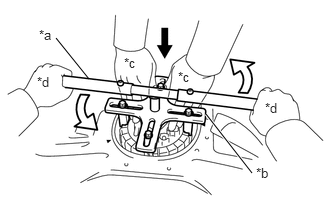
| *a | SST (Handle) |
| *b | SST (Plate) |
| *c | Worker A |
| *d | Worker B |
|
|
Press Down |
|
|
Slowly Rotate |
While one person presses down to prevent the fuel pump gauge retainer and fuel suction tube with pump and gauge assembly from rotating together, the other person should slowly rotate SST (handle) and remove the fuel pump gauge retainer from the fuel tank assembly.
- CAUTION:
-
Make sure not to pinch your hands with SST.
- NOTICE:
-
If the fuel pump gauge retainer is turned while the fuel suction tube with pump and gauge assembly and fuel tank assembly are not fully engaged, the fuel suction tube with pump and gauge assembly will move with the fuel pump gauge retainer, and the fuel suction tube with pump and gauge assembly and fuel tank assembly will both be damaged.
77020A
8.REMOVE FUEL SUCTION TUBE WITH PUMP AND GAUGE ASSEMBLY
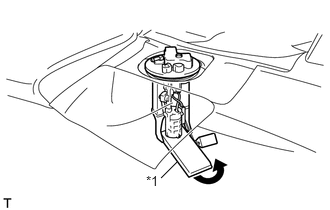
| *1 | Fuel Pump Filter |
|
|
Direction to Bend |
After bending up the tip of the fuel pump filter and pulling it out, pull out the arm of the fuel suction tube with pump and gauge assembly, and remove the fuel suction tube with pump and gauge assembly from the fuel tank assembly.
- NOTICE:
- ·
Be careful not to bend the arm of the fuel suction tube with pump and gauge assembly.
·When installing or removing the fuel suction tube with pump and gauge assembly, be careful of fuel splashing.
·Do not damage the fuel pump filter.
·When setting down the fuel suction tube with pump and gauge assembly, make sure that its weight is not pressing on the fuel pump filter.
77169A
9.REMOVE FUEL SUCTION TUBE SET GASKET
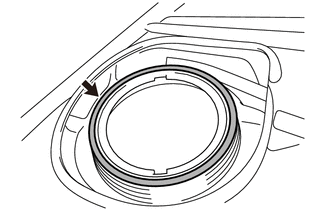
Remove the fuel suction tube set gasket from the fuel tank assembly.