FRONT SUSPENSION FRONT SHOCK ABSORBER INSTALLATION
CAUTION / NOTICE / HINT
- HINT:
- ·
Use the same procedure for the RH side and LH side.
·The following procedure is for the LH side.
PROCEDURE

 48158C
1.INSTALL FRONT LOWER COIL SPRING INSULATOR
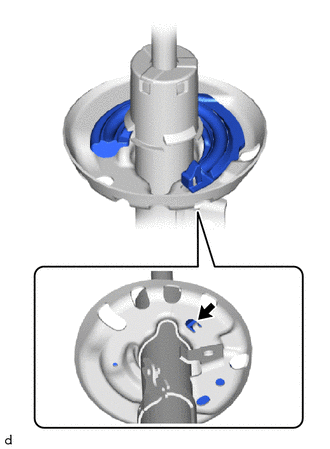
Install the front lower coil spring insulator to the front shock absorber assembly.
- NOTICE:
-
 0,0 0,0 false

Positioning Pin
-
When installing the front lower coil spring insulator, insert the positioning pin of the spring seat into the hole of the front lower coil spring insulator.
48331C
2.INSTALL FRONT SPRING BUMPER
Install the front spring bumper to the front shock absorber assembly.
48132
3.INSTALL FRONT COIL SPRING
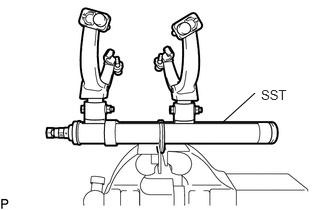
Secure SST in a vise.
- SST
- 09727-30022 (09727-00010, 09727-00022, 09727-00031)
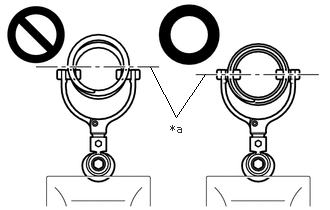
Attach the hooks of each SST arm across the diameter of the front coil spring.
- CAUTION:
- ·
 1.563,0.698 1.833,1.219 1.833,1.219 2.135,0.771 false 1.771,1.271 2.083,1.469 0.313,0.198 10 false *a
*a Front Coil Spring Diameter
Do not perform the work without checking to make sure that the claws of the hooks are securely engaged.
·It could cause the hook to slip off and the spring to fly out, which could result in an injury.
·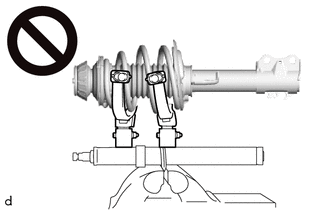
Do not install SST to the front coil spring unless its top and bottom hook distance is set to the widest condition.
·It could cause the hook to slip off and the spring to fly out, which could result in an injury.
·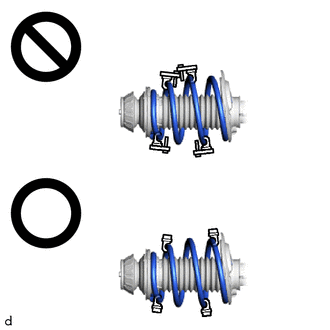
Do not install SST when the distances between the SST arms or the number of coils of the coil spring between the hooks are not the same.
·It could cause the hook to slip off and the spring to fly out, which could result in an injury.
Install the stopper pins to the hooks of SST.
- CAUTION:
- ·
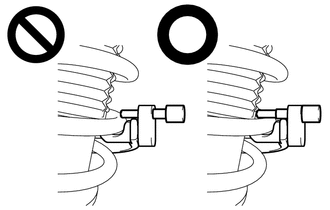
Do not perform the work if the stopper pin is not securely installed.
·It could cause the hook to slip off and the spring to fly out, which could result in an injury.
Using SST, compress the front coil spring.
- CAUTION:
- ·
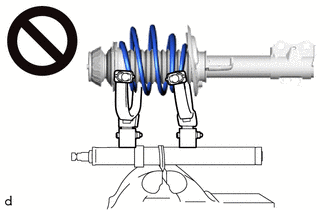
While compressing the spring, if the front coil spring starts to bend into a bow shape, do not continue the work.
·It could cause the hook to slip off and the spring to fly out, which could result in an injury.
·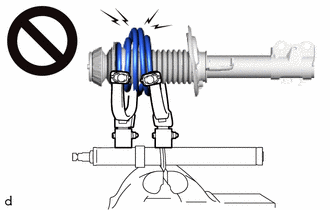
Do not compress the springs so far that the coils of the springs touch each other.
·It could cause the hook to slip off and the spring to fly out, which could result in an injury.
·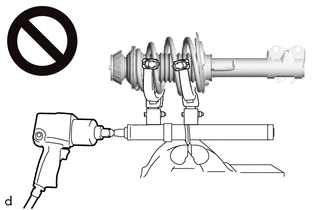
Do not use an impact wrench.
·The threads may be stripped, or the sudden compression may result in slack that causes the hooks to slip off, causing the spring to fly out and possibly resulting in injury.
·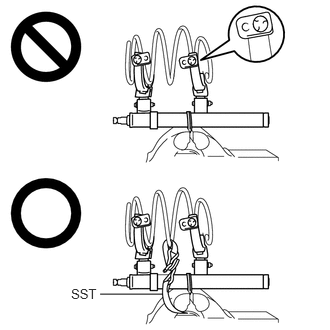 1.042,3.063 1.698,3.063 false 0.74,2.979 1.052,3.135 0.313,0.156 10 false SST
If a stopper pin touches the coil spring while using SST, remove the stopper pin and continue with the procedure.
·If a stopper pin is removed, install a coil spring stopper belt as shown in the illustration.
·If a hook disengages from the coil spring, the coil spring may fly out, resulting in injury.
- SST
- 09727-00110
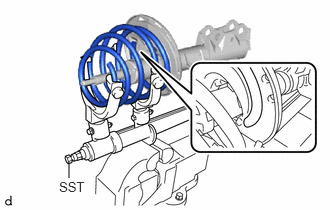
Install the front coil spring to the front shock absorber assembly.
- NOTICE:
-
Make sure to fit the end of the front coil spring that has the smaller diameter into the depression of the front lower coil spring insulator.
48157C
4.INSTALL FRONT UPPER COIL SPRING INSULATOR
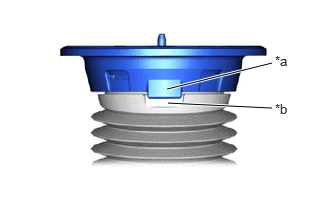
| *a | Positioning Tab |
| *b | Positioning Indentation |
Install the front upper coil spring insulator to the front No. 1 shock absorber dustcover so that the positioning tab of the front upper coil spring insulator is aligned with the positioning indentation of the front No. 1 shock absorber dustcover.
48471C
5.INSTALL FRONT UPPER COIL SPRING SEAT
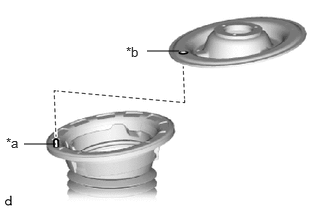
| *a | Positioning Pin |
| *b | Installation Hole |
Install the front upper coil spring seat to the front upper coil spring insulator.
- NOTICE:
-
When installing the front upper coil spring seat, fit the front upper coil spring insulator to the depression of the front upper coil spring seat and insert the positioning pin into the hole.
48559B
6.INSTALL FRONT NO. 1 SHOCK ABSORBER DUST COVER
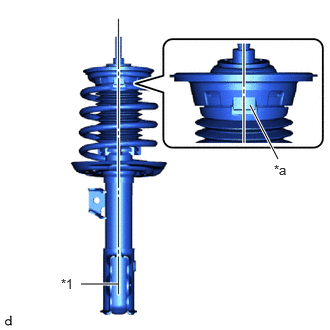
| *1 | Shock Absorber Assembly Lower Bracket |
| *a | Positioning Portions |
Align the positioning portions of the front No. 1 shock absorber dust cover and the front upper coil spring insulator with the center of the shock absorber assembly lower bracket and install them.
- NOTICE:
- ·
Make sure there is no excessive damage to the bellows of the front No. 1 shock absorber dust cover.
·Do not allow oil, grease, etc., to contact the front No. 1 shock absorber dust cover.
·If oil or grease has adhered, wipe clean with a cloth. Do not use an alcoholic cleaner.
48619A
7.INSTALL STRUT MOUNTING BEARING
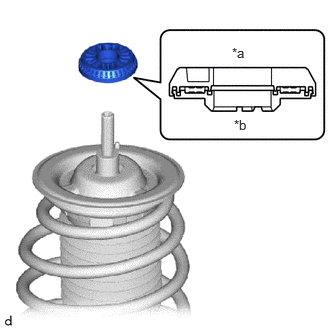
| *a | Upper Side |
| *b | Lower Side |
Install the strut mounting bearing to the front upper coil spring seat.
- NOTICE:
- ·
Do not install the strut mounting bearing upside down.
·Check that the strut mounting bearing are not damaged or missing.
48609
8.INSTALL FRONT SUSPENSION SUPPORT SUB-ASSEMBLY
Install the front suspension support sub-assembly to the front shock absorber assembly.
48609E
9.INSTALL FRONT SUPPORT TO FRONT SHOCK ABSORBER NUT
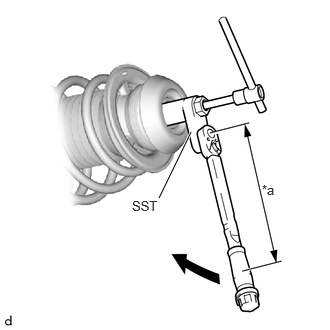
| *a | Torque Wrench Fulcrum Length |
Using SST and a 6 mm hexagon socket wrench, fix the front shock absorber rod and tighten the front support to front shock absorber nut.
- SST
- 09729-97202
- Torque:
- Specified tightening torque : 33.3 N*m (340 kgf*cm, 25 ft.*lbf)
- NOTICE:
-
Check that front coil spring is not contacting front upper coil spring insulator.
- HINT:
- ·
Calculate the torque wrench reading when changing the fulcrum length of the torque wrench.
Click hereGeneral>INTRODUCTION>REPAIR INSTRUCTION>PRECAUTION
·When using SST (fulcrum length of 40 mm (1.57 in.)) + torque wrench (fulcrum length of 180 mm (7.09 in.)): 27.2 N*m (277 kgf*cm, 20 ft.*lbf)
Remove SST from the front coil spring.
- NOTICE:
- ·
Check that front coil spring is installed so that it is aligned with the level difference of front lower coil spring insulator.
·Do not use an impact wrench. It will damage SST.
48559B
10.CONNECT FRONT NO. 1 SHOCK ABSORBER DUST COVER
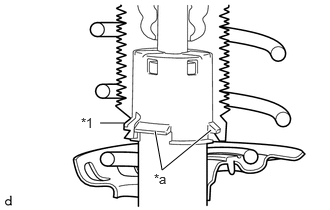
| *1 | Front No. 1 Shock Absorber Dust Cover |
| *a | Claw |
Connect the end of the front No. 1 shock absorber dust cover with the claws of the front shock absorber with coil spring.
- NOTICE:
- ·
Make sure that the end of the front No. 1 shock absorber dust cover is securely attached to the claws of the front shock absorber with coil spring.
·Make sure there is no excessive damage to the bellows of the front No. 1 shock absorber dust cover.
·Do not allow oil, grease, etc., to contact the front No. 1 shock absorber dust cover.
·If oil or grease has adhered, wipe clean with a cloth. Do not use an alcohol based cleaner.
11.INSTALL FRONT SHOCK ABSORBER WITH COIL SPRING
Temporarily install the front No. 2 suspension support and front shock absorber with coil spring to the vehicle with the nut.
Install the front shock absorber with coil spring to the steering knuckle with the 2 bolts and 2 nuts.
- Torque:
- 164 N*m (1672 kgf*cm, 121 ft.*lbf)
- NOTICE:
-
When installing the nuts, keep the bolts from rotating.
89543
12.INSTALL FRONT SPEED SENSOR
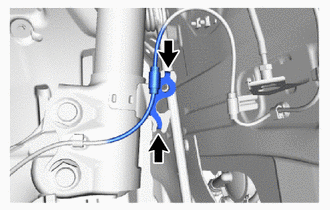
|
|
Hook |
Set the 2 hooks of the front speed sensor to the front shock absorber with coil spring.
- NOTICE:
-
Do not twist the front speed sensor when installing it.
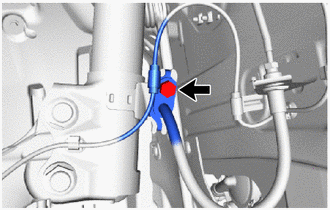
Install the front flexible hose and front speed sensor to the front shock absorber assembly with coil spring with the bolt.
- Torque:
- 29.4 N*m (300 kgf*cm, 22 ft.*lbf)
- NOTICE:
-
Do not kink or damage the front flexible hose and front speed sensor.
Engage the clamp.
48810
13.INSTALL FRONT STABILIZER LINK ASSEMBLY
Install the front stabilizer link assembly to the front shock absorber with coil spring with the nut.
- Torque:
- 74 N*m (755 kgf*cm, 55 ft.*lbf)
- HINT:
-
If the ball joint turns together with the nut, use a 6 mm hexagon socket wrench to hold the stud bolt.
14.INSTALL FRONT WHEEL
15. STABILIZE SUSPENSION
Press down on the vehicle several times to stabilize the suspension.
16.FULLY TIGHTEN FRONT SHOCK ABSORBER WITH COIL SPRING
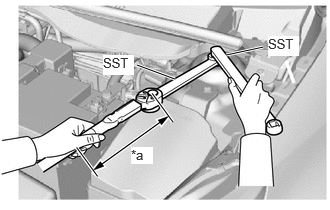
| *a | Torque Wrench Fulcrum Length |
Using SST, fix the front shock absorber rod and tighten the nut.
- SST
- 09729-00170
09729-38060
- Torque:
- Specified tightening torque : 55 N*m (561 kgf*cm, 41 ft.*lbf)
- HINT:
- ·
Calculate the torque wrench reading when changing the fulcrum length of the torque wrench.
Click hereGeneral>INTRODUCTION>REPAIR INSTRUCTION>PRECAUTION
·When using SST (fulcrum length of 200 mm (7.87 in.)) + torque wrench (fulcrum length of 180 mm (7.09 in.)): 26.1 N*m (266 kgf*cm, 19 ft.*lbf)
48684B
17.INSTALL FRONT SUSPENSION SUPPORT DUST COVER
Install the front suspension support dust cover to the front shock absorber with coil spring.
18.INSPECT AND ADJUST FRONT WHEEL ALIGNMENT
19.PERFORM INITIALIZATION
| Parking support brake system | ( ) |
| Parking assist monitor system | ()
|