WINDOW / GLASS POWER WINDOW CONTROL SYSTEM TERMINALS OF ECU
CHECK MULTIPLEX NETWORK MASTER SWITCH ASSEMBLY

| *A | for LHD | *B | for RHD |
Disconnect the L13*1 or K5*2 multiplex network master switch assembly connector.
*1: for LHD
*2: for RHD
Measure the voltage and resistance according to the value(s) in the table below.
- HINT:
-
Measure the values on the wire harness side with the connector disconnected.
| Terminal No. (Symbol) | Terminal Description | Condition | Specified Condition |
|---|---|---|---|
| L13-11 (B) - L13-12 (GND) | Power supply | Ignition switch off | 11 to 14 V |
| L13-12 (GND) - Body ground | Ground | Always | Below 1 Ω |
| Terminal No. (Symbol) | Terminal Description | Condition | Specified Condition |
|---|---|---|---|
| K5-11 (B) - K5-12 (GND) | Power supply | Ignition switch off | 11 to 14 V |
| K5-12 (GND) - Body ground | Ground | Always | Below 1 Ω |
Reconnect the L13*1 or K5*2 multiplex network master switch assembly connector.
*1: for LHD
*2: for RHD
Measure the voltage according to the value(s) in the table below.
| Terminal No. (Symbol) | Terminal Description | Condition | Specified Condition |
|---|---|---|---|
| L13-15 (DOWN) - L13-12 (GND) | Power window motor DOWN output | Ignition switch ON, driver door power window regulator switch not pushed or not pulled | 11 to 14 V |
| Ignition switch ON, driver door power window moving, driver door power window regulator switch pushed halfway down (Manual operation) | Below 1 V | ||
| L13-20 (UP) - L13-12 (GND) | Power window motor UP output | Ignition switch ON, driver door power window regulator switch not pushed or not pulled | 11 to 14 V |
| Ignition switch ON, driver door power window moving, driver door power window regulator switch pulled halfway up (Manual operation) | Below 1 V |
| Terminal No. (Symbol) | Terminal Description | Condition | Specified Condition |
|---|---|---|---|
| K5-15 (DOWN) - K5-12 (GND) | Power window motor DOWN output | Ignition switch ON, driver door power window regulator switch not pushed or not pulled | 11 to 14 V |
| Ignition switch ON, driver door power window moving, driver door power window regulator switch pushed halfway down (Manual operation) | Below 1 V | ||
| K5-20 (UP) - K5-12 (GND) | Power window motor UP output | Ignition switch ON, driver door power window regulator switch not pushed or not pulled | 11 to 14 V |
| Ignition switch ON, driver door power window moving, driver door power window regulator switch pulled halfway up (Manual operation) | Below 1 V |
CHECK POWER WINDOW REGULATOR SWITCH ASSEMBLY

| *A | for LHD | *B | for RHD |
Disconnect the K13*1 or L6*2 power window regulator switch assembly connector.
*1: for LHD
*2: for RHD
Measure the resistance according to the value(s) in the table below.
- HINT:
-
Measure the values on the wire harness side with the connector disconnected.
| Terminal No. (Symbol) | Terminal Description | Condition | Specified Condition |
|---|---|---|---|
| K13-7 (GND) - Body ground | Ground | Always | Below 1 Ω |
| Terminal No. (Symbol) | Terminal Description | Condition | Specified Condition |
|---|---|---|---|
| L6-7 (GND) - Body ground | Ground | Always | Below 1 Ω |
Reconnect the K13*1 or L6*2 power window regulator switch assembly connector.
*1: for LHD
*2: for RHD
Measure the voltage according to the value(s) in the table below.
| Terminal No. (Symbol) | Terminal Description | Condition | Specified Condition |
|---|---|---|---|
| K13-5 (UP) - K13-7 (GND) | Power window motor UP output | Ignition switch ON, power window regulator switch assembly not pushed or not pulled | 11 to 14 V |
| Ignition switch ON, front passenger door power window moving, power window regulator switch assembly pulled halfway up (Manual operation) | Below 1 V | ||
| Ignition switch ON, front passenger door power window fully open | 11 to 14 V | ||
| Ignition switch ON, front passenger door power window moving, power window regulator switch assembly fully pulled up (Auto operation) | Below 1 V | ||
| Ignition switch ON, front passenger door power window fully closed | 11 to 14 V | ||
| K13-4 (DOWN) - K13-7 (GND) | Power window motor DOWN output | Ignition switch ON, power window regulator switch assembly not pushed or not pulled | 11 to 14 V |
| Ignition switch ON, front passenger door power window moving, power window regulator switch assembly pushed halfway down (Manual operation) | Below 1 V | ||
| Ignition switch ON, front passenger door power window fully closed | 11 to 14 V | ||
| Ignition switch ON, front passenger door power window moving, power window regulator switch assembly fully pushed down (Auto operation) | Below 1 V | ||
| Ignition switch ON, front passenger door power window fully open | 11 to 14 V | ||
| K13-8 (AUTO) - K13-7 (GND) | Power window motor AUTO UP output | Ignition switch ON, front passenger door power window fully open | 11 to 14 V |
| Ignition switch ON, front passenger door power window moving, power window regulator switch assembly fully pulled up (Auto operation) | Below 1 V | ||
| Ignition switch ON, front passenger door power window fully closed | 11 to 14 V | ||
| Power window motor AUTO DOWN output | Ignition switch ON, front passenger door power window fully closed | 11 to 14 V | |
| Ignition switch ON, front passenger door power window moving, power window regulator switch assembly fully pushed down (Auto operation) | Below 1 V | ||
| Ignition switch ON, front passenger door power window fully open | 11 to 14 V |
| Terminal No. (Symbol) | Terminal Description | Condition | Specified Condition |
|---|---|---|---|
| L6-5 (UP) - L6-7 (GND) | Power window motor UP output | Ignition switch ON, power window regulator switch assembly not pushed or not pulled | 11 to 14 V |
| Ignition switch ON, front passenger door power window moving, power window regulator switch assembly pulled halfway up (Manual operation) | Below 1 V | ||
| Ignition switch ON, front passenger door power window fully open | 11 to 14 V | ||
| Ignition switch ON, front passenger door power window moving, power window regulator switch assembly fully pulled up (Auto operation) | Below 1 V | ||
| Ignition switch ON, front passenger door power window fully closed | 11 to 14 V | ||
| L6-4 (DOWN) - L6-7 (GND) | Power window motor DOWN output | Ignition switch ON, power window regulator switch assembly not pushed or not pulled | 11 to 14 V |
| Ignition switch ON, front passenger door power window moving, power window regulator switch assembly pushed halfway down (Manual operation) | Below 1 V | ||
| Ignition switch ON, front passenger door power window fully closed | 11 to 14 V | ||
| Ignition switch ON, front passenger door power window moving, power window regulator switch assembly fully pushed down (Auto operation) | Below 1 V | ||
| Ignition switch ON, front passenger door power window fully open | 11 to 14 V | ||
| L6-8 (AUTO) - L6-7 (GND) | Power window motor AUTO UP output | Ignition switch ON, front passenger door power window fully open | 11 to 14 V |
| Ignition switch ON, front passenger door power window moving, power window regulator switch assembly fully pulled up (Auto operation) | Below 1 V | ||
| Ignition switch ON, front passenger door power window fully closed | 11 to 14 V | ||
| Power window motor AUTO DOWN output | Ignition switch ON, front passenger door power window fully closed | 11 to 14 V | |
| Ignition switch ON, front passenger door power window moving, power window regulator switch assembly fully pushed down (Auto operation) | Below 1 V | ||
| Ignition switch ON, front passenger door power window fully open | 11 to 14 V |
CHECK REAR POWER WINDOW REGULATOR SWITCH ASSEMBLY (for LH Door) (w/ Rear Power Window)

Disconnect the N3 rear power window regulator switch assembly (for LH door) connector.
Measure the resistance according to the value(s) in the table below.
- HINT:
-
Measure the values on the wire harness side with the connector disconnected.
| Terminal No. (Symbol) | Terminal Description | Condition | Specified Condition |
|---|---|---|---|
| N3-7 (GND) - Body ground | Ground | Always | Below 1 Ω |
Reconnect the N3 rear power window regulator switch assembly (for LH door) connector.
Measure the voltage according to the value(s) in the table below.
| Terminal No. (Symbol) | Terminal Description | Condition | Specified Condition |
|---|---|---|---|
| N3-5 (UP) - N3-7 (GND) | Power window motor UP output | Ignition switch ON, rear power window regulator switch assembly (for LH door) not pushed or not pulled | 11 to 14 V |
| Ignition switch ON, rear LH door power window moving, rear power window regulator switch assembly (for LH door) pulled halfway up (Manual operation) | Below 1 V | ||
| Ignition switch ON, rear LH door power window fully open | 11 to 14 V | ||
| Ignition switch ON, rear LH door power window moving, rear power window regulator switch assembly (for LH door) fully pulled up (Auto operation) | Below 1 V | ||
| Ignition switch ON, rear LH door power window fully closed | 11 to 14 V | ||
| N3-4 (DOWN) - N3-7 (GND) | Power window motor DOWN output | Ignition switch ON, rear power window regulator switch assembly (for LH door) not pushed or not pulled | 11 to 14 V |
| Ignition switch ON, rear LH door power window moving, rear power window regulator switch assembly (for LH door) pushed halfway down (Manual operation) | Below 1 V | ||
| Ignition switch ON, rear LH door power window fully closed | 11 to 14 V | ||
| Ignition switch ON, rear LH door power window moving, rear power window regulator switch assembly (for LH door) fully pushed down (Auto operation) | Below 1 V | ||
| Ignition switch ON, rear LH door power window fully open | 11 to 14 V | ||
| N3-8 (AUTO) - N3-7 (GND) | Power window motor AUTO UP output | Ignition switch ON, rear LH door power window fully open | 11 to 14 V |
| Ignition switch ON, rear LH door power window moving, rear power window regulator switch assembly (for LH door) fully pulled up (Auto operation) | Below 1 V | ||
| Ignition switch ON, rear LH door power window fully closed | 11 to 14 V | ||
| Power window motor AUTO DOWN output | Ignition switch ON, rear LH door power window fully closed | 11 to 14 V | |
| Ignition switch ON, rear LH door power window moving, rear power window regulator switch assembly (for LH door) fully pushed down (Auto operation) | Below 1 V | ||
| Ignition switch ON, rear LH door power window fully open | 11 to 14 V |
CHECK REAR POWER WINDOW REGULATOR SWITCH ASSEMBLY (for RH Door) (w/ Rear Power Window)

Disconnect the M3 rear power window regulator switch assembly (for RH door) connector.
Measure the resistance according to the value(s) in the table below.
- HINT:
-
Measure the values on the wire harness side with the connector disconnected.
| Terminal No. (Symbol) | Terminal Description | Condition | Specified Condition |
|---|---|---|---|
| M3-7 (GND) - Body ground | Ground | Always | Below 1 Ω |
Reconnect the M3 rear power window regulator switch assembly (for RH door) connector.
Measure the voltage according to the value(s) in the table below.
| Terminal No. (Symbol) | Terminal Description | Condition | Specified Condition |
|---|---|---|---|
| M3-5 (UP) - M3-7 (GND) | Power window motor UP output | Ignition switch ON, rear power window regulator switch assembly (for RH door) not pushed or not pulled | 11 to 14 V |
| Ignition switch ON, rear RH door power window moving, rear power window regulator switch assembly (for RH door) pulled halfway up (Manual operation) | Below 1 V | ||
| Ignition switch ON, rear RH door power window fully open | 11 to 14 V | ||
| Ignition switch ON, rear RH door power window moving, rear power window regulator switch assembly (for RH door) fully pulled up (Auto operation) | Below 1 V | ||
| Ignition switch ON, rear RH door power window fully closed | 11 to 14 V | ||
| M3-4 (DOWN) - M3-7 (GND) | Power window motor DOWN output | Ignition switch ON, rear power window regulator switch assembly (for RH door) not pushed or not pulled | 11 to 14 V |
| Ignition switch ON, rear RH door power window moving, rear power window regulator switch assembly (for RH door) pushed halfway down (Manual operation) | Below 1 V | ||
| Ignition switch ON, rear RH door power window fully closed | 11 to 14 V | ||
| Ignition switch ON, rear RH door power window moving, rear power window regulator switch assembly (for RH door) fully pushed down (Auto operation) | Below 1 V | ||
| Ignition switch ON, rear RH door power window fully open | 11 to 14 V | ||
| M3-8 (AUTO) - M3-7 (GND) | Power window motor AUTO UP output | Ignition switch ON, rear RH door power window fully open | 11 to 14 V |
| Ignition switch ON, rear RH door power window moving, rear power window regulator switch assembly (for RH door) fully pulled up (Auto operation) | Below 1 V | ||
| Ignition switch ON, rear RH door power window fully closed | 11 to 14 V | ||
| Power window motor AUTO DOWN output | Ignition switch ON, rear RH door power window fully closed | 11 to 14 V | |
| Ignition switch ON, rear RH door power window moving, rear power window regulator switch assembly (for RH door) fully pushed down (Auto operation) | Below 1 V | ||
| Ignition switch ON, rear RH door power window fully open | 11 to 14 V |
CHECK POWER WINDOW REGULATOR MOTOR ASSEMBLY (for Driver Door)

| *A | for LHD | *B | for RHD |
Disconnect the L7*1 or K7*2 power window regulator motor assembly (for driver door) connector.
*1: for LHD
*2: for RHD
Measure the voltage and resistance according to the value(s) in the table below.
- HINT:
-
Measure the values on the wire harness side with the connector disconnected.
| Terminal No. (Symbol) | Terminal Description | Condition | Specified Condition |
|---|---|---|---|
| L7-1 (GND) - Body ground | Ground | Always | Below 1 Ω |
| L7-2 (B) - Body ground | Power supply | Ignition switch off | 11 to 14 V |
| Terminal No. (Symbol) | Terminal Description | Condition | Specified Condition |
|---|---|---|---|
| K7-1 (GND) - Body ground | Ground | Always | Below 1 Ω |
| K7-2 (B) - Body ground | Power supply | Ignition switch off | 11 to 14 V |
Reconnect the L7*1 or K7*2 power window regulator motor assembly (for driver door) connector.
*1: for LHD
*2: for RHD
Measure the voltage according to the value(s) in the table below.
| Terminal No. (Symbol) | Terminal Description | Condition | Specified Condition |
|---|---|---|---|
| L7-7 (DOWN) - L7-1 (GND) | Power window motor DOWN input | Ignition switch ON, multiplex network master switch assembly (driver door power window regulator switch) not pushed or not pulled | 11 to 14 V |
| Ignition switch ON, driver door power window moving, multiplex network master switch assembly (driver door power window regulator switch) pushed halfway down (Manual operation) | Below 1 V | ||
| Ignition switch ON, driver door power window fully closed | 11 to 14 V | ||
| Ignition switch ON, driver door power window moving, multiplex network master switch assembly (driver door power window regulator switch) fully pushed down (Auto operation) | Below 1 V | ||
| Ignition switch ON, driver door power window fully open | 11 to 14 V | ||
| L7-10 (UP) - L7-1 (GND) | Power window motor UP input | Ignition switch ON, multiplex network master switch assembly (driver door power window regulator switch) not pushed or not pulled | 11 to 14 V |
| Ignition switch ON, driver door power window moving, multiplex network master switch assembly (driver door power window regulator switch) pulled halfway up (Manual operation) | Below 1 V | ||
| Ignition switch ON, multiplex network master switch assembly (driver door power window regulator switch) fully open | 11 to 14 V | ||
| Ignition switch ON, driver door power window moving, multiplex network master switch assembly (driver door power window regulator switch) fully pulled up (Auto operation) | Below 1 V | ||
| Ignition switch ON, driver door power window fully closed | 11 to 14 V |
| Terminal No. (Symbol) | Terminal Description | Condition | Specified Condition |
|---|---|---|---|
| K7-7 (DOWN) - K7-1 (GND) | Power window motor DOWN input | Ignition switch ON, multiplex network master switch assembly (driver door power window regulator switch) not pushed or not pulled | 11 to 14 V |
| Ignition switch ON, driver door power window moving, multiplex network master switch assembly (driver door power window regulator switch) pushed halfway down (Manual operation) | Below 1 V | ||
| Ignition switch ON, driver door power window fully closed | 11 to 14 V | ||
| Ignition switch ON, driver door power window moving, multiplex network master switch assembly (driver door power window regulator switch) fully pushed down (Auto operation) | Below 1 V | ||
| Ignition switch ON, driver door power window fully open | 11 to 14 V | ||
| K7-10 (UP) - K7-1 (GND) | Power window motor UP input | Ignition switch ON, multiplex network master switch assembly (driver door power window regulator switch) not pushed or not pulled | 11 to 14 V |
| Ignition switch ON, driver door power window moving, multiplex network master switch assembly (driver door power window regulator switch) pulled halfway up (Manual operation) | Below 1 V | ||
| Ignition switch ON, multiplex network master switch assembly (driver door power window regulator switch) fully open | 11 to 14 V | ||
| Ignition switch ON, driver door power window moving, multiplex network master switch assembly (driver door power window regulator switch) fully pulled up (Auto operation) | Below 1 V | ||
| Ignition switch ON, driver door power window fully closed | 11 to 14 V |
CHECK POWER WINDOW REGULATOR MOTOR ASSEMBLY (for Front Passenger Door)

| *A | for LHD | *B | for RHD |
Disconnect the K7*1 or L7*2 power window regulator motor assembly (for front passenger door) connector.
*1: for LHD
*2: for RHD
Measure the voltage and resistance according to the value(s) in the table below.
- HINT:
-
Measure the values on the wire harness side with the connector disconnected.
| Terminal No. (Symbol) | Terminal Description | Condition | Specified Condition |
|---|---|---|---|
| K7-1 (GND) - Body ground | Ground | Always | Below 1 Ω |
| K7-2 (B) - Body ground | Power supply | Ignition switch off | 11 to 14 V |
| Terminal No. (Symbol) | Terminal Description | Condition | Specified Condition |
|---|---|---|---|
| L7-1 (GND) - Body ground | Ground | Always | Below 1 Ω |
| L7-2 (B) - Body ground | Power supply | Ignition switch off | 11 to 14 V |
Reconnect the K7*1 or L7*2 power window regulator motor assembly (for front passenger door) connector.
*1: for LHD
*2: for RHD
Measure the voltage according to the value(s) in the table below.
| Terminal No. (Symbol) | Terminal Description | Condition | Specified Condition |
|---|---|---|---|
| K7-4 (AUTO) - K7-1 (GND) | Power window motor AUTO UP input | Ignition switch ON, front passenger door power window fully open | 11 to 14 V |
| Ignition switch ON, front passenger door power window moving, power window regulator switch assembly fully pulled up (Auto operation) | Below 1 V | ||
| Ignition switch ON, front passenger door power window fully closed | 11 to 14 V | ||
| Power window motor AUTO DOWN input | Ignition switch ON, front passenger door power window fully closed | 11 to 14 V | |
| Ignition switch ON, front passenger door power window moving, power window regulator switch assembly fully pushed down (Auto operation) | Below 1 V | ||
| Ignition switch ON, front passenger door power window fully open | 11 to 14 V | ||
| K7-7 (DOWN) - K7-1 (GND) | Power window motor DOWN input | Ignition switch ON, power window regulator switch assembly not pushed or not pulled | 11 to 14 V |
| Ignition switch ON, front passenger door power window moving, power window regulator switch assembly pushed halfway down (Manual operation) | Below 1 V | ||
| Ignition switch ON, front passenger door power window fully closed | 11 to 14 V | ||
| Ignition switch ON, front passenger door power window moving, power window regulator switch assembly fully pushed down (Auto operation) | Below 1 V | ||
| Ignition switch ON, front passenger door power window fully open | 11 to 14 V | ||
| K7-10 (UP) - K7-1 (GND) | Power window motor UP input | Ignition switch ON, power window regulator switch assembly not pushed or not pulled | 11 to 14 V |
| Ignition switch ON, front passenger door power window moving, power window regulator switch assembly pulled halfway up (Manual operation) | Below 1 V | ||
| Ignition switch ON, front passenger door power window fully open | 11 to 14 V | ||
| Ignition switch ON, front passenger door power window moving, power window regulator switch assembly fully pulled up (Auto operation) | Below 1 V | ||
| Ignition switch ON, front passenger door power window fully closed | 11 to 14 V |
| Terminal No. (Symbol) | Terminal Description | Condition | Specified Condition |
|---|---|---|---|
| L7-4 (AUTO) - L7-1 (GND) | Power window motor AUTO UP input | Ignition switch ON, front passenger door power window fully open | 11 to 14 V |
| Ignition switch ON, front passenger door power window moving, power window regulator switch assembly fully pulled up (Auto operation) | Below 1 V | ||
| Ignition switch ON, front passenger door power window fully closed | 11 to 14 V | ||
| Power window motor AUTO DOWN input | Ignition switch ON, front passenger door power window fully closed | 11 to 14 V | |
| Ignition switch ON, front passenger door power window moving, power window regulator switch assembly fully pushed down (Auto operation) | Below 1 V | ||
| Ignition switch ON, front passenger door power window fully open | 11 to 14 V | ||
| L7-7 (DOWN) - L7-1 (GND) | Power window motor DOWN input | Ignition switch ON, power window regulator switch assembly not pushed or not pulled | 11 to 14 V |
| Ignition switch ON, front passenger door power window moving, power window regulator switch assembly pushed halfway down (Manual operation) | Below 1 V | ||
| Ignition switch ON, front passenger door power window fully closed | 11 to 14 V | ||
| Ignition switch ON, front passenger door power window moving, power window regulator switch assembly fully pushed down (Auto operation) | Below 1 V | ||
| Ignition switch ON, front passenger door power window fully open | 11 to 14 V | ||
| L7-10 (UP) - L7-1 (GND) | Power window motor UP input | Ignition switch ON, power window regulator switch assembly not pushed or not pulled | 11 to 14 V |
| Ignition switch ON, front passenger door power window moving, power window regulator switch assembly pulled halfway up (Manual operation) | Below 1 V | ||
| Ignition switch ON, front passenger door power window fully open | 11 to 14 V | ||
| Ignition switch ON, front passenger door power window moving, power window regulator switch assembly fully pulled up (Auto operation) | Below 1 V | ||
| Ignition switch ON, front passenger door power window fully closed | 11 to 14 V |
CHECK POWER WINDOW REGULATOR MOTOR ASSEMBLY (for Rear LH Door) (w/ Rear Power Window)

Disconnect the N4 power window regulator motor assembly (for rear LH door) connector.
Measure the voltage and resistance according to the value(s) in the table below.
- HINT:
-
Measure the values on the wire harness side with the connector disconnected.
| Terminal No. (Symbol) | Terminal Description | Condition | Specified Condition |
|---|---|---|---|
| N4-1 (GND) - Body ground | Ground | Always | Below 1 Ω |
| N4-2 (B) - Body ground | Power supply | Ignition switch off | 11 to 14 V |
Reconnect the N4 power window regulator motor assembly (for rear LH door) connector.
Measure the voltage according to the value(s) in the table below.
| Terminal No. (Symbol) | Terminal Description | Condition | Specified Condition |
|---|---|---|---|
| N4-4 (AUTO) - N4-1 (GND) | Power window motor AUTO UP input | Ignition switch ON, rear LH door power window fully open | 11 to 14 V |
| Ignition switch ON, rear LH door power window moving, rear power window regulator switch assembly (for LH door) fully pulled up (Auto operation) | Below 1 V | ||
| Ignition switch ON, rear LH door power window fully closed | 11 to 14 V | ||
| Power window motor AUTO DOWN input | Ignition switch ON, rear LH door power window fully closed | 11 to 14 V | |
| Ignition switch ON, rear LH door power window moving, rear power window regulator switch assembly (for LH door) fully pushed down (Auto operation) | Below 1 V | ||
| Ignition switch ON, rear LH door power window fully open | 11 to 14 V | ||
| N4-7 (DOWN) - N4-1 (GND) | Power window motor DOWN input | Ignition switch ON, rear power window regulator switch assembly (for LH door) not pushed or not pulled | 11 to 14 V |
| Ignition switch ON, rear LH door power window moving, rear power window regulator switch assembly (for LH door) pushed halfway down (Manual operation) | Below 1 V | ||
| Ignition switch ON, rear LH door power window fully closed | 11 to 14 V | ||
| Ignition switch ON, rear LH door power window moving, rear power window regulator switch assembly (for LH door) fully pushed down (Auto operation) | Below 1 V | ||
| Ignition switch ON, rear LH door power window fully open | 11 to 14 V | ||
| N4-10 (UP) - N4-1 (GND) | Power window motor UP input | Ignition switch ON, rear power window regulator switch assembly (for LH door) not pushed or not pulled | 11 to 14 V |
| Ignition switch ON, rear LH door power window moving, rear power window regulator switch assembly (for LH door) pulled halfway up (Manual operation) | Below 1 V | ||
| Ignition switch ON, rear LH door power window fully open | 11 to 14 V | ||
| Ignition switch ON, rear LH door power window moving, rear power window regulator switch assembly (for LH door) fully pulled up (Auto operation) | Below 1 V | ||
| Ignition switch ON, rear LH door power window fully closed | 11 to 14 V |
CHECK POWER WINDOW REGULATOR MOTOR ASSEMBLY (for Rear RH Door) (w/ Rear Power Window)

Disconnect the M4 power window regulator motor assembly (for rear RH door) connector.
Measure the voltage and resistance according to the value(s) in the table below.
- HINT:
-
Measure the values on the wire harness side with the connector disconnected.
| Terminal No. (Symbol) | Terminal Description | Condition | Specified Condition |
|---|---|---|---|
| M4-1 (GND) - Body ground | Ground | Always | Below 1 Ω |
| M4-2 (B) - Body ground | Power supply | Ignition switch off | 11 to 14 V |
Reconnect the M4 power window regulator motor assembly (for rear RH door) connector.
Measure the voltage according to the value(s) in the table below.
| Terminal No. (Symbol) | Terminal Description | Condition | Specified Condition |
|---|---|---|---|
| M4-4 (AUTO) - M4-1 (GND) | Power window motor AUTO UP input | Ignition switch ON, rear RH door power window fully open | 11 to 14 V |
| Ignition switch ON, rear RH door power window moving, rear power window regulator switch assembly (for RH door) fully pulled up (Auto operation) | Below 1 V | ||
| Ignition switch ON, rear RH door power window fully closed | 11 to 14 V | ||
| Power window motor AUTO DOWN input | Ignition switch ON, rear RH door power window fully closed | 11 to 14 V | |
| Ignition switch ON, rear RH door power window moving, rear power window regulator switch assembly (for RH door) fully pushed down (Auto operation) | Below 1 V | ||
| Ignition switch ON, rear RH door power window fully open | 11 to 14 V | ||
| M4-7 (DOWN) - M4-1 (GND) | Power window motor DOWN input | Ignition switch ON, rear power window regulator switch assembly (for RH door) not pushed or not pulled | 11 to 14 V |
| Ignition switch ON, rear RH door power window moving, rear power window regulator switch assembly (for RH door) pushed halfway down (Manual operation) | Below 1 V | ||
| Ignition switch ON, rear RH door power window fully closed | 11 to 14 V | ||
| Ignition switch ON, rear RH door power window moving, rear power window regulator switch assembly (for RH door) fully pushed down (Auto operation) | Below 1 V | ||
| Ignition switch ON, rear RH door power window fully open | 11 to 14 V | ||
| M4-10 (UP) - M4-1 (GND) | Power window motor UP input | Ignition switch ON, rear power window regulator switch assembly (for RH door) not pushed or not pulled | 11 to 14 V |
| Ignition switch ON, rear RH door power window moving, rear power window regulator switch assembly (for RH door) pulled halfway up (Manual operation) | Below 1 V | ||
| Ignition switch ON, rear RH door power window fully open | 11 to 14 V | ||
| Ignition switch ON, rear RH door power window moving, rear power window regulator switch assembly (for RH door) fully pulled up (Auto operation) | Below 1 V | ||
| Ignition switch ON, rear RH door power window fully closed | 11 to 14 V |
CHECK POWER DISTRIBUTION BOX ASSEMBLY AND MAIN BODY ECU (MULTIPLEX NETWORK BODY ECU)
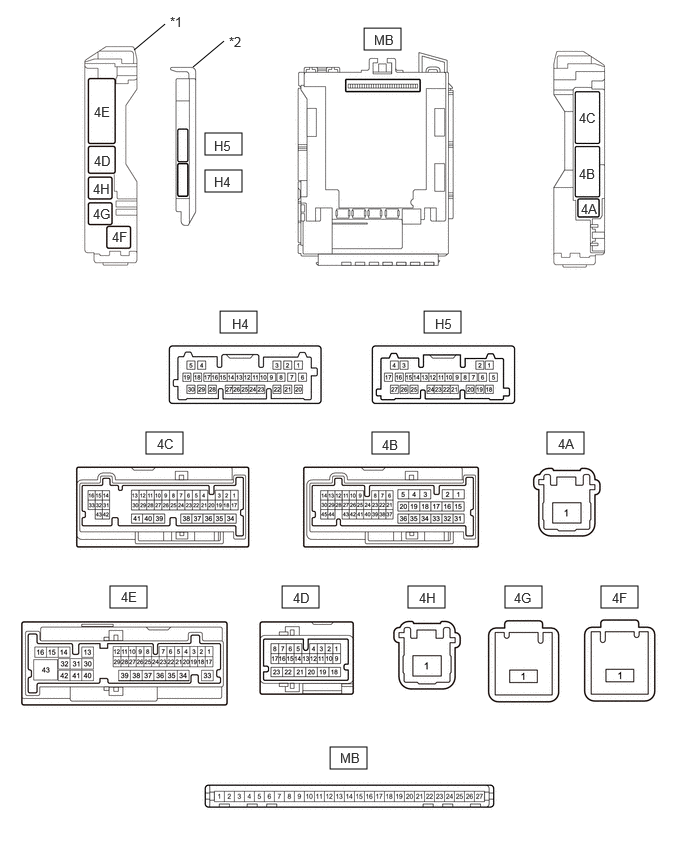
| *1 | Power Distribution Box Assembly | *2 | Main Body ECU (Multiplex Network Body ECU) |
Remove the main body ECU (multiplex network body ECU) from the power distribution box assembly.
for LHD:
Click herePower Source / Network>POWER DISTRIBUTION>MAIN BODY ECU (for LHD)>REMOVAL
for RHD:
Click herePower Source / Network>POWER DISTRIBUTION>MAIN BODY ECU (for RHD)>REMOVAL
Reconnect the power distribution box assembly connectors.
Measure the voltage and resistance according to the value(s) in the table below.
- HINT:
-
Measure the values on the wire harness side with the connectors connected.
| Terminal No. (Symbol) | Terminal Description | Condition | Specified Condition |
|---|---|---|---|
| MB-13 (GND1) - Body ground | Ground | Always | Below 1 Ω |
| MB-26 (BECU) - Body ground | Auxiliary battery power supply | Ignition switch off | 11 to 14 V |
| MB-27 (IGR) - Body ground | IG power supply | Ignition switch ON | 11 to 14 V |
Install the main body ECU (multiplex network body ECU) to the power distribution box assembly.
Measure the voltage and check for pulses according to the value(s) in the table below.
| Terminal No. (Symbol) | Terminal Description | Condition | Specified Condition |
|---|---|---|---|
| MB-4 (FRCY) - Body ground | Front door courtesy light switch (for RH) input | Front door RH open | Below 1 V |
| Front door RH closed | 11 to 14 V | ||
| H4-28 (L2) - Body ground | Driver door key-linked lock input | Driver door key cylinder turned to lock | Below 1 V |
| Driver door key cylinder not turned | Pulse generation | ||
| H4-4 (UL3) - Body ground | Driver door key-linked unlock input | Driver door key cylinder turned to unlock | Below 1 V |
| Driver door key cylinder not turned | Pulse generation |