MAINTENANCE BRAKE FLUID(for HV Model TMC Made) REPLACEMENT
CAUTION / NOTICE / HINT
- NOTICE:
- ·
Perform fluid replacement with the shift lever in P and the parking brake applied.
·Perform fluid replacement while maintaining the brake fluid level between the MAX and MIN lines on the brake fluid reservoir.
·If the brake fluid reservoir becomes empty, air will enter the hose and brake booster with accumulator pump assembly and it may become difficult to replace brake fluid.
·When performing fluid replacement, the accumulator pressure drop may cause a buzzer to sound. As this is not a malfunction, continue with the fluid replacement.
·If fluid replacement is performed, a motor drive permission malfunction or accumulator low pressure DTC may be stored. Clear the DTCs after performing fluid replacement or whenever specified by a procedure.
·Do not allow brake fluid to contact any painted surface. If brake fluid leaks onto any painted surface, immediately wash it off.
·When performing fluid replacement, do not continuously operate the pump motor for more than 100 seconds. If the pump motor is operated for more than 100 seconds, release the brake pedal to stop operation of the pump in order to prevent damage to the pump motor.
·As brake fluid may overflow from the reservoir when brake fluid is released from the accumulator, do not invert and place the brake fluid bottle on the reservoir filler opening.
- HINT:
-
There are 2 ways of brake fluid replacement: using the GTS or not using the GTS.
PROCEDURE

 1.REPLACE BRAKE FLUID (When Using the GTS)
Remove the center cowl top ventilator louver.
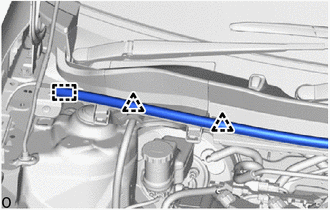
Disengage the 2 clips and hook to separate the hood to cowl top seal.
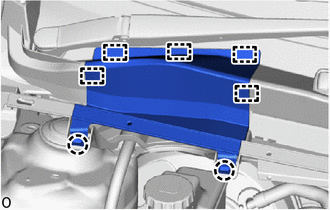
Disengage the 2 claws and 5 guides to remove the center cowl top ventilator louver from the cowl top ventilator louver sub-assembly.
Fill the reservoir with brake fluid.
Remove the brake master cylinder reservoir filler cap assembly.
Add brake fluid to the reservoir until the fluid level is between the MAX and MIN lines on the brake fluid reservoir.
- Brake Fluid:
SAE J1703 or FMVSS No. 116 DOT 3
SAE J1704 or FMVSS No. 116 DOT 4
Replace the brake fluid.
Connect the GTS to the DLC3 and turn the ignition switch to ON.
Turn the GTS on and enter the following menus: Chassis / Brake / Utility / Brake Line Air Bleeding.
- Chassis > Brake > Utility
-
Tester Display Brake Line Air Bleeding - 50005 435 6116
Select "Brake Line Air Bleeding", and replace the brake fluid following the instructions on the GTS.
- HINT:
-
When the brake pedal is released, the piston inside the master cylinder may take longer than the brake pedal to return to its original position. Therefore, make sure to wait for 1 second or more between each depression of the brake pedal.
After replacing brake fluid, tighten each bleeder plug.
- Torque:
- Front Disc Brake Bleeder Plug : 8.3 N*m (85 kgf*cm, 73 in.*lbf)
- Rear Drum Brake Bleeder Plug : 8.5 N*m (87 kgf*cm, 75 in.*lbf)
Install the brake master cylinder reservoir filler cap assembly.
Turn the GTS off then turn the ignition switch off.
Inspect for brake fluid leaks.
Install the center cowl top ventilator louver.
Engage the 5 guides and 2 claws to install the center cowl top ventilator louver to the cowl top ventilator louver sub-assembly.
Engage the 2 clips and hook to install the hood to cowl top seal.
2.REPLACE BRAKE FLUID (When Not Using the GTS)
- NOTICE:
- ·
Performing the following procedure enters ECB (Electronically Controlled Brake system) Invalid Mode without using the GTS.
·ECB (Electronically Controlled Brake system) Invalid Mode allows the brake fluid to be replaced without using the GTS.
·The brake warning light blinks (yellow) to indicate that ECB (Electronically Controlled Brake system) Invalid Mode is selected.
·Be sure to confirm that the brake warning light is blinking (yellow) throughout the brake fluid replacement procedure.
·If any of the following conditions are met, ECB (Electronically Controlled Brake system) Invalid Mode is canceled and the brake warning light (yellow) turns off. Do not allow ECB (Electronically Controlled Brake system) Invalid Mode to be canceled while replacing brake fluid or DTCs may be stored.
The shift lever is moved from P to any other position. The ignition switch is turned to ON (READY). The ignition switch is turned off. The parking brake is released. The vehicle speed is more than 0 km/h (0 mph).
·Do not rotate any brake disc while ECB (Electronically Controlled Brake system) Invalid Mode is selected.
·Although the brake warning light will blink (yellow) and a buzzer will sound while performing fluid replacement, this is not a malfunction.
Remove all 4 wheels.
Enter ECB (Electronically Controlled Brake system) Deactivate Mode.
Perform the procedure listed below within 1 minute.
Turn the ignition switch to ON with the shift lever in P and parking brake applied.
Move the shift lever to N and then depress the brake pedal more than 8 times within 5 seconds.
Move the shift lever to P and then depress the brake pedal more than 8 times within 5 seconds.
Move the shift lever to N and then depress the brake pedal more than 8 times within 5 seconds.
Move the shift lever to P.
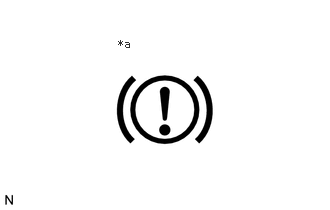
| *a | Brake Warning Light (Yellow) |
Check that the brake warning light is blinking (yellow).
Remove the center cowl top ventilator louver.
Disengage the 2 clips and hook to separate the hood to cowl top seal.
Disengage the 2 claws and 5 guides to remove the center cowl top ventilator louver from the cowl top ventilator louver sub-assembly.
Fill the reservoir with brake fluid.
Remove the brake master cylinder reservoir filler cap assembly.
Add brake fluid to the reservoir until the fluid level is between the MAX and MIN lines on the brake fluid reservoir.
- Brake Fluid:
SAE J1703 or FMVSS No. 116 DOT 3
SAE J1704 or FMVSS No. 116 DOT 4
Replace the brake fluid.
- HINT:
-
When replacing the brake fluid using vacuum, the brake fluid bottle can be inverted and placed on the reservoir filler opening.
Connect a vinyl tube to the bleeder plug of the front disc brake cylinder assembly RH.
Depress the brake pedal several times with approximately 1 second between each depression, and then loosen the bleeder plug with the pedal depressed.*1
When brake fluid stops coming out, tighten the bleeder plug and then release the brake pedal for 1 second or more.*2
- HINT:
-
When the brake pedal is released, the piston inside the master cylinder may take longer than the brake pedal to return to its original position. Therefore, make sure to wait for 1 second or more between each depression of the brake pedal.
Repeat steps *1 and *2 until new brake fluid comes out.
Tighten the bleeder plug completely.
- Torque:
- 8.3 N*m (85 kgf*cm, 73 in.*lbf)
Replace brake fluid from the front disc brake cylinder assembly LH using the same procedure as for the RH side.
Connect a vinyl tube to the bleeder plug of the rear wheel cylinder assembly LH.
Depress the brake pedal several times with approximately 1 second between each depression, and then loosen the bleeder plug with the pedal depressed.*3
When brake fluid stops coming out, tighten the bleeder plug and then release the brake pedal for 1 second or more.*4
- HINT:
-
When the brake pedal is released, the piston inside the master cylinder may take longer than the brake pedal to return to its original position. Therefore, make sure to wait for 1 second or more between each depression of the brake pedal.
Repeat steps *3 and *4 until new brake fluid comes out.
Tighten the bleeder plug completely.
- Torque:
- 8.5 N*m (87 kgf*cm, 75 in.*lbf)
Replace brake fluid from the rear wheel cylinder assembly RH using the same procedure as for the LH side.
Turn the ignition switch off.
Inspect for brake fluid leaks.
Adjust the brake fluid level in the reservoir.
Click hereBrake>BRAKE SYSTEM (OTHER)>BRAKE FLUID (for HV Model TMC Made)>ON-VEHICLE INSPECTION
Install the brake master cylinder reservoir filler cap assembly.
Install the 4 wheels.
Install the center cowl top ventilator louver.
Engage the 5 guides and 2 claws to install the center cowl top ventilator louver to the cowl top ventilator louver sub-assembly.
Engage the 2 clips and hook to install the hood to cowl top seal.