POWER DISTRIBUTION POWER INTEGRATION SYSTEM TERMINALS OF ECU
- NOTICE:
- ·
After turning the power switch off, waiting time may be required before disconnecting the cable from the negative (-) auxiliary battery terminal. Therefore, make sure to read the disconnecting the cable from the negative (-) auxiliary battery terminal notices before proceeding with work.
Click hereGeneral>INTRODUCTION>REPAIR INSTRUCTION>PRECAUTION
·When disconnecting the cable from the negative (-) auxiliary battery terminal while performing repairs, some systems need to be initialized after the cable is reconnected.
Click hereGeneral>SETUP>WHEN DISCONNECTING OR RECONNECTING BATTERY TERMINAL>WORK PROCEDURE
CHECK POWER DISTRIBUTION BOX ASSEMBLY AND MAIN BODY ECU (MULTIPLEX NETWORK BODY ECU)
Remove the main body ECU (multiplex network body ECU) from the power distribution box assembly.
for RHD:
Click herePower Source / Network>POWER DISTRIBUTION>MAIN BODY ECU (for RHD)>REMOVAL
for LHD:
Click herePower Source / Network>POWER DISTRIBUTION>MAIN BODY ECU (for LHD)>REMOVAL
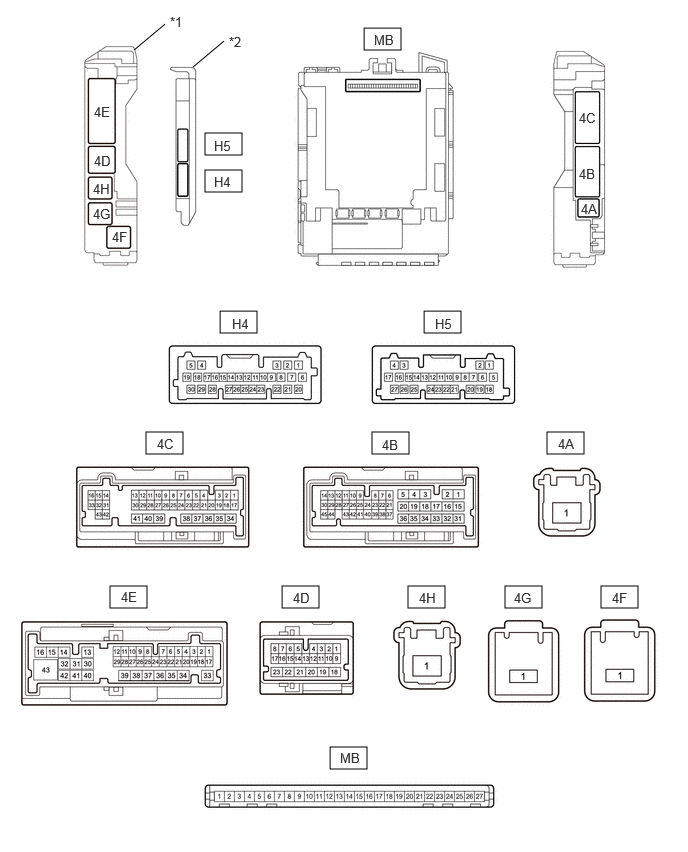
| *1 | Power Distribution Box Assembly | *2 | Main Body ECU (Multiplex Network Body ECU) |
Reconnect the power distribution box assembly connectors.
Measure the voltage and resistance according to the value(s) in the table below.
| Terminal No. (Symbol) | Terminal Description | Condition | Specified Condition |
|---|---|---|---|
| MB-13 (GND1) - Body ground | Ground | Always | Below 1 Ω |
| MB-26 (BECU) - Body ground | Auxiliary battery power supply | Ignition switch off | 11 to 14 V |
| MB-27 (IGR) - Body ground | IG power supply | Ignition switch off | Below 1 V |
| Ignition switch ON | 11 to 14 V |
Install the main body ECU (multiplex network body ECU) to power distribution box assembly.
for RHD:
Click herePower Source / Network>POWER DISTRIBUTION>MAIN BODY ECU (for RHD)>REMOVAL
for LHD:
Click herePower Source / Network>POWER DISTRIBUTION>MAIN BODY ECU (for LHD)>REMOVAL
Measure the voltage and check for pulses according to the value(s) in the table below.
| Terminal No. (Symbol) | Terminal Description | Condition | Specified Condition |
|---|---|---|---|
| 4D-5 - Body ground | CXPI communication line | Ignition switch ON | Pulse generation |
| 4E-43 - Body ground | Rear window defogger signal (output) | rear window defogger switch off | Below 1.5 V |
| rear window defogger switch on | 8 to 14 V | ||
| 4B-2 - Body ground*1 | Mirror heater drive voltage (output) | Ignition switch ON, rear defogger switch off | Below 1.5 V |
| Ignition switch ON, rear defogger switch on | 8 to 14 V | ||
| 4C-10 - Body ground | Power retract mirror motor drive voltage (output) | Outer rear view mirror assembly moves to the retracted position | Below 1.5 V |
| Outer rear view mirror assembly not move | 8 to 14 V | ||
| 4C-21 - Body ground | Power retract mirror motor drive voltage (output) | Outer rear view mirror assembly moves to the return position | Below 1.5 V |
| Outer rear view mirror assembly not move | 8 to 14 V | ||
| 4C-24 - Body ground*2 | Rear defogger switch signal (input) | rear window defogger switch off | Below 1.5 V |
| rear window defogger switch on | 8 to 14 V |
*1: w/ Mirror Heater
*2: for Manual Air Conditioning System
CHECK SEMICONDUCTOR POWER INTEGRATION ECU

| *a | Component without harness connected
(Semiconductor power integration ECU) |
- | - |
Disconnect the cable from the negative (-) auxiliary battery terminal.
Disconnect the A85 and A86 semiconductor power integration ECU connectors.
Connect the cable to the negative (-) auxiliary battery terminal.
Measure the resistance and voltage according to the value(s) in the table below.
| Terminal No. (Symbol) | Terminal Description | Condition | Specified Condition |
|---|---|---|---|
| A85-1 (+B) - Body ground | Auxiliary battery power supply | Ignition switch off | 8 to 14 V |
| A86-5 (-S) - Body ground | Headlight ECU sub-assembly operation signal input | Ignition switch off | 6 V or higher |
| Ignition switch ON | Below 1.7 V | ||
| A86-16 (GND2) - Body ground | Ground | Always | Below 1 Ω |
| A86-20 (IG) - Body ground | IG power supply | Ignition switch off | Below 1.5 V |
| Ignition switch ON | 8 to 14 V | ||
| A86-24 (-S) - Body ground | Headlight ECU sub-assembly operation signal input | Ignition switch off | 6 V or higher |
| Ignition switch ON | Below 1.7 V | ||
| A86-26 (GND1) - Body ground | Ground | Always | Below 1 Ω |
Reconnect the A85 and A86 semiconductor power integration ECU connectors.
Measure the voltage and check for pulses according to the value(s) in the table below.
| Terminal No. (Symbol) | Terminal Description | Condition | Specified Condition |
|---|---|---|---|
| A86-8 (CXPI) - Body ground | CXPI communication line | Ignition switch ON | Pulse generation |
| A86-1 (L) - Body ground | Headlight ECU sub-assembly LH power supply | Ignition switch off | Below 3.0 V |
| Ignition switch ON | 8 V or higher | ||
| A86-2 (L)- Body ground | Headlight ECU sub-assembly RH power supply | Ignition switch off | Below 3.0 V |
| Ignition switch ON | 8 V or higher | ||
| A86-17 (L) - Body ground | Front fog light output | Front fog light not illuminated | Below 3.0 V |
| Front fog light illuminated | 8 V or higher | ||
| A86-18 (L) - Body ground | Front fog light output | Front fog light not illuminated | Below 3.0 V |
| Front fog light illuminated | 8 V or higher |
CHECK NO. 2 SEMICONDUCTOR POWER INTEGRATION ECU (w/ PTC Heater)

| *a | Component without harness connected
(No. 2 semiconductor power integration ECU) |
- | - |
Disconnect the cable from the negative (-) auxiliary battery terminal.
Disconnect the A87 and A88 No. 2 semiconductor power integration ECU connectors.
Connect the cable to the negative (-) auxiliary battery terminal.
Measure the resistance and voltage according to the value(s) in the table below.
| Terminal No. (Symbol) | Terminal Description | Condition | Specified Condition |
|---|---|---|---|
| A87-1 (+B) - Body ground | Auxiliary battery power supply | Ignition switch off | 8 to 14 V |
| A88-9 (IG) - Body ground | IG power supply | Ignition switch off | Below 1.5 V |
| Ignition switch ON | 8 to 14 V | ||
| A88-13 (GND1) - Body ground | Ground | Always | Below 1 Ω |
Reconnect the A87 and A88 No. 2 semiconductor power integration ECU connectors.
Measure the voltage and check for pulses according to the value(s) in the table below.
| Terminal No. (Symbol) | Terminal Description | Condition | Specified Condition |
|---|---|---|---|
| A88-7 (CXPI) - Body ground | CXPI communication line | Ignition switch ON | Pulse generation |
| A88-1 (L) - Body ground | Quick heater assembly (PTC1) power supply | Ignition switch ON, quick heater assembly (PTC1) off | Below 3.0 V |
| Ignition switch ON, quick heater assembly (PTC1) on | 8 V or higher | ||
| A88-2 (L)- Body ground | Quick heater assembly (PTC2) power supply | Ignition switch ON, quick heater assembly (PTC2) off | Below 3.0 V |
| Ignition switch ON, quick heater assembly (PTC2) on | 8 V or higher | ||
| A88-16 (L) - Body ground | Quick heater assembly (PTC3) power supply | Ignition switch ON, quick heater assembly (PTC3) off | Below 3.0 V |
| Ignition switch ON, quick heater assembly (PTC3) on | 8 V or higher |