INTERIOR PANELS / TRIM REAR CONSOLE BOX REMOVAL
PROCEDURE

 55479D
1.REMOVE LOWER INSTRUMENT CLUSTER FINISH PANEL GARNISH
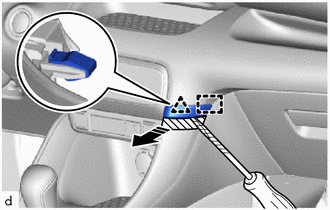

|
Protective Tape |

|
Remove in this Direction |
Using a screwdriver with its tip wrapped in protective tape, disengage the claw and guide to remove the lower instrument cluster finish panel garnish as shown in the illustration.
55432B
2.REMOVE LOWER INSTRUMENT PANEL FINISH PANEL
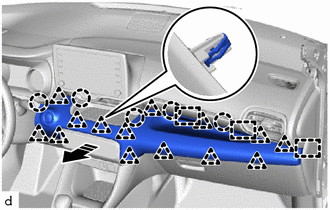
|
|
Remove in this Direction |
Disengage the clips, claws and guides to remove the lower instrument panel finish panel as shown in the illustration.
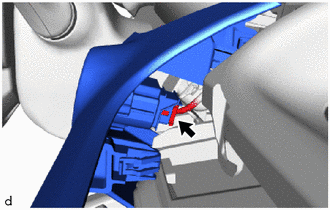
w/ Entry and Start System:
Disconnect the connector.
55407B
3.REMOVE SWITCH HOLE BASE SUB-ASSEMBLY
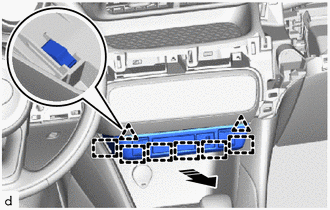
|
|
Remove in this Direction |
Disengage the clips and guides to remove the switch hole base sub-assembly as shown in the illustration.
Disconnect each connector.
33504F
4.REMOVE SHIFT LEVER KNOB SUB-ASSEMBLY (for CVT)
33504F
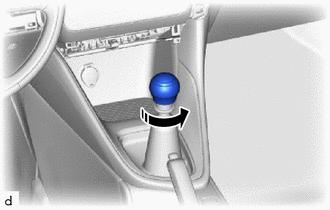
5.REMOVE SHIFT LEVER KNOB SUB-ASSEMBLY (for Manual Transaxle)
|
|
Remove in this Direction |
Turn the shift lever knob sub-assembly as shown in the illustration and remove it.
33554
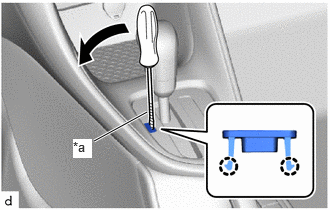
6.REMOVE SHIFT LEVER CAP (for CVT)
| *a | Protective Tape |
Using a screwdriver with its tip wrapped in protective tape, disengage the 2 claws to remove the shift lever cap from the position indicator housing.
- NOTICE:
- ·
When removing the shift lever cap, if the screwdriver is lowered in the direction opposite to the one shown in the illustration, the cap could be damaged as a result.
·Be careful not to damage the shift lever cap and position indicator housing.
|
|
Protective Tape |
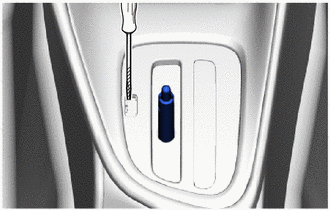
Using a screwdriver with its tip wrapped in protective tape, push the shift lock release button to move the shift lever to N.
- NOTICE:
-
Be careful not to damage the floor shift lever assembly.
58802E
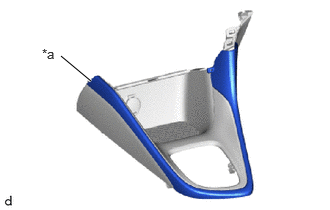
7.REMOVE FRONT CONSOLE BOX SUB-ASSEMBLY
- NOTICE:
-
 0.635,0.583 0.948,0.844 true 0.438,0.479 0.75,0.677 0.313,0.198 10 false *a
*a Portion A
-
To avoid damaging the front console box sub-assembly, do not attempt to remove the front console box sub-assembly while your hands are only holding portion A in the illustration.
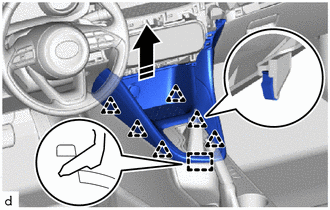
|
|
Remove in this Direction |
Disengage the clips and guide so that the front console box sub-assembly is lifted up as shown in the illustration.
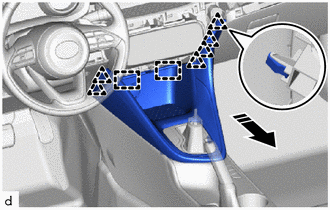
|
|
Remove in this Direction |
Disengage the clips and guides to remove the front console box sub-assembly as shown in the illustration.
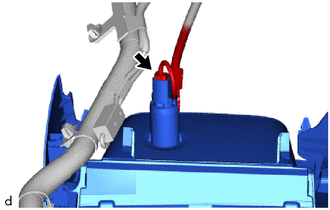
Disconnect the connector.
8.REMOVE NO. 1 BOX SIDE PANEL (for TMC Made)
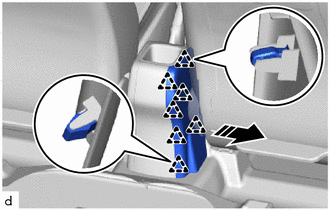
|
|
Remove in this Direction |
Disengage the clips to remove the No. 1 box side panel as shown in the illustration.
58912C
9.REMOVE NO. 2 BOX SIDE PANEL (for TMC Made)
- HINT:
-
Use the same procedure as for the No. 1 side.
58903A
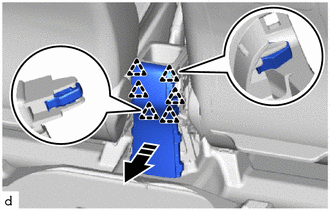
10.REMOVE CONSOLE REAR END PANEL SUB-ASSEMBLY (for TMC Made)
|
|
Remove in this Direction |
Disengage the clips to remove the console rear end panel sub-assembly as shown in the illustration.
58857A
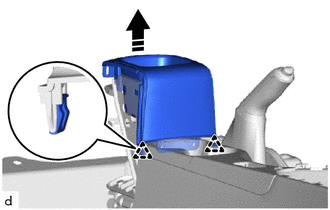
11.REMOVE UPPER NO. 1 CONSOLE SUPPORT BRACKET (for TMC Made)
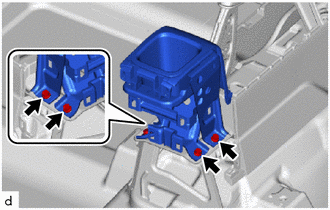
Remove the 4 bolts.
|
|
Remove in this Direction |
Disengage the clips to remove the upper No. 1 console support bracket with console box front cover as shown in the illustration.
58818A
12.REMOVE CONSOLE BOX FRONT COVER (for TMC Made)
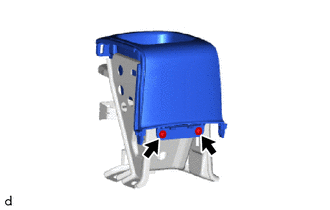
Remove the 2 screws.
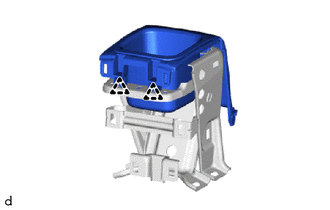
Disengage the clips to remove the console box front cover.
58903A
13.REMOVE CONSOLE REAR END PANEL SUB-ASSEMBLY (for Gasoline Model TMMF Made)
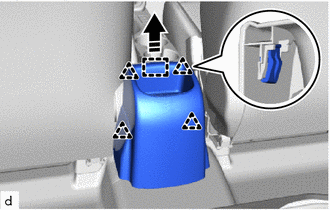
Disengage the clips and guide to remove the console rear end panel sub-assembly.
58911A
14.REMOVE NO. 1 BOX SIDE PANEL (for HV Model TMMF Made)
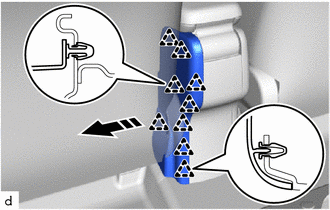
Disengage the 9 clips to remove the No. 2 box side panel as shown in the illustration.
58912C
15.REMOVE NO. 2 BOX SIDE PANEL (for HV Model TMMF Made)
- HINT:
-
Use the same procedure as for the No. 1 side.
58857A
16.REMOVE UPPER NO. 1 CONSOLE SUPPORT BRACKET (for HV Model TMMF Made)
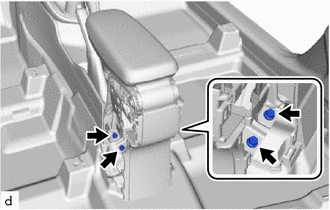
Remove the 4 bolts.
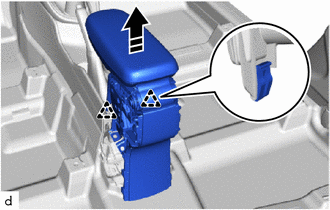
Disengage the 2 clips to remove the upper No. 1 console support bracket as shown in the illustration.
58822A
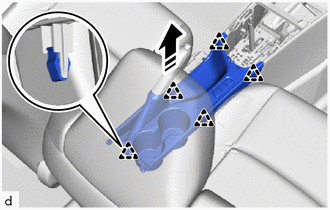
17.REMOVE REAR UPPER CONSOLE PANEL
|
|
Remove in this Direction |
Disengage the clips to remove the rear upper console panel as shown in the illustration.
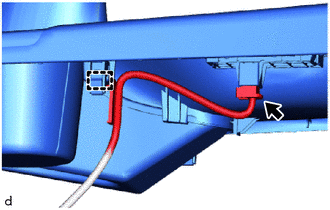
Disconnect the connector.
Disengage the clamp.
58910C
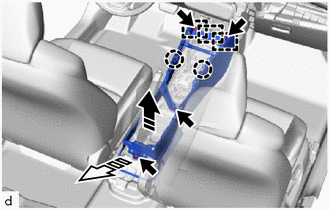
18.REMOVE REAR CONSOLE BOX ASSEMBLY
|
|
Remove in this Direction (1) |

|
Remove in this Direction (2) |
Remove the 2 screws.
Remove the 2 bolts.
Disengage the guides and claws to remove the rear console box assembly as shown in the illustration.