EXTERIOR PANELS / TRIM ROOF DRIP SIDE FINISH MOULDING REMOVAL
CAUTION / NOTICE / HINT
- HINT:
- ·
Use the same procedure for the RH side and LH side.
·The following procedure is for the LH side.
PROCEDURE

 75552
1.REMOVE ROOF DRIP SIDE FINISH MOULDING (for 5 Door)
w/o Glass Roof:
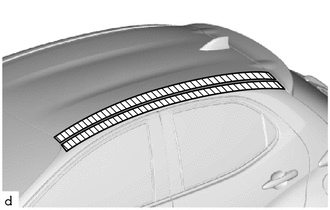

|
Protective Tape |
Apply protective tape around the roof drip side finish moulding.
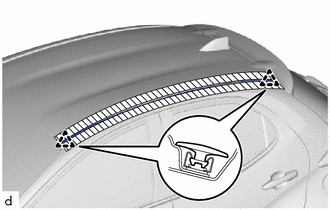
Disengage the clips to remove the roof drip side finish moulding.
- NOTICE:
- ·
Do not remove the No. 1 roof drip side finish moulding clips.
·If a No. 1 roof drip side finish moulding clip is damaged or falls off, replace it with a new one.
75552
2.REMOVE ROOF DRIP SIDE FINISH MOULDING (for 5 Door)
w/ Glass Roof:
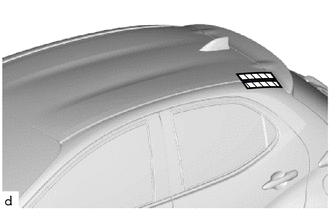
|
|
Protective Tape |
Apply protective tape around the roof drip side finish moulding.
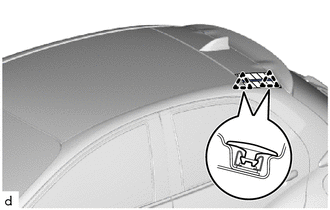
Disengage the clips to remove the roof drip side finish moulding.
- NOTICE:
- ·
Do not remove the No. 1 roof drip side finish moulding clips.
·If a No. 1 roof drip side finish moulding clip is damaged or falls off, replace it with a new one.
75552H
3.REMOVE ROOF DRIP SIDE MOULDING (for 3 Door)
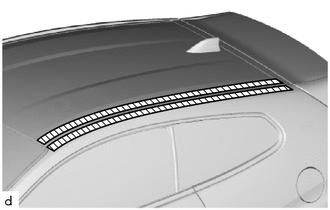
Apply protective tape around the roof drip side moulding.
for 1-clip Type:
Disengage the clip.
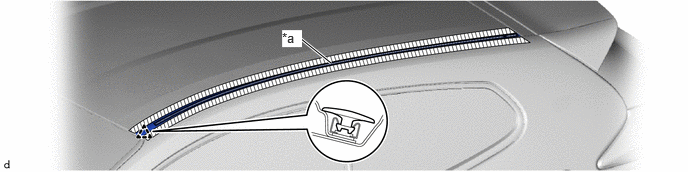
| *a | Double-sided Tape | - | - |
Separate the double-sided tape to remove the roof drip side moulding.
- NOTICE:
- ·
Do not remove the No. 1 roof drip side finish moulding clip.
·If a No. 1 roof drip side finish moulding clip is damaged falls off, replace it with a new one.
for 2-clip Type:
Disengage the clips.
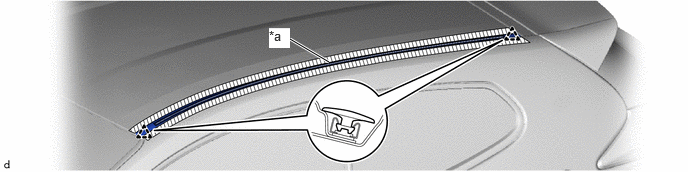
| *a | Double-sided Tape | - | - |
Separate the double-sided tape to remove the roof drip side moulding.
- NOTICE:
- ·
Do not remove the No. 1 roof drip side finish moulding clips.
·If a No. 1 roof drip side finish moulding clip is damaged falls off, replace it with a new one.