DOOR / HATCH FRONT DOOR OPENING TRIM WEATHERSTRIP(for 3 Door) INSTALLATION
CAUTION / NOTICE / HINT
- HINT:
- ·
Use the same procedure for the LH side and RH side.
·The following procedure is for the LH side.
PROCEDURE

 62312B
1.INSTALL FRONT DOOR OPENING TRIM WEATHERSTRIP
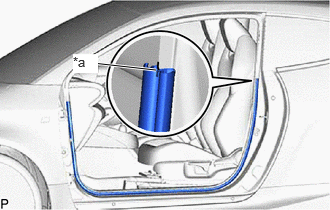
| *a | Reference Cutout of the Body |
Align the edge of the front door opening trim weatherstrip with the reference cutout of the body, and install the front door opening trim weatherstrip.
- NOTICE:
-
After installation, check that the corners fit correctly.
62362
2.INSTALL FRONT ROOF SIDE RAIL WEATHERSTRIP RETAINER
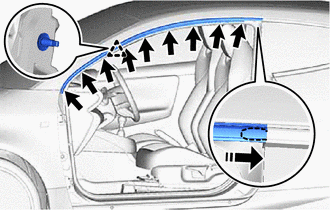

|
Install in this Direction |
Insert the front roof side rail weatherstrip retainer into the clip portion of the quaeter window assembly as shown in the illustration.
Engage the clip to install the front roof side rail weatherstrip retainer.
Install the 9 screws in order from the rear of the vehicle.
62382B
3.INSTALL ROOF SIDE RAIL WEATHERSTRIP
- HINT:
-
When installing the name plates, heat the vehicle body and roof side rail weatherstrip using a heat light.
| Item | Temperature |
|---|---|
| Vehicle Body | 40 to 60°C (104 to 140°F) |
| Roof Side Rail Weatherstrip | 20 to 30°C (68 to 86°F) |
- CAUTION:
-
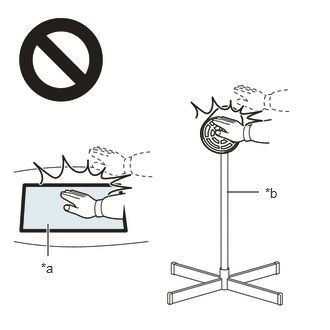 2.365,2 2.698,2 false 0.5,2.333 0.5,2.667 true 0.427,2.708 0.74,2.865 0.313,0.156 10 false *a 2.76,1.927 3.073,2.083 0.313,0.156 10 false *b
*a Heated Part *b Heat Light
- ·
Do not touch the heat light and heated parts, touching the heat light may result in burns.
·Touching heated parts for a long time may result in burns.
- NOTICE:
-
Do not heat the vehicle body or roof side rail weatherstrip excessively.
Clean the vehicle body surface.
Using a heat light, heat the vehicle body surface.
Remove any remaining double-sided tape from the vehicle body.
Wipe off any tape adhesive residue with cleaner.
Using a heat light, heat the vehicle body and roof side rail weatherstrip.
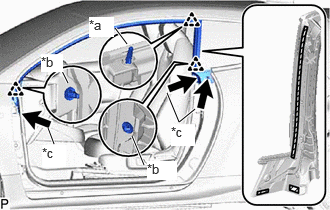
| *a | Clip (A) |
| *b | Clip (B) |
| *c | Clip (C) |

|
Double-sided Tape |
Engage the clip (A).
Engage the clips (B).
Remove the release paper from a new roof side rail weatherstrip.
- HINT:
-
After removing the release paper, keep the exposed adhesive free from foreign matter.
Install the roof side rail weatherstrip wiht the 3 clips (C).
62112
4.INSTALL COWL SIDE TRIM BOARD
67914B
5.INSTALL FRONT DOOR SCUFF PLATE