AXLE AND DIFFERENTIAL REAR DIFFERENTIAL CARRIER ASSEMBLY DISASSEMBLY
CAUTION / NOTICE / HINT
- NOTICE:
- ·
Before installation, thoroughly clean and dry each part and then apply Toyota Genuine Differential gear oil LX SAE 75W-85 GL-5 or equivalent to them.
·Do not use alkaline cleaner for aluminum or rubber parts and rear differential case bolts.
·Do not clean rubber parts such as oil seals with non-residue solvent.
·Use an overhaul stand as necessary.
PROCEDURE

 1.SEPARATE ELECTRO MAGNETIC CONTROL COUPLING WIRE HARNESS
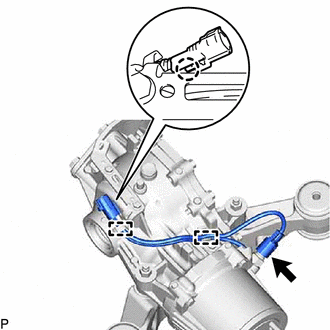
Disengage the claw.
Disconnect the temperature sensor connector.
Disengage the 2 clamps to disconnect the electro magnetic control coupling wire harness from the rear differential carrier assembly.
- NOTICE:
-
Do not damage the electro magnetic control coupling wire harness.
2.REMOVE CONNECTOR BRACKET
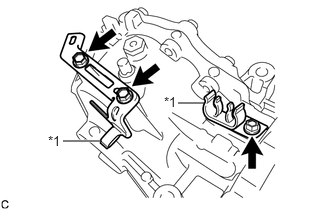
| *1 | Clamp |
Remove the 3 bolts and 2 connector brackets from the rear differential carrier assembly.
Remove the 2 clamps from the 2 connector brackets.
3.REMOVE STUD BOLT
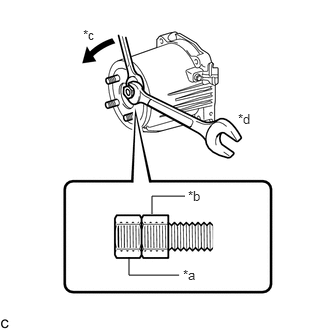
| *a | Upper Nut |
| *b | Lower Nut |
| *c | Turn |
| *d | Hold |
Install 2 service nuts to the stud bolt.
- Recommended Service Nut:
- Thread Diameter:
10 mm (0.394 in.)
- Thread Pitch:
1.0 mm (0.0394 in.)
Turn the lower nut and remove the other 3 stud bolts in the same way.
- NOTICE:
-
Prevent foreign matter from entering the electro magnetic control coupling sub-assembly.
- HINT:
- ·
Lock the lower nut using the upper nut.
·If the threads of the electro magnetic control coupling sub-assembly are damaged while removing the stud bolt, replace the electro magnetic control coupling sub-assembly with a new one.
41110H
4.REMOVE REAR DIFFERENTIAL FILLER PLUG
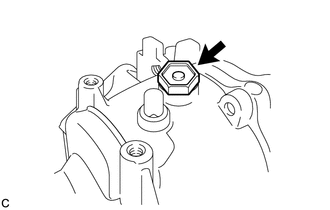
Remove the rear differential filler plug and gasket.
41108C
5.REMOVE REAR DIFFERENTIAL CARRIER COVER BREATHER PLUG
Using a chisel and hammer, lift the rear differential carrier cover breather plug slightly.
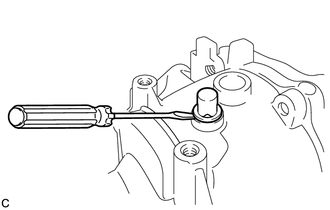
Using a screwdriver, remove the rear differential carrier cover breather plug.
6.INSPECT RUNOUT OF ELECTRO MAGNETIC CONTROL COUPLING SUB-ASSEMBLY
w/ LSD:
Install a dial indicator and magnetic base perpendicular to the inner side of the electro magnetic control coupling sub-assembly as shown in the illustration.
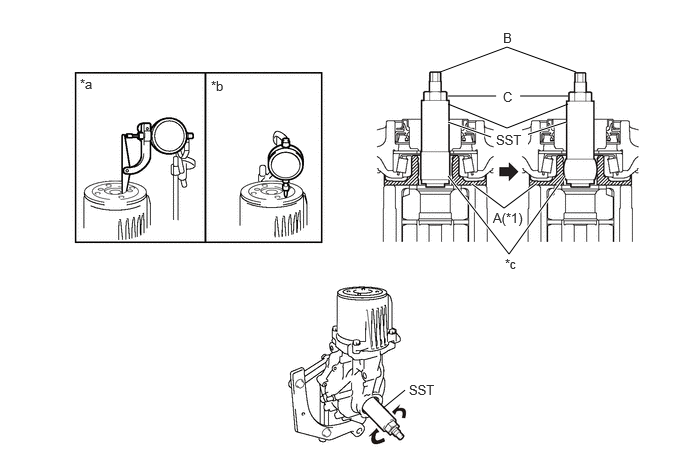
| *1 | Rear Differential Case Assembly | - | - |
| *a | Vertical Runout | *b | Lateral Runout |
| *c | Urethane | - | - |
Insert the urethane portion of SST until it reaches portion A shown in the illustration.
- SST
- 09564-52020
Hold the B portion of SST and rotate the C portion, and continue expanding until the urethane portion of SST contacts the rear differential case assembly.
- HINT:
-
If the urethane portion does not contact the rear differential case assembly, the rotation of SST and the rear differential case assembly will not be synchronized, and accurate measurement will be impossible.
Using SST, rotate the electro magnetic control coupling sub-assembly forward and backward, and measure the vertical runout.
- SST
- 09564-52020
- Maximum Runout:
0.06 mm (0.00236 in.)
If the runout is greater than the maximum value, replace the electro magnetic control coupling sub-assembly.
Install a dial indicator and magnetic base perpendicular to the electro magnetic control coupling sub-assembly as shown in the illustration.
Using SST, rotate the electro magnetic control coupling sub-assembly forward and backward, and measure the lateral runout.
- SST
- 09564-52020
- Maximum Runout:
0.07 mm (0.00276 in.)
If the runout is greater than the maximum value, replace the electro magnetic control coupling sub-assembly.
w/o LSD:
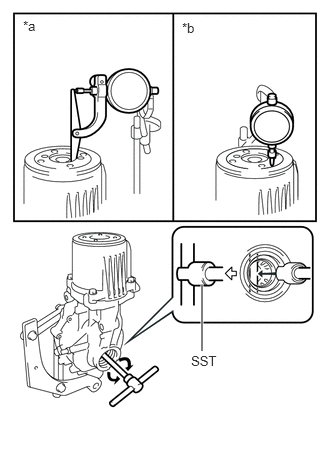
| *a | Vertical Runout |
| *b | Lateral Runout |
Install a dial indicator and magnetic base perpendicular to the inner side of the electro magnetic control coupling sub-assembly as shown in the illustration.
Using SST, rotate the electro magnetic control coupling sub-assembly forward and backward, and measure the vertical runout.
- SST
- 09564-32011
- Maximum Runout:
0.06 mm (0.00236 in.)
If the runout is greater than the maximum value, replace the electro magnetic control coupling sub-assembly.
Install a dial indicator and magnetic base perpendicular to the electro magnetic control coupling sub-assembly as shown in the illustration.
Using SST, rotate the electro magnetic control coupling sub-assembly forward and backward, and measure the lateral runout.
- SST
- 09564-32011
- Maximum Runout:
0.07 mm (0.00276 in.)
If the runout is greater than the maximum value, replace the electro magnetic control coupling sub-assembly.
7.REMOVE ELECTRO MAGNETIC CONTROL COUPLING SUB-ASSEMBLY
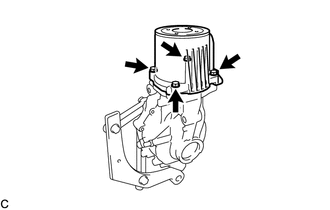
Remove the 4 bolts.
Using a brass bar and a hammer, lightly tap the electro magnetic control coupling sub-assembly to remove it from the rear differential carrier assembly.
- NOTICE:
- ·
Set the brass bar on the ribbed part of the electro magnetic control coupling sub-assembly.
·Do not damage the contact surface.
- HINT:
-
Temporarily install 2 bolts by approximately 5 or 6 threads to prevent the electro magnetic control coupling sub-assembly from falling.
8.REMOVE REAR DIFFERENTIAL DUST DEFLECTOR
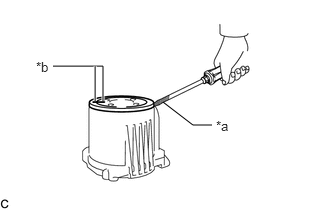
| *a | Protective Tape |
| *b | Matchmark |
Put matchmarks on the rear differential dust deflector and electro magnetic control coupling sub-assembly.
Using a screwdriver, remove the rear differential dust deflector.
- NOTICE:
- ·
Pry around the circumference of the rear differential dust deflector uniformly to prevent deformation.
·Do not damage the end surface of the electro magnetic control coupling sub-assembly.
- HINT:
- ·
Tape the screwdriver tip before use.
·If the end surface of the electro magnetic control coupling sub-assembly is damaged while removing the rear differential dust deflector, replace the electro magnetic control coupling sub-assembly with a new one.
41330E
9.REMOVE TRANSMISSION COUPLING CONICAL SPRING WASHER
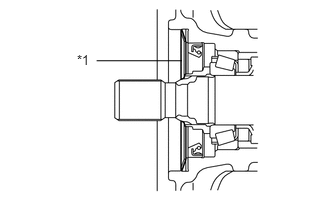
| *1 | Transmission Coupling Conical Spring Washer |
Remove the transmission coupling conical spring washer from the rear differential carrier assembly.
41330H
10.REMOVE TRANSMISSION COUPLING SPACER
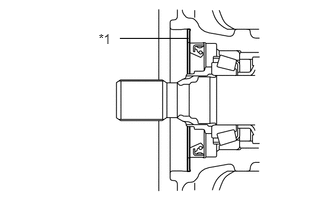
| *1 | Transmission Coupling Spacer |
Remove the transmission coupling spacer from the rear differential carrier assembly.
11.INSPECT DIFFERENTIAL RING GEAR BACKLASH
w/ LSD:
Insert a dial indicator and magnetic base through the rear differential filler plug hole, and set it perpendicular to a differential ring gear tooth tip.
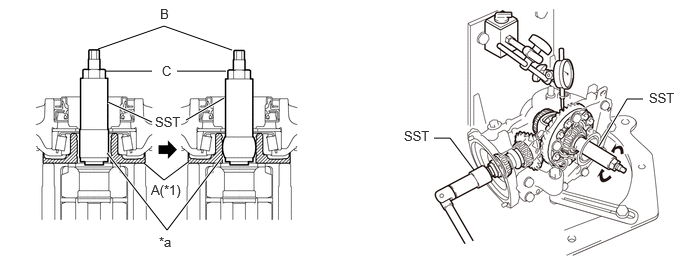
| *1 | Rear Differential Case Assembly | - | - |
| *a | Urethane | - | - |
Using SST, hold the differential drive pinion in place.
- SST
- 09556-16011
Insert the urethane portion of SST until it reaches portion A shown in the illustration.
- SST
- 09564-52020
Hold the B portion of SST and rotate the C portion, and continue expanding until the urethane portion of SST contacts the rear differential case assembly.
- HINT:
-
If the urethane portion does not contact the rear differential case assembly, the rotation of SST and the rear differential case assembly will not be synchronized, and accurate measurement will be impossible.
Using SST, rotate the rear differential case assembly forward and backward, and measure the backlash.
- SST
- 09564-52020
- Backlash:
0.13 to 0.25 mm (0.00512 to 0.00984 in.)
If the backlash is not within the specification, adjust the side bearing preload or repair as necessary.
- HINT:
-
Measure at 3 or more areas on the circumference of the differential ring gear.
w/o LSD:
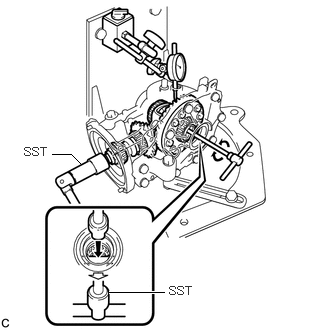
Insert a dial indicator and magnetic base through the rear differential filler plug hole, and set it perpendicular to a differential ring gear tooth tip.
Using SST, hold the differential drive pinion in place.
- SST
- 09556-16011
Using SST, rotate the rear differential case assembly forward and backward, and measure the backlash.
- SST
- 09564-32011
- Backlash:
0.13 to 0.25 mm (0.00512 to 0.00984 in.)
If the backlash is not within the specification, adjust the side bearing preload or repair as necessary.
- HINT:
-
Measure at 3 or more areas on the circumference of the differential ring gear.
12.INSPECT DIFFERENTIAL DRIVE PINION PRELOAD
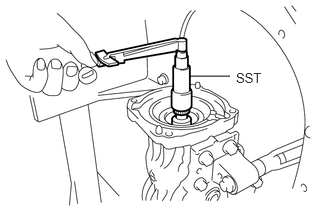
Using SST and a torque wrench, inspect the differential drive pinion preload (starting torque) of the backlash between the differential drive pinion and differential ring gear.
- SST
- 09556-16011
- Standard Drive Pinion Preload:
1.51 to 2.52 N*m (16 to 25 kgf*cm, 14 to 22 in.*lbf)
If the differential drive pinion preload is not within the specified range, adjust the differential drive pinion preload or repair as necessary.
- HINT:
-
For a more accurate measurement, rotate the rear differential case bearing forward and backward before measuring.
13.INSPECT TOTAL PRELOAD
Using SST and a torque wrench, inspect the total preload (starting torque) with the teeth of the differential drive pinion and differential ring gear in contact.
- SST
- 09556-16011
- Standard Total Preload:
2.80 to 5.34 N*m (29 to 54 kgf*cm, 25 to 47 in.*lbf)
If the total preload is not within the specified range, adjust the total preload or repair as necessary.
- HINT:
-
For a more accurate measurement, rotate the rear differential case bearing forward and backward before measuring.
14.REMOVE REAR DRIVE SHAFT OIL SEAL LH
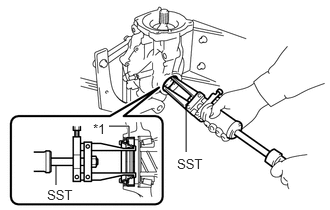
| *1 | Rear Drive Shaft Oil Seal LH |
Using SST, remove the rear drive shaft oil seal LH from the rear differential carrier assembly.
- SST
- 09308-00010
15.REMOVE REAR DRIVE SHAFT OIL SEAL RH
- HINT:
-
Use the same procedure for the RH side and LH side.
41410D
16.REMOVE DIAPHRAGM OIL SEAL
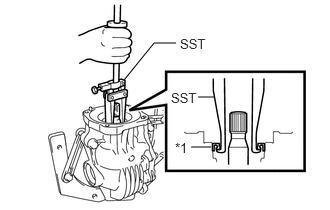
| *1 | Diaphragm Oil Seal |
Using SST, remove the diaphragm oil seal from the rear differential carrier assembly.
- SST
- 09308-00010
41204B
17.REMOVE REAR DRIVE PINION NUT
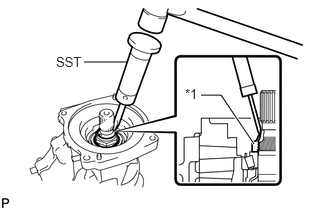
| *1 | Rear Drive Pinion Nut |
Using SST and a hammer, release the staked part of the rear drive pinion nut.
- SST
- 09930-00010
- NOTICE:
- ·
When using SST, make sure that the flat portion is on the differential drive pinion side.
·Do not modify the SST tip with a grinder or equivalent.
·Loosen the staked part of the rear drive pinion nut completely, otherwise the threads of the differential drive pinion may be damaged.
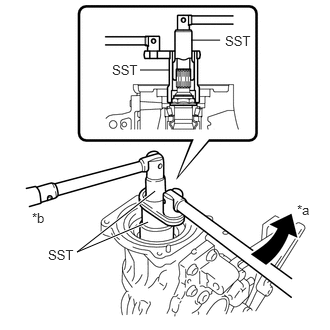
| *a | Turn |
| *b | Hold |
Using SST, hold the differential drive pinion in place and remove the rear drive pinion nut from the differential drive pinion.
- SST
- 09556-16011
09564-16020
41201B
18.REMOVE REAR DRIVE PINION FRONT BEARING
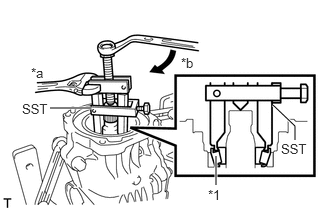
| *1 | Rear Drive Pinion Front Tapered Roller Bearing (Inner Race) |
| *a | Hold |
| *b | Turn |
Using SST, remove the rear drive pinion front tapered roller bearing (inner race) from the differential drive pinion.
- SST
- 09556-40010
19.REMOVE DIFFERENTIAL SIDE BEARING RETAINER
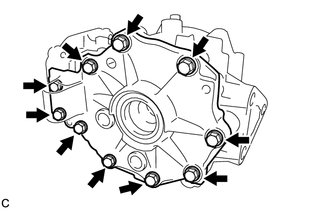
Remove the 10 bolts from the rear differential carrier.
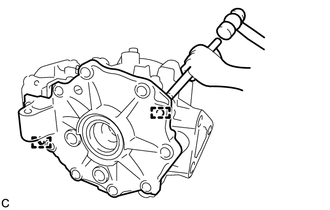
Using a brass bar and a hammer, disengage the 2 pins and remove the differential side bearing retainer from the rear differential carrier.
- NOTICE:
- ·
Set the brass bar on the ribbed part of the differential side bearing retainer.
·Do not damage the contact surface.
- HINT:
-
Temporarily install 2 bolts by approximately 5 or 6 threads to prevent the differential side bearing retainer from falling.
20.REMOVE REAR DIFFERENTIAL CASE ASSEMBLY
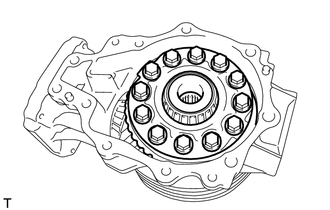
Remove the rear differential case assembly from the rear differential carrier.
21.REMOVE DIFFERENTIAL DRIVE PINION
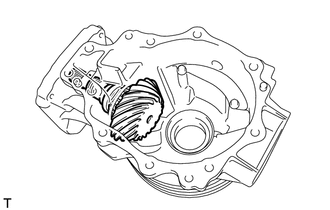
Remove the differential drive pinion from the rear differential carrier.
41214
22.REMOVE REAR DIFFERENTIAL DRIVE PINION OIL SLINGER
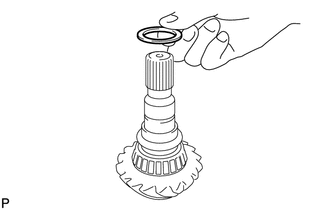
Remove the rear differential drive pinion oil slinger from the differential drive pinion.
41231
23.REMOVE REAR DIFFERENTIAL DRIVE PINION BEARING SPACER
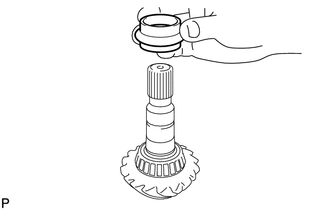
Remove the rear differential drive pinion bearing spacer from the differential drive pinion.
41201A
24.REMOVE REAR DRIVE PINION REAR BEARING
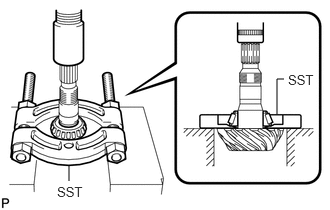
Using SST and a press, press out the rear drive pinion rear tapered roller bearing (inner race) from the differential drive pinion.
- SST
- 09950-00020
- NOTICE:
-
Do not drop the differential drive pinion.
- HINT:
-
If the differential driver pinion or differential ring gear is damaged, replace them both.
Remove the rear differential drive pinion plate washer.
41201B
25.REMOVE REAR DRIVE PINION FRONT BEARING
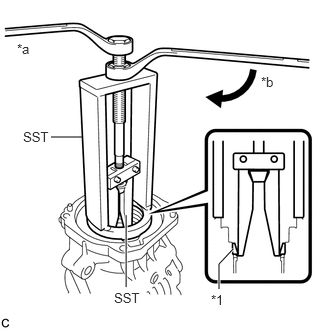
| *1 | Rear Drive Pinion Front Tapered Roller Bearing (Outer Race) |
| *a | Hold |
| *b | Turn |
Using SST, remove the rear drive pinion front tapered roller bearing (outer race) from the rear differential carrier.
- SST
- 09387-00041 (09387-01030, 09387-01041)
09387-02020
41201A
26.REMOVE REAR DRIVE PINION REAR BEARING
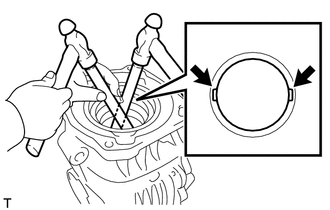
Using a brass bar and a hammer, lightly and uniformly tap out the rear drive pinion rear tapered roller bearing (outer race) from the rear differential carrier.
- NOTICE:
-
Set the brass bar on the notch.
41301A
27.REMOVE REAR DIFFERENTIAL CASE BEARING (for LH Side)
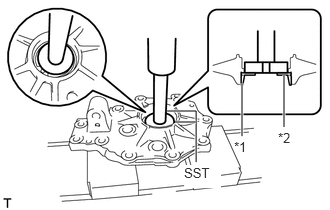
| *1 | Rear Differential Case Bearing (Outer Race) |
| *2 | Rear Differential Side Gear Shaft Plate Washer |
Using SST and a press, remove the rear differential case bearing (LH side outer race) and rear differential side gear shaft plate washer from the differential side bearing retainer.
- SST
- 09950-60011 (09951-00540)
09950-70010 (09951-07100)
41301A
28.REMOVE REAR DIFFERENTIAL CASE BEARING (for RH Side)
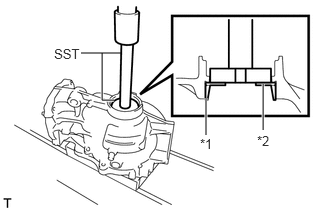
| *1 | Rear Differential Case Bearing (Outer Race) |
| *2 | Rear Differential Side Gear Shaft Plate Washer |
Using SST and a press, remove the rear differential case bearing (RH side outer race) and rear differential side gear shaft plate washer from the rear differential carrier.
- SST
- 09950-60011 (09951-00590)
09950-70010 (09951-07100)
41301A
29.REMOVE REAR DIFFERENTIAL CASE BEARING (for LH Side)
- HINT:
-
Perform this step only when replacing the rear differential case bearing or rear differential case sub-assembly.
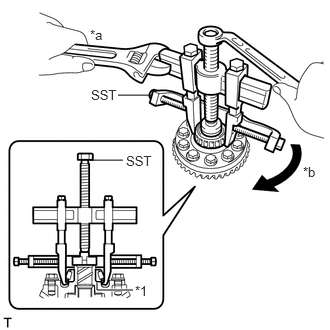
| *1 | Rear Differential Case Bearing (LH Side Inner Race) |
| *a | Hold |
| *b | Turn |
Using SST, remove the rear differential case bearing (LH side inner race) from the rear differential case sub-assembly.
- SST
- 09950-40011 (09951-04020, 09952-04010, 09953-04020, 09954-04010, 09955-04011, 09957-04010, 09958-04011)
09950-60011 (09951-00340)
- NOTICE:
-
Before using the SST center bolt (09953-04020), apply grease to its threads and tip.
- HINT:
- ·
If the race remains on the rear differential case sub-assembly, repeat the step above to remove the race.
·If the rear differential case bearing (LH side inner race) is deformed, replace it with a new one.
41301A
30.REMOVE REAR DIFFERENTIAL CASE BEARING (for RH Side)
- HINT:
-
Perform this step only when replacing the rear differential case bearing or rear differential case sub-assembly.
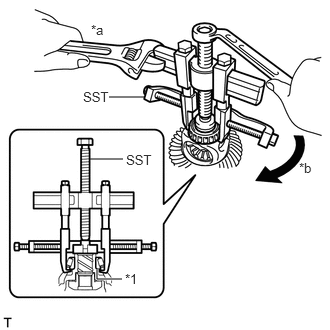
| *1 | Rear Differential Case Bearing (RH Side Inner Race) |
| *a | Hold |
| *b | Turn |
Using SST, remove the rear differential case bearing (RH side inner race) from the rear differential case sub-assembly.
- SST
- 09950-40011 (09951-04020, 09952-04010, 09953-04020, 09954-04010, 09955-04061, 09957-04010, 09958-04011)
09950-60011 (09951-00370)
- NOTICE:
-
Before using the SST center bolt (09953-04020), apply grease to its threads and tip.
- HINT:
- ·
If the race remains on the rear differential case sub-assembly, repeat the step above to remove the race.
·If the rear differential case bearing (RH side inner race) is deformed, replace it with a new one.
31.REMOVE DIFFERENTIAL RING GEAR
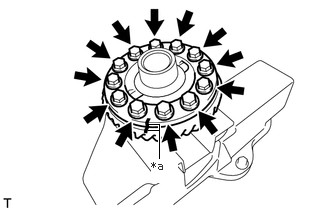
| *a | Matchmark |
Secure the rear differential case sub-assembly in a vise between aluminum plates.
- NOTICE:
-
Do not overtighten the vise.
Put matchmarks on the rear differential case sub-assembly and differential ring gear.
Remove the 12 rear differential case bolts.
Using a plastic hammer, lightly and uniformly tap the outer circumference of the differential ring gear to remove it from the rear differential case sub-assembly.
- NOTICE:
- ·
Be careful not to damage the edges of the differential ring gear.
·Do not drop the differential ring gear.
- HINT:
- ·
Place a cloth on the teeth side of the differential ring gear to prevent damage.
·If it is difficult to remove, tap the outer circumference of the differential ring gear using a brass bar and a hammer.
·If the differential drive pinion or differential ring gear is damaged, replace them both.
41183
32.REMOVE REAR DIFFERENTIAL BREATHER PLUG OIL DEFLECTOR
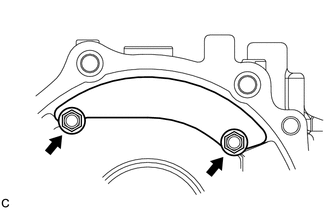
Remove the 2 bolts and rear differential breather plug oil deflector from the rear differential carrier.
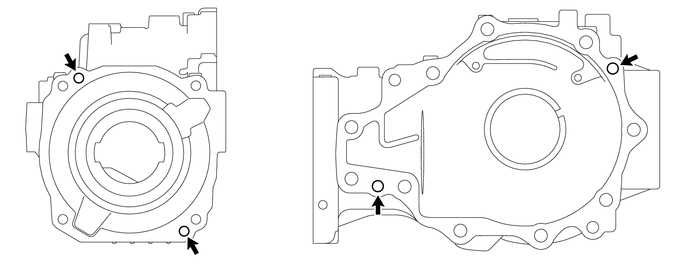
33.REMOVE STRAIGHT PIN
Remove the 4 straight pins from the rear differential carrier.
34.INSPECT DIFFERENTIAL PINION AND SIDE GEAR
Check the differential pinion gears and differential side gears for wear.
If the differential pinion gears and differential side gears are damaged, replace the rear differential case sub-assembly.
35.INSPECT DIFFERENTIAL CASE
Check the differential case for cracks or damage.
If the differential case is damaged, replace the rear differential case sub-assembly.