G16E-GTS ENGINE CONTROL MASS AIR FLOW METER ON-VEHICLE INSPECTION
PROCEDURE

 22204
1.INSPECT MASS AIR FLOW METER
Read the value of Data List item "Mass Air Flow Sensor" using the GTS.
- NOTICE:
-
Perform the inspection of the mass air flow meter while it is installed to the air cleaner cap sub-assembly (installed to the vehicle).
Vehicle is made into the following state.
Turn off all electrical loads, such as the air condition, etc.
Check that the coolant temperature is 75 °C (167 °F) or more.
Put the Shift Lever in the N position.
Start the engine.
According to the display on the GTS, read the Data List when the engine is running.
- Powertrain > Engine > Data List
-
Tester Display Mass Air Flow Sensor - 50003 372 215
According to the display on the GTS, read the Data List when the engine is running.
- Standard Condition:
GTS Display Condition Specified Condition Mass Air Flow Sensor Idling (engine warmed up) 1.5 to 4.5 gm/sec 2000 rpm (without load) 2.5 to 8.0 gm/sec 3000 rpm (without load) 4.5 to 12.0 gm/sec
If the result is not as specified, clean the mass air flow meter.
If the result is within the specified range, check the intake air temperature sensor (thermistor) resistance.
Click hereEngine / Hybrid System>G16E-GTS (ENGINE CONTROL)>MASS AIR FLOW METER>INSPECTION
22204
2.CLEAN MASS AIR FLOW METER
- NOTICE:
-
If the mass air flow meter sub-assembly is removed and installed 10 times or more, the thread of the hole of the mass air flow meter sub-assembly may be damaged. Therefore, do not loosen the screws of the mass air flow meter sub-assembly.
Remove the air cleaner cap sub-assembly.
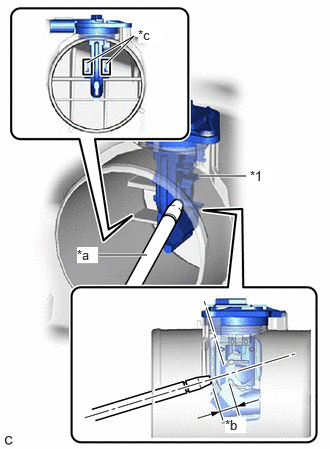
| *1 | Mass Air Flow Meter Sub-assembly |
| *a | Air Blow Gun |
| *b | 10 mm (0.394 in.) |
| *c | Airflow Hole |
Clean the mass air flow meter sub-assembly.
- NOTICE:
- ·
Do not contact the mass air flow meter sub-assembly with the nozzle of the air blow gun.
·Do not insert the nozzle of the air blow gun into the airflow hole.
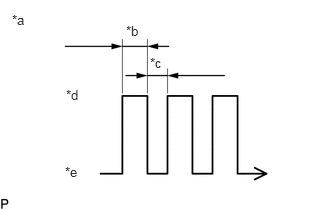
| *a | Air Blow Duration |
| *b | 3 to 6 Seconds |
| *c | 1 Second |
| *d | Air Blowing |
| *e | Air Stopped |
Using an air blow gun, clean the hole of the mass air flow meter sub-assembly by applying approximately 10 intermittent bursts of air to the airflow hole at a pressure of approximately 392 to 981 kPa (4.0 to 10.0 kgf/cm2, 57 to 142 psi).
- HINT:
-
Apply 5 intermittent bursts of air to the airflow hole at 2 locations.
Install the air cleaner cap sub-assembly.