LIGHTING (EXT) HEADLIGHT ASSEMBLY(for LED Headlight) REASSEMBLY
CAUTION / NOTICE / HINT
- NOTICE:
- ·
Handle components indoors as much as possible to prevent foreign matter from entering and adhering to headlight assembly components.
·Do not reuse parts which have reduced fastening ability due to thread damage.
·When installing components, make sure that the wire harness is not pinched or pulled.
·Do not use solvent to clean components. Only clean them with a dry cloth.
- HINT:
- ·
Use the same procedure for the RH side and LH side.
·The following procedure is for the LH side.
PROCEDURE

 1.INSTALL HEADLIGHT HOUSING SUB-ASSEMBLY
- HINT:
-
As the headlight housing sub-assembly is available as a supply part, proceed to the next step if it is necessary to change the headlight housing sub-assembly.
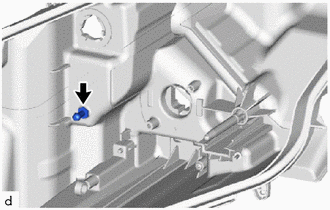
Install the pivot screw.
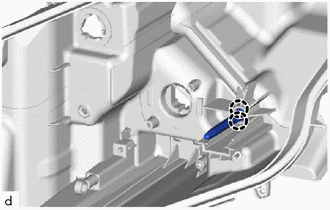
Engage the claws to install a new aiming screw.
2.INSTALL WIRE HARNESS
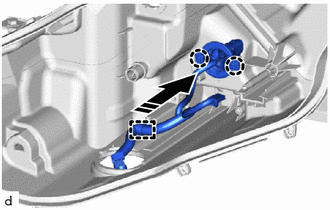

|
Install in this Direction |
Engage the claws to install the wire harness.
Engage the clamp.
81175
3.INSTALL HEADLIGHT UNIT ASSEMBLY
- NOTICE:
- ·
Make sure to wear clean rubber gloves when performing this procedure.
·Do not allow dirt or foreign matter to get on the headlight unit assembly or other components.
·Prevention of static electricity is required during this procedure.
·Use static electricity countermeasures SST (desktop anti-static mat set) and observe all precautions to prevent damage to the system by electrostatic discharge (ESD).
·Do not touch the headlight unit assembly with bare hands.
·Do not allow metallic surfaces to become dirty, as such surfaces become damaged even if they are only lightly wiped with a soft cloth.
·If there are any fingerprints or foreign matter on the headlight unit assembly or other components, wipe them off with a soft cloth.
·Do not use solvent to clean components. Only clean them with a dry cloth.
- SST
- 09890-47010 (09891-04010, 09891-04020, 09891-04030, 09891-04040)
When reusing the headlight unit assembly:
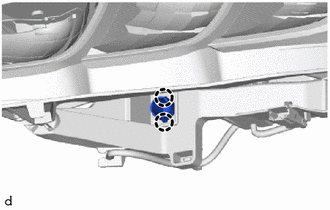
Engage the claws to install a new pivot collar.
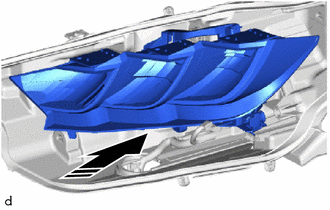
|
|
Install in this Direction |
Temporarily install the headlight unit assembly to the headlight housing sub-assembly.
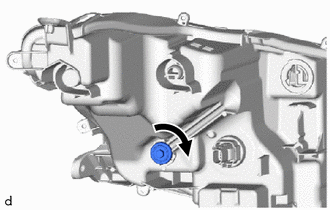
While holding the headlight unit assembly by hand, turn the aiming screw.
- HINT:
-
Turn the aiming screw the same number of times as they were turned during removal.
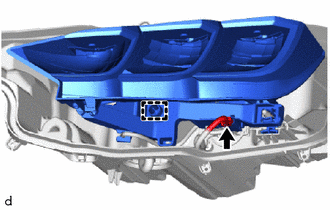
Engage the pivot collar.
Connect the connector.
85967D
4.INSTALL LIGHT CONTROL LED ECU
- NOTICE:
- ·
Make sure to wear clean rubber gloves when performing this procedure.
·Do not allow dirt or foreign matter to get on the headlight unit assembly or other components.
·Prevention of static electricity is required during this procedure.
·Use static electricity countermeasures SST (desktop anti-static mat set) and observe all precautions to prevent damage to the system by electrostatic discharge (ESD).
·Do not touch the headlight unit assembly with bare hands.
·Do not allow metallic surfaces to become dirty, as such surfaces become damaged even if they are only lightly wiped with a soft cloth.
·If there are any fingerprints or foreign matter on the headlight unit assembly or other components, wipe them off with a soft cloth.
·Do not use solvent to clean components. Only clean them with a dry cloth.
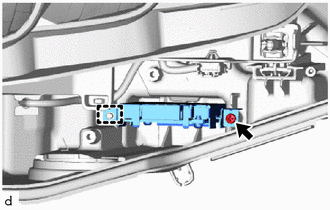
Engage the guide to install the light control LED ECU.
Install the screw.
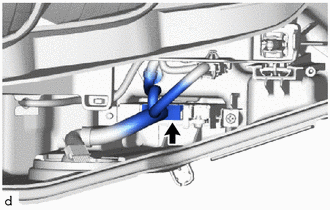
Connect the connector.
81134
5.INSTALL HEADLIGHT GASKET
- NOTICE:
- ·
The headlight gasket must not be reused.
·Make sure to wear clean rubber gloves when performing this procedure.
·Do not touch the inner surface of the lens and metallic surfaces as much as possible, or they may become dirty.
·Do not allow metallic surfaces to become dirty, as such surfaces become damaged even if they are only lightly wiped with a soft cloth.
·If there are any fingerprints or foreign matter on the headlight unit assembly or other components, wipe them off with a soft cloth.
·Do not use solvent to clean components. Only clean them with a dry cloth.
Completely remove the old headlight gasket.
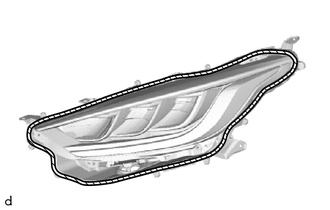

|
Cleaning Area |
Clean the installation groove of the headlight lens sub-assembly.
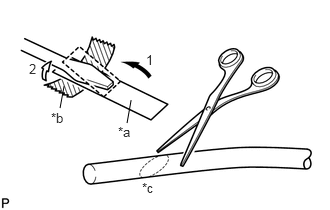
| *a | Release Paper |
| *b | Tape |
| *c | 90° |
Partially remove the release paper from a new headlight gasket, and cut off a piece of it.
Fold the release paper over the tip of a screwdriver and secure it in place with tape as indicated by the arrows, in the order shown in the illustration.
Using scissors, cut the end of the headlight gasket at a 90° angle.
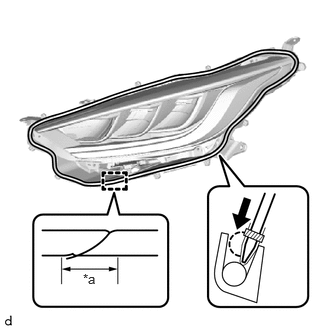
| *a | 5 to 15 mm |
Install a new headlight gasket as shown in the illustration.
Using a screwdriver with their tips wrapped in release paper, completely press the headlight gasket into the groove to install it.
8110B
6.INSTALL HEADLIGHT LENS SUB-ASSEMBLY
- NOTICE:
- ·
Make sure to wear clean rubber gloves when performing this procedure.
·Do not allow dirt or foreign matter to get on the headlight lens sub-assembly.
·Prevention of static electricity is required during this procedure.
·Use static electricity countermeasures SST (desktop anti-static mat set) and observe all precautions to prevent damage to the system by electrostatic discharge (ESD).
·Do not touch the headlight lens sub-assembly with bare hands.
·Do not touch the inner surface of the lens and metallic surfaces as much as possible, or they may become dirty.
·Do not allow metallic surfaces to become dirty, as such surfaces become damaged even if they are only lightly wiped with a soft cloth.
·If there are any fingerprints or foreign matter on the back of the headlight lens sub-assembly, wipe them off with a soft cloth.
·Do not use solvent to clean components. Only clean them with a dry cloth.
- SST
- 09890-47010 (09891-04010, 09891-04020, 09891-04030, 09891-04040)
Clean the sealing surface of the headlight lens sub-assembly.
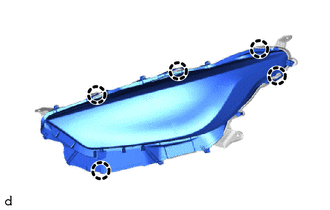
Engage the claws to install the headlight lens sub-assembly to the headlight housing sub-assembly.
- NOTICE:
-
Make sure all of the claws are engaged.
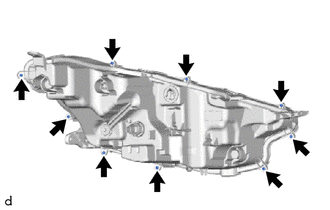
Install the 9 screws.
Check the installation condition of the headlight gasket.
- NOTICE:
-
Make sure the headlight gasket is not protruding and completely contacts the headlight lens sub-assembly.
7.INSTALL HEADLIGHT COVER
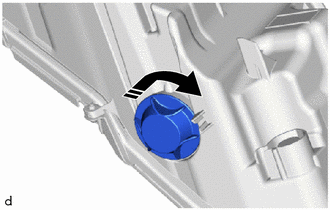
|
|
Install in this Direction |
Install the headlight cover as shown in the illustration.
85669
8.INSTALL HEADLIGHT LEVELING MOTOR BASE PACKING
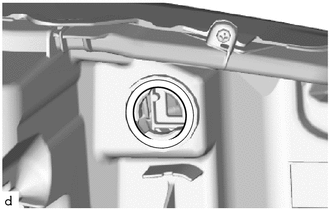
Install a new headlight leveling motor base packing.
85662
9.INSTALL HEADLIGHT LEVELING MOTOR (for TMC Made)
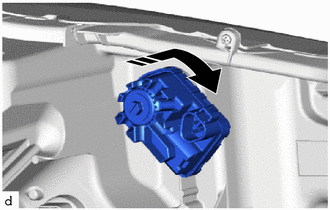
|
|
Install in this Direction |
Install the headlight leveling motor as shown in the illustration.
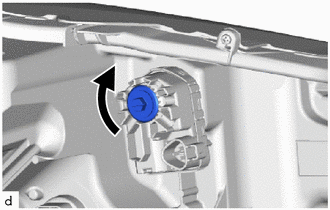
Turn the aiming screw as shown in the illustration.
- HINT:
-
Turn the aiming screw the same number of times as they were turned during removal.
85662
10.INSTALL HEADLIGHT LEVELING MOTOR (for TMMF, TMMCZ Made)
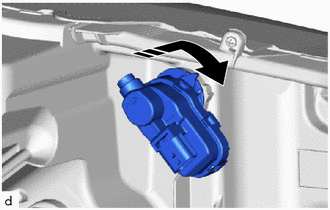
|
|
Install in this Direction |
Install the headlight leveling motor as shown in the illustration.
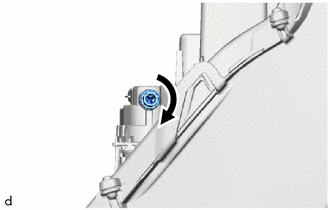
Turn the aiming screw as shown in the illustration.
- HINT:
-
Turn the aiming screw the same number of times as they were turned during removal.