INSTALLATION
Removal / installation · Vehicles built from Nov 2005
| 1. ADJUST COMPRESSOR OIL |

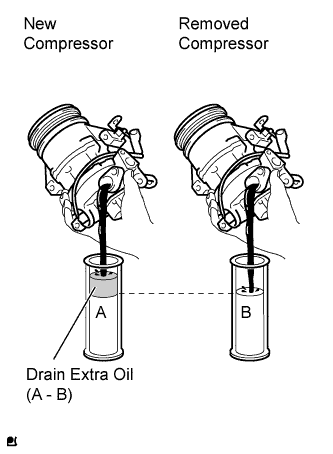  |
When replacing the compressor with a new one, gradually discharge the refrigerant gas from the service valve. Then drain the following amount of oil from the new compressor before installation, so that the amount of oil contained in it is the same as that in the compressor to be replaced.
- HINT:
- New compressors are filled with sufficient oil for the whole cycle. Therefore, it is necessary to drain residual oil from the condenser and cooling unit.
- Standard:
- (The amount of oil inside a new compressor: 60 (+15) cc (2.0 (+0.51) fl.oz.)) - (The amount of oil remaining in the removed compressor) = The amount of oil to be removed when replacing the compressor
- NOTICE:
- When checking the compressor oil level, observe the precautions for cooler removal/installation.
- If a new compressor is installed without removing the amount of oil remaining in the pipes of the vehicle, the amount of oil becomes too large. This prevents heat exchange in the refrigerant cycle and causes refrigeration failure.
- If the amount of oil remaining in the removed compressor is too low, check for oil leakage.
- Use ND-OIL8 compressor oil.
- When checking the compressor oil level, observe the precautions for cooler removal/installation.
| 2. INSTALL COMPRESSOR AND PULLEY |
Install the compressor and pulley (Previous Version).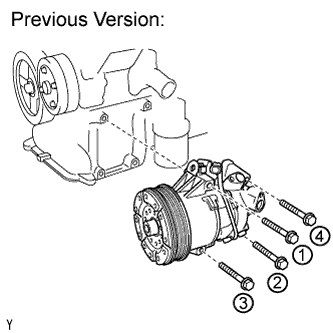
Provisionally tighten the compressor with the 4 bolts.
Tighten the compressor with the 4 bolts.
- Torque:
- 25 N*m{ 250 kgf*cm , 18 ft.*lbf }
- NOTICE:
- Tighten the bolts in the following order: 1 (provisional tightening) → 2 → 3 → 4 → 1.
Connect the connector.
Replace the compressor and pulley (Previous Version).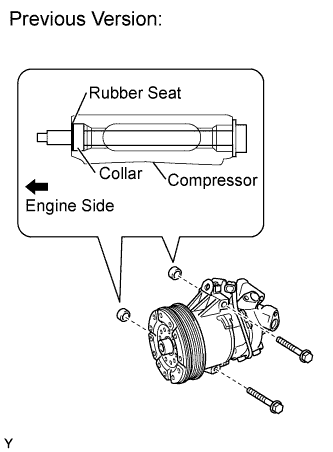
- NOTICE:
- When using the supply kit to replace the compressor, follow the procedure below.
Install the 2 collars into the 2 recesses on the compressor pulley engine side and provisionally install the bolts.
- NOTICE:
- The collars are for centering the compressor when installed. Be sure to install them to prevent the belt from making any abnormal noise.
- HINT:
- Provisionally install the rubber seats on the outer surface of the collars to prevent them from falling out.
Provisionally tighten the compressor with the 4 bolts.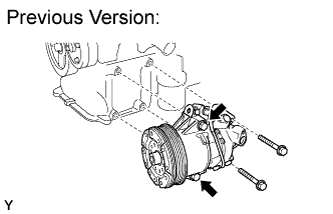
- NOTICE:
- Be careful that the collar doesn't fall off during the procedure.
Tighten the compressor with the 4 bolts.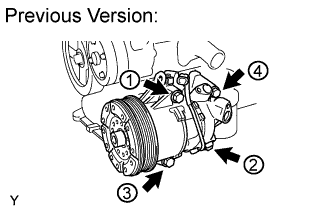
- Torque:
- 25 N*m{ 250 kgf*cm , 18 ft.*lbf }
- NOTICE:
- Tighten the bolts in the following order: 1 (provisional tightening) → 2 → 3 → 4 → 1.
Connect the connector.
Install the compressor and pulley (New Version).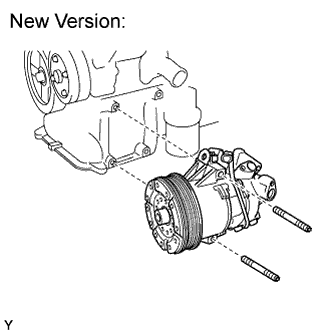
Using "TORX" socket wrench E8, install the compressor with the 2 stud bolts.
- Torque:
- 15 N*m{ 153 kgf*cm , 11 ft.*lbf }
Tighten the compressor with the 2 nuts and 2 bolts.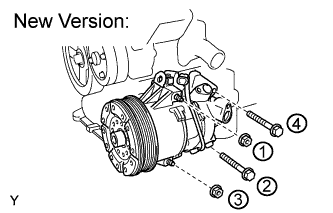
- Torque:
- 25 N*m{ 250 kgf*cm , 18 ft.*lbf }
- NOTICE:
- Tighten the bolts in the following order: 1 (provisional tightening) → 2 → 3 → 4 → 1.
Connect the connector.
| 3. INSTALL NO. 1 COOLER REFRIGERANT DISCHARGE HOSE |
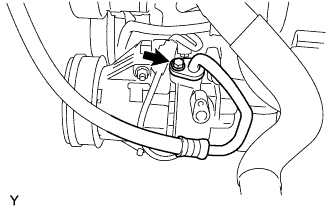 |
Remove the attached vinyl tape from the hose.
Apply sufficient compressor oil (ND-OIL8) to a new O-ring and the fitting surface of the compressor.
- Compressor oil:
- ND-OIL8 or equivalent
Install the O-ring onto the discharge hose.
Install the discharge hose onto the compressor with the bolt.
- NOTICE:
- When using the supply kit to replace the compressor, use the bolt (M6, L=25) which is included in the kit (Previous Version).
- Torque:
- 9.8 N*m{ 100 kgf*cm , 87 in.*lbf }
| 4. INSTALL NO. 1 COOLER REFRIGERANT SUCTION HOSE |
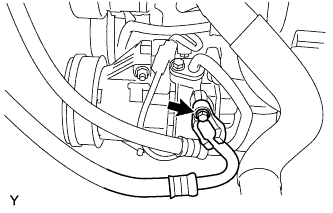 |
Remove the attached vinyl tape from the hose.
Apply sufficient compressor oil (ND-OIL8) to a new O-ring and the fitting surface of the compressor.
- Compressor oil:
- ND-OIL8 or equivalent
Install the O-ring onto the suction hose.
Install the suction hose onto the compressor with the bolt.
- NOTICE:
- When using the supply kit to replace the compressor, use the bolt (M6, L=25) which is included in the kit (Previous Version).
- Torque:
- 9.8 N*m{ 100 kgf*cm , 87 in.*lbf }
| 5. INSTALL FAN AND GENERATOR V BELT |
Temporarily install the fan and generator V belt onto each pulley.
- NOTICE:
- Before installing the V belt, check each pulley for any kind of liquid and chips.
- Before installing the V belt, check each pulley for any kind of liquid and chips.
- Check that the ribs of the V belt are correctly fitted into the grooves of the pulleys.
- Check that the ribs of the V belt are correctly fitted into the grooves of the pulleys.
| 6. ADJUST FAN AND GENERATOR V BELT |
Insert a bar between the generator and the engine. Pull the bar toward the front of the vehicle and adjust the tension.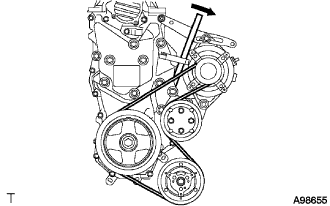
Tighten bolt A, then tighten bolt B.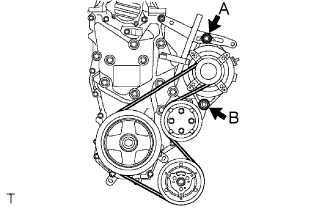
- Torque:
- Bolt A:
- 19 N*m{ 189 kgf*cm , 14 ft.*lbf }
- Bolt B:
- 32 N*m{ 326 kgf*cm , 24 ft.*lbf }
| 7. INSPECT DRIVE BELT DEFLECTION AND TENSION |
Inspect the fan and generator V belt deflection.
- Pressing force:
- 98 N (10kgf, 221 lbf)
New belt
mm (in.)
Used belt
mm (in.)
5.0 to 6.0
(0.197 to 0.236)
7.0 to 8.5
(0.276 to 0.335)
Inspection the fan and generator V belt tension.
New belt
mm (in.)
Used belt
mm (in.)
980 to 1176
(100 to 120, 220 to 264)
490 to 686
(50 to 70, 110 to 154)
- NOTICE:
- Check the V belt deflection at the specified point.
- Check the V belt deflection at the specified point.
- When installing a new belt, set its tension value as specified.
- When installing a new belt, set its tension value as specified.
- When checking a belt used for over 5 minutes, confirm that the deflection value is within the specified range for a used belt.
- When checking a belt used for over 5 minutes, confirm that the deflection value is within the specified range for a used belt.
- When reinstalling a belt used for over 5 minutes, check whether its deflection value is within the specified range for the used belt.
- When reinstalling a belt used for over 5 minutes, check whether its deflection value is within the specified range for the used belt.
- When using a belt tension gauge, confirm its accuracy first by using a master gauge.
- When using a belt tension gauge, confirm its accuracy first by using a master gauge.
| 8. INSTALL WIRE HARNESS |
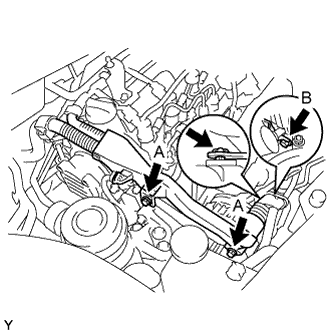 |
Install the wire harness with the 3 bolts and clip.
- Torque:
- Bolt A:
- 13 N*m{ 131 kgf*cm , 14 ft.*lbf }
- Bolt B:
- 11 N*m{ 112 kgf*cm , 8.1 ft.*lbf }
| 9. INSTALL ENGINE COVER SUB-ASSEMBLY NO. 1 |
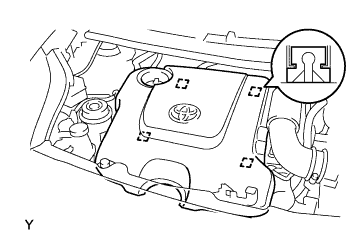 |
Engage the 4 pins and install engine cover No. 1.
| 10. INSTALL ENGINE UNDER COVER |
Provisionally install the engine under cover with the 5 bolts, 4 screws and 2 clips.
Tighten the 4 screws.
Tighten the 5 bolts.
- Torque:
- 5.0 N*m{ 51 kgf*cm , 44 in.*lbf }
| 11. CONNECT CABLE TO NEGATIVE BATTERY TERMINAL |
- Torque:
- 5.4 N*m{ 55 kgf*cm , 48 in.*lbf }
| 12. CHARGE REFRIGERANT |
- SST
- 07110-58060
(07117-58060, 07117-58070, 07117-58080, 07117-58090, 09985-02100, 09985-02120, 07117-78050, 07117-88060, 07117-88070, 07117-88080)
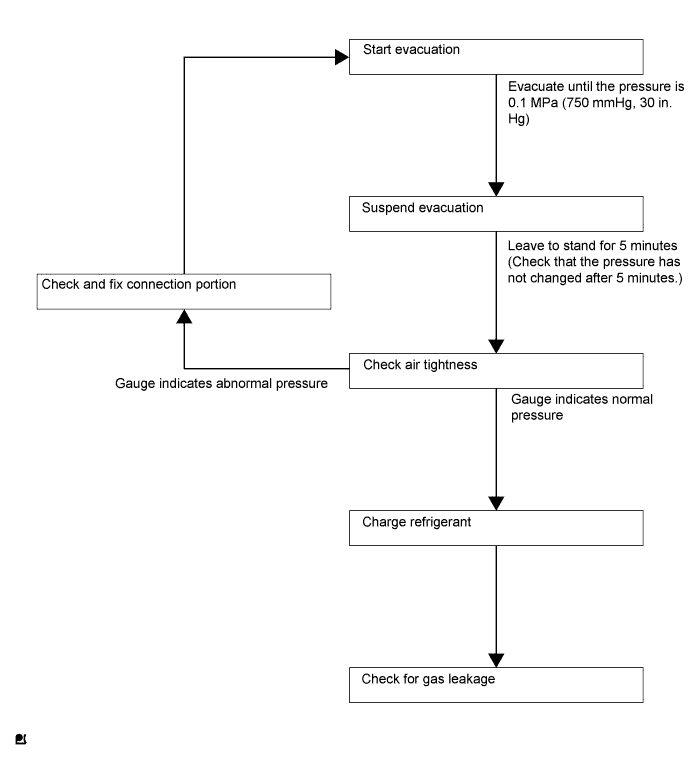
- NOTICE:
- Charge refrigerant in accordance with the equipment manual.
Perform vacuum purging using a vacuum pump.
Charge refrigerant HFC-134a (R134a).
- Standard:
- 330 to 390 g (11.64 to 13.76 oz.) w/o Fan Shroud Ventilation Duct
- 350 to 410 g (12.35 to 14.46 oz.) w/ Fan Shroud Ventilation Duct
- NOTICE:
- Do not start the engine before charging it with refrigerant as the cooler compressor doesn't work properly without sufficient refrigerant. This could cause the compressor to overheat.
- HINT:
- The relationship between the refrigerant charge amount and the pressure is as follows.
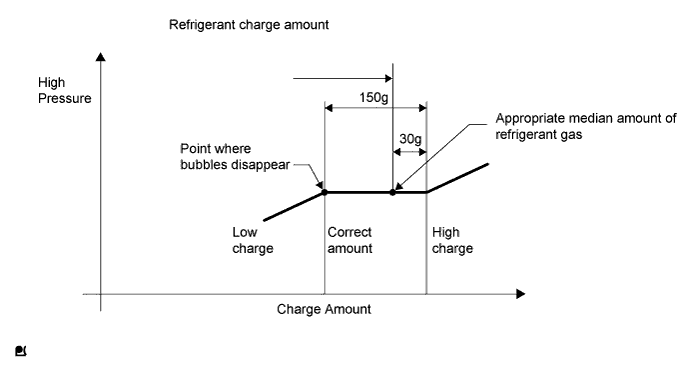
- High Charge Range:
If the refrigerant is overcharged, the pressure rises on the high-pressure side. High-pressure cut off frequently occurs. This causes insufficient cooling performance and also insufficient compressor lubrication.
- Low Charge Range:
Shortage of refrigerant causes insufficient cooling performance and low circulation of refrigerant oil, which shortens the compressor life. Operation with insufficient coolant raises the refrigerant temperature and causes heat deterioration of the rubber seals and hoses. Cracking and thus refrigerant leakage may occur.
- The relationship between the refrigerant charge amount and the pressure is as follows.
Install the caps onto the service valves on the refrigerant line.
| 13. WARM UP ENGINE |
- NOTICE:
- Warm up the engine at less than 2000 rpm for 1 minute or more after charging it with refrigerant.
| 14. CHECK FOR REFRIGERANT LEAKAGE |
After recharging the refrigerant gas, check for refrigerant gas leakage using a halogen leak detector.
Perform the operation as follows:
- Stop the engine.
- Secure good ventilation (the halogen leak detector may react to volatile gases other than refrigerant, such as evaporated gasoline or exhaust gas).
- Repeat the test 2 or 3 times.
- Make sure that some refrigerant remains in the refrigeration system.
When the compressor is off: approximately 392 to 588 kPa (4 to 6 kgf*cm2, 57 to 85 psi)
- HINT:
- It is impossible for the above pressure to be maintained if there is leakage.
- Stop the engine.
Using the halogen leak detector, check the refrigerant line, especially at the connection points, for leakage.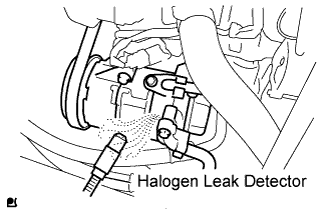
Bring the halogen leak detector close to the drain hose before performing the test.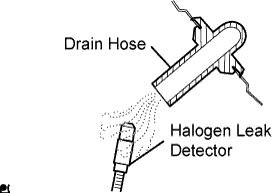
- HINT:
- After the blower motor has stopped, leave the cooling unit for at least 15 minutes.
- Place the halogen leak detector sensor under the drain hose.
- When bringing the halogen leak detector close to the drain hose, make sure that the halogen leak detector does not react to the volatile gases.
- After the blower motor has stopped, leave the cooling unit for at least 15 minutes.
If no gas leakage is detected from the drain hose, remove the blower motor from the cooling unit. Insert the halogen leak detector sensor into the unit and perform the test.
Disconnect the pressure switch connector and leave it for approximately 20 minutes. Bring the halogen leak detector close to the pressure switch and perform the test.