REASSEMBLY
Removal / installation · Vehicles built from Aug 2005
| 1. INSTALL OUTPUT SHAFT COVER |

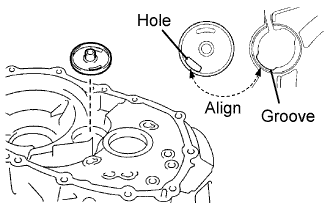  |
Install the output shaft cover, as shown in the illustration.
| 2. INSTALL OUTPUT SHAFT FRONT BEARING |
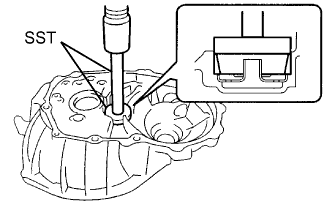 |
Using SST and a press, press in the output shaft front bearing (outer race).
- SST
- 09950-60010
(09951-00510)
09950-70010 (09951-07150)
| 3. INSTALL FRONT DIFFERENTIAL CASE FRONT TAPERED ROLLER BEARING |
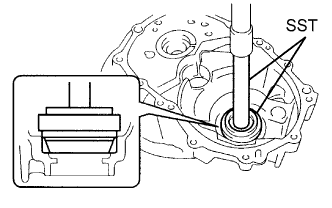 |
Using SST and a press, press in the front differential case front tapered roller bearing (outer race).
- SST
- 09350-32014
(09351-32111, 09351-32130)
| 4. INSTALL FR DIFFERENTIAL CASE REAR TAPERED ROLLER BEARING |
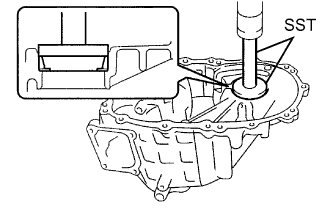 |
Install the shim onto the manual transmission case.
- HINT:
- When reusing the output shaft rear tapered roller bearing, first install a shim of the same thickness as the original.
- When installing a new output shaft rear tapered roller bearing, first select and install a shim which is thinner than the original.
Using SST and a press, press in the front differential case rear tapered roller bearing (outer race).
- SST
- 09950-60010
(09951-00620)
09950-70010 (09951-07100)
| 5. ADJUST DIFFERENTIAL SIDE BEARING PRELOAD |
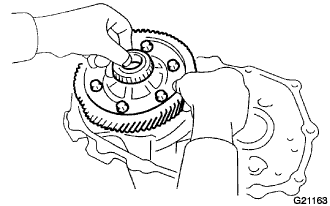 |
Coat the differential case with gear oil, and install it onto the front transaxle case.
Install the manual transmission case with the 13 bolts.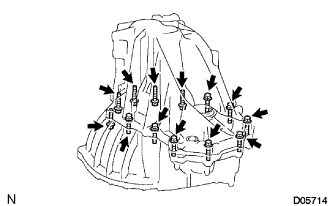
- Torque:
- 29 N*m{ 300 kgf*cm , 22 ft.*lbf }
- HINT:
- Manual transmission case side: 8 bolts
- Front transaxle case side: 5 bolts
Using SST and a torque wrench, turn the differential case right and left 2 or 3 times to allow the bearings to settle.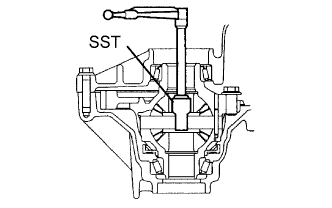
- SST
- 09564-32011
Using SST and a torque wrench, measure the starting preload.
- SST
- 09564-32011
- New bearing preload:
- 0.78 to 1.57 N*m (7.95 to 16.00 kgf*cm, 6.9 to 13.89 in.*lbf)
- Used bearing preload:
- 0.49 to 0.98 N*m (5.00 to 9.99 kgf*cm, 4.3 to 8.67 in.*lbf)
Select a new shim.
Mark
Thickness mm (in.)
Mark
Thickness mm (in.)
Mark
Thickness mm (in.)
AA
2.1 (0.0827)
HH
2.45 (0.0965)
QQ
2.80 (0.1102)
BB
2.15 (0.0847)
JJ
2.50 (0.0984)
RR
2.85 (0.1122)
CC
2.2 (0.0866)
KK
2.55 (0.1004)
SS
2.90 (0.1142)
DD
2.25 (0.0886)
LL
2.60 (0.1024)
TT
2.95 (0.1161)
EE
2.30 (0.0906)
MM
2.65 (0.1043)
UU
3.00 (0.1181)
FF
2.35 (0.0925)
NN
2.70 (0.1063)
-
-
GG
2.40 (0.0945)
PP
2.75 (0.1083)
-
-
Remove the 13 bolts and the manual transmission case from the front transaxle case.
Remove the differential case from the front transaxle case.
| 6. INSTALL OUTPUT SHAFT REAR BEARING |
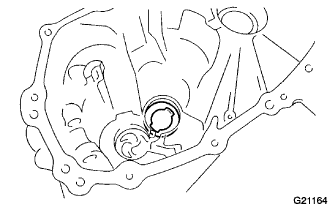 |
Install the output shaft rear bearing shim onto the manual transmission case.
- HINT:
- When reusing the output shaft rear tapered roller bearing, first install a shim of the same thickness as the original.
- When installing a new output shaft rear tapered roller bearing, first select and install a shim which is thinner than the original.
Using SST and a press, press in the output shaft rear bearing (outer race).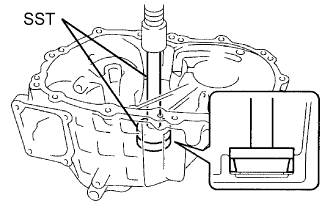
- SST
- 09950-60010
(09951-00570)
09950-70010 (09951-07200)
| 7. ADJUST OUTPUT SHAFT BEARING PRELOAD |
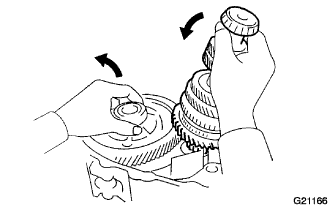 |
Install the output shaft assembly and the differential case onto the front transaxle case.
Install the manual transmission case onto the front transaxle case with the 13 bolts.
- Torque:
- 29 N*m{ 300 kgf*cm , 22 ft.*lbf }
- HINT:
- Manual transmission case side: 8 bolts
- Front transaxle case side: 5 bolts
Using SST and a torque wrench, turn the output shaft assembly and the differential case right and left 2 or 3 times to allow the bearings to settle.
- SST
- 09564-32011
Using SST and a torque wrench, measure the starting preload.
- New bearing preload:
- 3.46 to 6.91 N*m (35.3 to 70.5 kgf*cm, 30.6 to 61.2 in.*lbf) for 1KR-FE
- 3.18 to 6.35 N*m (32.4 to 64.7 kgf*cm, 28.1 to 56.2 in.*lbf) for 2SZ-FE
- Used bearing preload:
- 2.16 to 4.32 N*m (22.0 to 44.1 kgf*cm, 19.1 to 38.2 in.*lbf) for 1KR-FE
- 1.98 to 3.97 N*m (20.2 to 40.5 kgf*cm, 17.5 to 35.1 in.*lbf) for 2SZ-FE
Select a new output shaft rear bearing shim.
Mark
Thickness mm (in.)
Mark
Thickness mm (in.)
A
1.55 (0.0610)
J
1.95 (0.0768)
B
1.60 (0.0630)
K
2.00 (0.0787)
C
1.65 (0.0650)
L
2.05 (0.0807)
D
1.70 (0.0669)
M
2.10 (0.0827)
E
1.75 (0.0689)
N
2.15 (0.0846)
F
1.80 (0.0709)
P
2.20 (0.0866)
G
1.85 (0.0728)
Q
2.25 (0.0886)
H
1.90 (0.0748)
-
-
Remove the 13 bolts and the manual transmission case from the front transaxle case.
Remove the output shaft assembly from the front transaxle case.
Remove the differential case from the front transaxle case.
| 8. ADJUST INPUT SHAFT REAR BEARING SHIM |
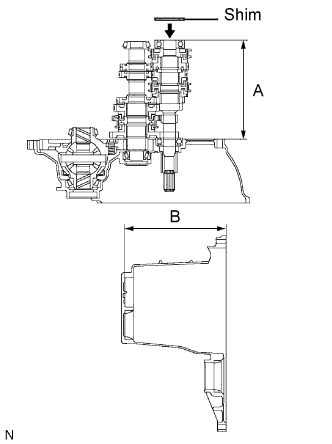 |
Using vernier calipers, accurately measure dimensions A and B.
Select an input shaft rear bearing shim that brings the value to within the specifications.
- Shim thickness:
- Shim thickness (B-A) should be more than 0 mm (0 in.) and less than 0.1 mm (0.0039 in.).
Mark
Thickness mm (in.)
Mark
Thickness mm (in.)
F
1.80 (0.0709)
N
2.15 (0.0846)
G
1.85 (0.0728)
P
2.20 (0.0866)
H
1.90 (0.0748)
Q
2.25 (0.0886)
J
1.95 (0.0768)
R
2.30 (0.0906)
K
2.00 (0.0787)
S
2.35 (0.0925)
L
2.05 (0.0807)
T
2.40 (0.0945)
M
2.10 (0.0827)
-
-
Install the input shaft rear bearing shim.
| 9. INSTALL TRANSMISSION CASE OIL SEAL |
Coat the lip of a new oil seal with MP grease.
Using SST and a hammer, install the new manual transmission case oil seal.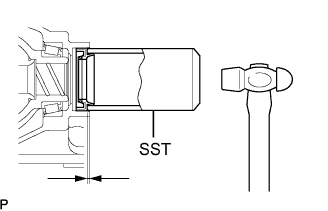
- SST
- 09316-60011
(09316-00011)
- Drive in depth:
- 2.1 to 3.1 mm (0.083 to 0.122in.)
- NOTICE:
- Do not damage the oil seal lip.
| 10. INSTALL TRANSAXLE CASE OIL SEAL |
Coat the lip of a new oil seal with MP grease.
Using SST and a hammer, install the new manual transaxle case oil seal.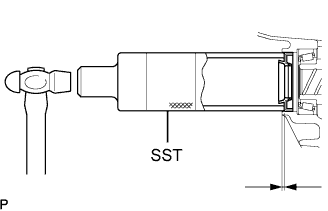
- SST
- 09636-20010
- Drive in depth:
- 1.7 to 2.7 mm (0.067 to 0.106 in.)
- NOTICE:
- Do not damage the oil seal lip.
| 11. INSTALL FRONT TRANSAXLE CASE OIL SEAL |
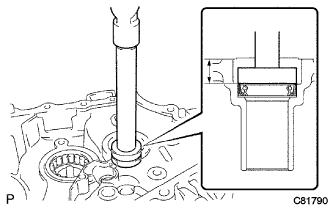 |
Using SST and a hammer, install a new front transaxle case oil seal into the front transaxle case.
- SST
- 09710-20011
(09710-06071)
09950-70010 (09951-07150)
- Drive in depth:
- 14.4 to 15.4 mm (0.567 to 0.606 in.)
Coat the tip of the front transaxle case oil seal with MP grease.
| 12. INSTALL TRANSMISSION MAGNET |
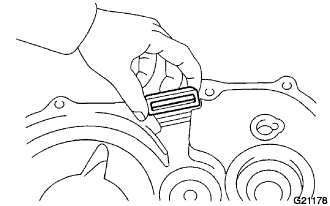 |
Clean the transmission magnet and install it onto the front transaxle case.
| 13. INSTALL OIL RECEIVER PIPE NO. 2 |
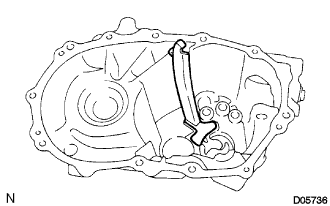 |
Install oil receiver pipe No. 2 onto the manual transmission case.
- NOTICE:
- Do not damage oil receiver pipe No. 2.
| 14. INSTALL DIFFERENTIAL CASE ASSEMBLY |
|
|
Coat the differential case tapered roller bearing with gear oil, and install it onto the front transaxle case.
| 15. INSTALL OUTPUT SHAFT ASSEMBLY |
|
|
Install the output shaft assembly onto the front transaxle case.
| 16. INSTALL INPUT SHAFT ASSEMBLY |
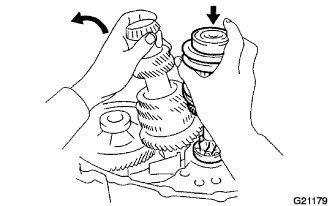 |
Coat sliding and rotating surfaces of the input shaft assembly and output shaft assembly with gear oil, and install them onto the front transaxle case.
| 17. INSTALL GEAR SHIFT FORK SHAFT NO.2 |
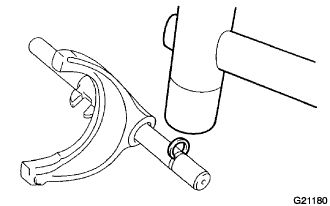 |
Install gear shift fork No. 2 onto gear shift fork shaft No. 2.
Using a hammer, tap a new snap ring onto gear shift fork shaft No. 2.
Install the reverse shift fork onto gear shift fork shaft No. 2.
Shift gear shift fork No. 2 to the 4th gear range.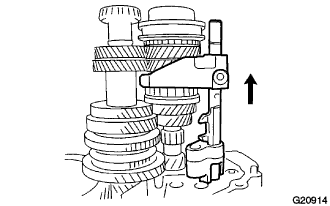
Install gear shift fork shaft No. 2, gear shift fork No. 2 and the reverse shift fork.
Coat the gear shift fork No. 2 bolt with sealant.
- Sealant:
- Toyota Genuine Adhesive 1344, Three Bond 1344 or Equivalent
Install the gear shift fork No. 2 bolt onto gear shift fork No. 2.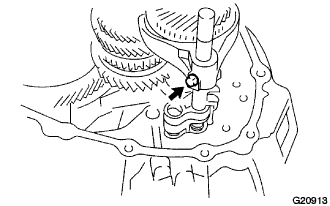
- Torque:
- 16 N*m{ 160 kgf*cm , 12 ft.*lbf }
Using a brass bar and hammer, install a new snap ring onto gear shift fork shaft No. 2.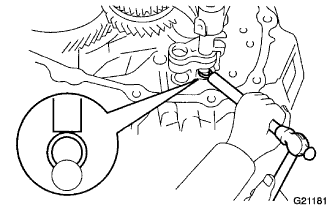
Using a magnetic finger, install the straight pin onto the reverse shift fork.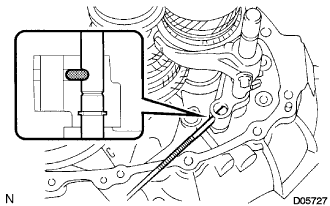
| 18. INSTALL GEAR SHIFT FORK SHAFT NO.3 |
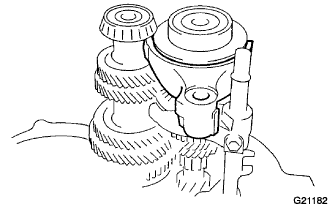 |
Install gear shift fork No. 3 onto hub sleeve No. 3.
Using a hammer, tap a new snap ring onto gear shift fork shaft No. 3.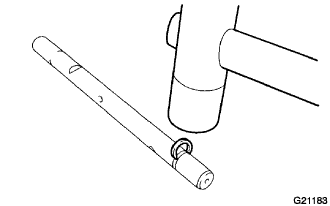
Install gear shift fork shaft No. 3, the compression spring, gear shift head No. 3 and gear shift fork No. 3 onto the front transaxle case.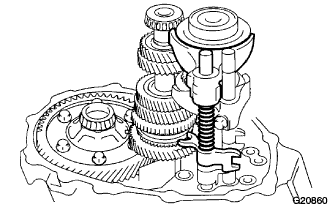
Using a pin punch and hammer, drive the slotted spring pin into gear shift head No. 3.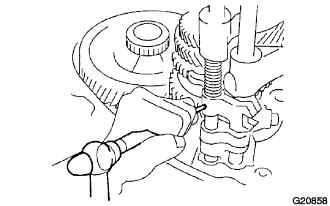
Using a screwdriver and hammer, tap a new snap ring onto gear shift fork shaft No. 3.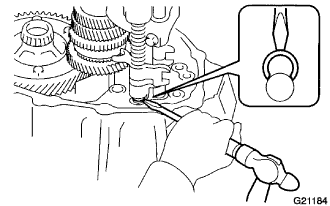
Install the straight pin onto gear shift fork No. 3.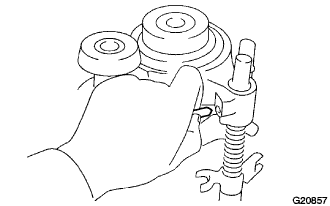
| 19. INSTALL GEAR SHIFT FORK SHAFT NO.1 |
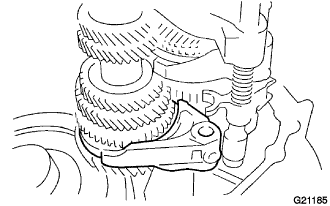 |
Install gear shift fork No. 1 onto hub sleeve No. 1.
Using a hammer, tap a new snap ring onto gear shift fork shaft No. 1.
Install gear shift fork shaft No. 1, gear shift head No. 1 and gear shift fork No. 1.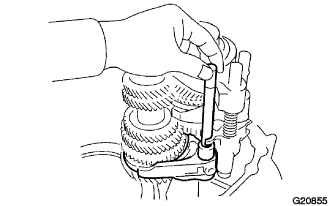
Using a pin punch and hammer, drive the slotted spring pin into the gear shift head No. 1.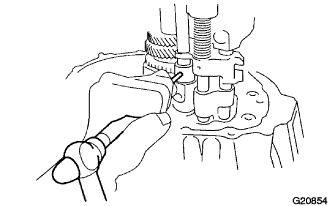
Coat the gear shift fork No. 1 bolt with sealant.
- Sealant:
- Toyota Genuine Adhesive 1344, Three Bond 1344 or Equivalent
Install the bolt onto gear shift fork No. 1.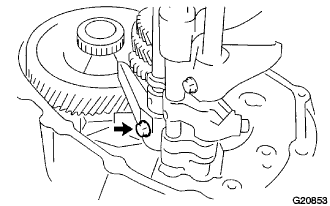
- Torque:
- 16 N*m{ 160 kgf*cm , 12 ft.*lbf }
| 20. INSTALL REVERSE IDLER GEAR SUB-ASSEMBLY |
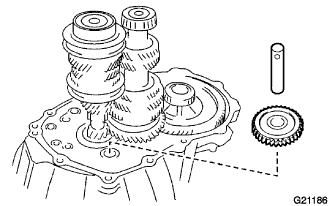 |
| 21. INSTALL REVERSE IDLER GEAR SHAFT |
Coat the reverse idler gear shaft with gear oil, and install it as shown.
Align the mark on the reverse idler gear shaft with the bolt hole, as shown in the illustration.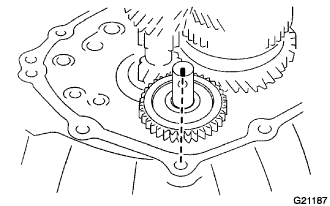
| 22. INSTALL REVERSE SHIFT ARM BRACKET ASSEMBLY |
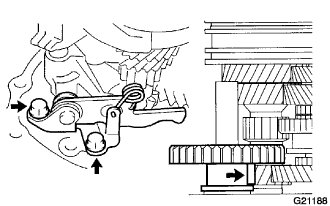 |
Coat the 2 bolts with sealant.
- Sealant:
- Toyota Genuine Adhesive 1344, Three Bond 1344 or equivalent
Install the reverse shift arm bracket assembly onto the front transaxle case with the 2 bolts.
- Torque:
- 17 N*m{ 175 kgf*cm , 13 ft.*lbf }
| 23. INSTALL MANUAL TRANSMISSION CASE |
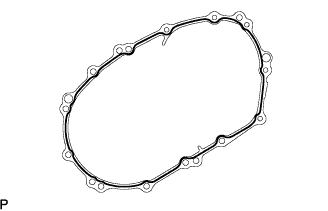 |
Apply FIPG to the manual transmission case, as shown in the illustration.
- FIPG:
- Toyota Genuine Seal Packing 1281, Three Bond 1281 or Equivalent
- NOTICE:
- Assemble parts within 10 minutes of application. Otherwise, the packing (FIPG) material must be removed and reapplied.
Install the 8 bolts onto the manual transmission side.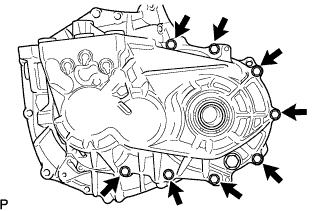
- Torque:
- 29 N*m{ 300 kgf*cm , 22 ft.*lbf }
Install the 5 bolts onto the manual transaxle side.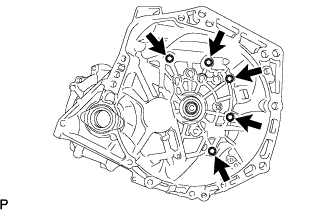
- Torque:
- 29 N*m{ 300 kgf*cm , 22 ft.*lbf }
| 24. INSTALL REVERSE IDLER GEAR SHAFT BOLT |
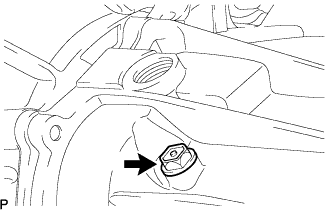 |
Coat the reverse idler gear shaft bolt with sealant, and install it with a new gasket.
- Sealant:
- Toyota Genuine Adhesive 1344, Three Bond 1344 or Equivalent
- Torque:
- 29 N*m{ 300 kgf*cm , 22 ft.*lbf }
| 25. INSTALL SHIFT AND SELECT LEVER SHAFT ASSEMBLY |
Install the select return compression spring onto the manual transmission case.
Apply FIPG to the manual transmission case, as shown in the illustration.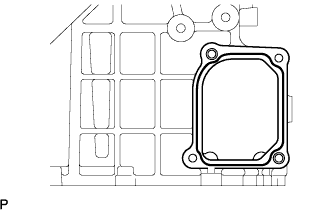
- FIPG:
- Toyota Genuine Seal Packing 1281, Three Bond 1281 or Equivalent
Coat the 4 bolts with sealant.
- Sealant:
- Toyota Genuine Adhesive 1344, Three Bond 1344 or Equivalent
Install the shift and select lever shaft, wire harness clamp bracket and release fork retracting spring hanger onto the manual transmission case with the 4 bolts.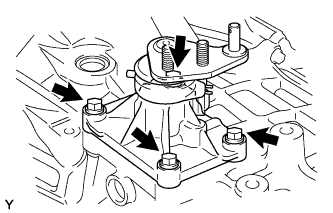
- Torque:
- 18 N*m{ 184 kgf*cm , 13 ft.*lbf }
| 26. INSTALL SHIFT GATE PIN |
Coat the shift gate pin with sealant.
- Sealant:
- Toyota Genuine Adhesive 1344, Three Bond 1344 or Equivalent
Install the shift gate pin onto the manual transmission case.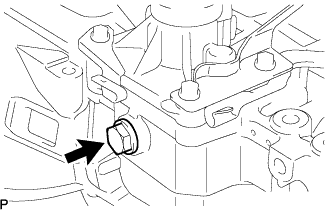
- Torque:
- 37 N*m{ 375 kgf*cm , 27 ft.*lbf }
| 27. INSTALL CONTROL CABLE BRACKET |
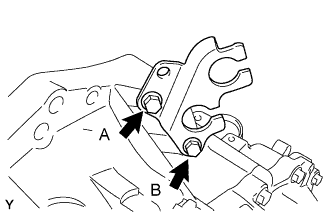 |
Install the control cable bracket with the 2 bolts.
- Torque:
- 11 N*m{ 115 kgf*cm , 8.3 ft.*lbf }
- HINT:
- Each bolt length is indicated in the table.
Bolt A
(Black)
25 mm (0.984 in.)
Bolt B
(White)
22.5 mm (0.886 in.)
| 28. INSTALL BACK-UP LIGHT SWITCH ASSEMBLY |
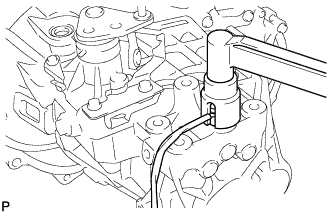 |
Using SST, install the back-up light switch with a new gasket onto the manual transmission case.
- SST
- 09817-16011
- Torque:
- 40 N*m{ 410 kgf*cm , 30 ft.*lbf }
Install the back-up light switch wire harness into the 2 clamps.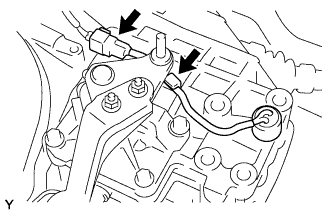
| 29. INSTALL SPEEDOMETER DRIVEN HOLE COVER SUB-ASSEMBLY (w/ Speedometer Driven Hole Cover) |
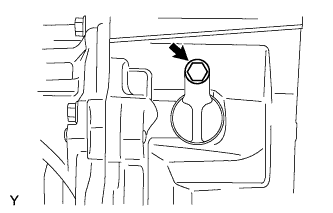 |
Install the speedometer driven hole cover onto the transaxle case with the bolt.
- Torque:
- 11 N*m{ 115 kgf*cm , 8.3 ft.*lbf }
| 30. INSTALL MANUAL TRANSMISSION CASE PLUG |
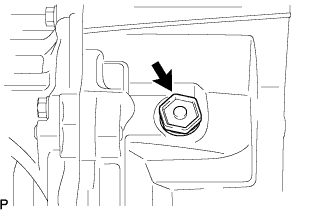 |
Install the manual transaxle case plug with a new gasket.
- Torque:
- 39 N*m{ 400 kgf*cm , 29 ft.*lbf }