TERMINALS OF ECU
System information · Vehicles built from Nov 2005
| CHECK POWER SOURCE CONTROL ECU |
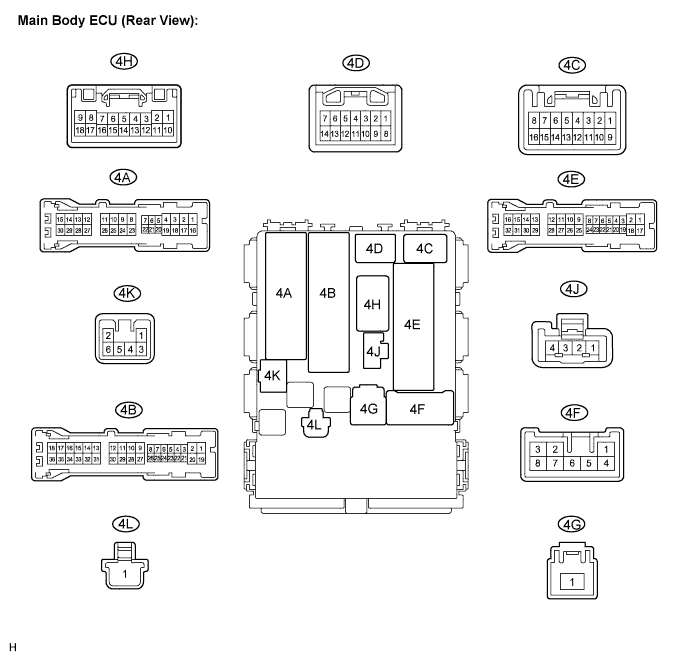

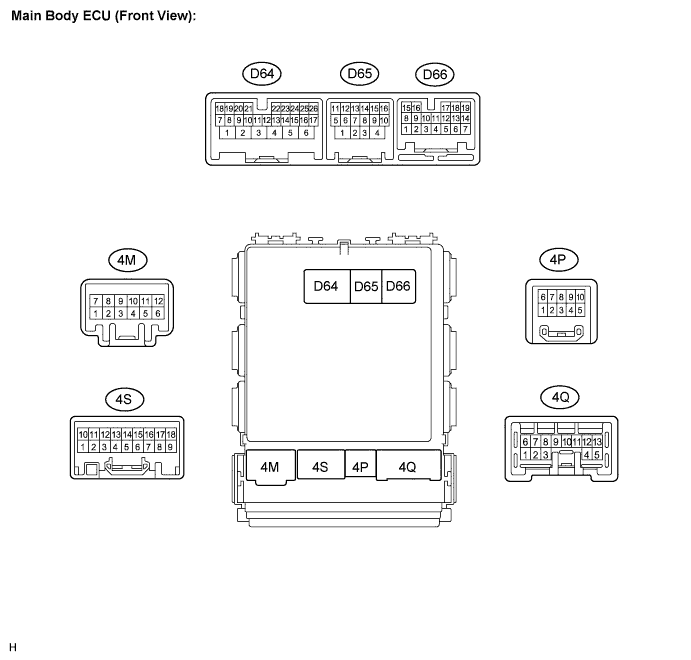
Disconnect the 4B, 4D, 4E and D65 ECU connectors.
Measure the voltages and resistances of the wire harness side connectors.
If the result is not as specified, there may be a malfunction on the wire harness side.Standard Symbols (Terminal No.)
Wiring Color
Terminal Description
Condition
Specified Condition
BECU (4B-30) - Body ground
L - Body ground
+B power supply
Always
10 to 14 V
AM1 (D65-1) - Body ground
O - Body ground
+B power supply
Always
10 to 14 V
AM2 (D64-6) - Body ground
SB - Body ground
+B power supply
Always
10 to 14 V
SSW1 (D65-10) - Body ground
R - Body ground
Ignition switch signal
Ignition switch pushed
Below 1 Ω
SSW1 (D65-10) - Body ground
R - Body ground
Ignition switch signal
Ignition switch not pushed
10 kΩ or higher
SSW2 (D65-9) - Body ground
L - Body ground
Ignition switch signal
Ignition switch pushed
Below 1 Ω
SSW2 (D65-9) - Body ground
L - Body ground
Ignition switch signal
Ignition switch not pushed
10 kΩ or higher
GND1 (4E-17) - Body ground
W-B - Body ground
Ground
Always
Below 1 Ω
GND2 (D65-4) - Body ground
W-B - Body ground
Ground
Always
Below 1 Ω
LIN1 (4D-9) - Body ground
P - Body ground
LIN line
Always
10 kΩ or higher
Reconnect the 4B, 4D, 4E and D65 ECU connectors.
Measure the voltages of the connectors.
Standard voltage Symbols (Terminal No.)
Wiring Color
Terminal Description
Condition
Specified Condition
ACCD (D64-4) - GND2 (D65-4)
LG - W-B
ACC signal
Ignition switch on (ACC)
10 to 14 V
ACCD (D64-4) - GND2 (D65-4)
LG - W-B
ACC signal
Ignition switch off
Below 1 V
IG2D (D65-5) - GND2 (D65-4)
P - W-B
IG2 signal
Ignition switch on (IG)
10 to 14 V
IG2D (D65-5) - GND2 (D65-4)
P - W-B
IG2 signal
Ignition switch on (ACC)
Below 1 V
SLR+ (D64-7) - GND2 (D65-4)
L - W-B
Steering lock motor signal
Steering lock motor operating
Below 1 V
SLR+ (D64-7) - GND2 (D65-4)
L - W-B
Steering lock motor signal
Steering lock motor does not operate
10 to 14 V
SLP (D64-18) - GND2 (D65-4)
GR - W-B
Steering lock actuator position signal
Steering lock locked
10 to 14 V
SLP (D64-18) - GND2 (D65-4)
GR - W-B
Steering lock actuator position signal
Steering lock released
Below 1 V
SPD (4C-8) - GND2 (D65-4)
SB - W-B
Speed signal from combination meter
Ignition switch on (IG), Rotate driving wheel slowly
Pulse generation
(see waveform 1)
TACH (D66-2) - GND2 (D65-4)
L - W-B
Tachometer signal
Engine running
Pulse generation
(see waveform 2)
STSW (D66-4) - GND2 (D65-4)
B - W-B
Starter activation request signal
Clutch pedal (M/T) or brake pedal (except M/T) depressed, ignition switch pushed once
10 to 14 V*
STR (D66-3) - GND2 (D65-4)
GR - W-B
Clutch pedal switch
Clutch pedal (M/T) or brake pedal (except M/T) depressed
Below 1 V
STR2 (D66-14) - GND2 (D65-4)
O - W-B
Starter signal
Clutch pedal (M/T) or brake pedal (except M/T) depressed, ignition switch pushed once
10 to 14 V*
INDS (D66-1) - GND2 (D65-4)
SB - W-B
Vehicle condition signal
Clutch pedal (M/T) or brake pedal (except M/T) depressed, ignition switch off, on (ACC, IG)
10 to 14 V
INDW (D66-8) - GND2 (D65-4)
Y - W-B
Vehicle condition signal
Clutch pedal (M/T) or brake pedal (except M/T) released, ignition switch off, on (ACC, IG)
10 to 14 V
STP (D64-14) - GND2 (D65-4)
G - W-B
Stop light switch
Brake pedal depressed
Below 1 V
SWIL (D65-8) - GND2 (D65-4)
LG - W-B
Illumination signal
Light control switch TAIL or HEAD
10 to 14 V
- HINT:
- *: Voltage is output for 0.3 seconds after the engine is started.
Inspect the connectors the using an oscilloscope.
Waveform 1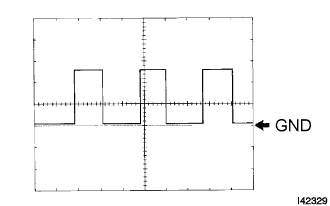
Item
Content
Symbols (Terminal No.)
SPD (4C-8) - GND2 (D65-4)
Tool Setting
5 V/DIV., 10 msec./DIV.
Condition
Driving at approx. 20 km/h (12 mph)
- HINT:
- As the vehicle speed increases, the wavelength shortens.
Waveform 2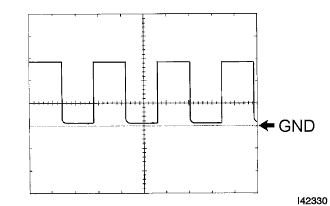
Item
Content
Symbols (Terminal No.)
TACH (D66-2) - GND2 (D65-4)
Tool Setting
5 V/DIV., 10 msec./DIV.
Condition
Engine idling
- HINT:
- As the vehicle speed increases, the wavelength shortens.
| CHECK CERTIFICATION ECU |
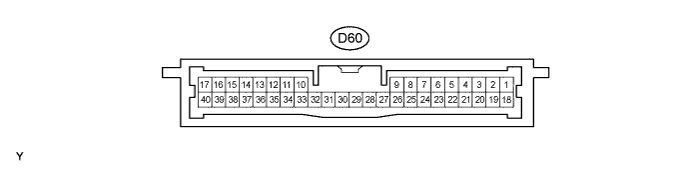
Disconnect the D60 ECU connector.
Measure the voltage and resistance of the wire harness side connector.
If the result is not as specified, there may be a malfunction on the wire harness side.Standard Symbols (Terminal No.)
Wiring Color
Terminal Description
Condition
Specified Condition
+B1 (D60-1) - Body ground
B - Body ground
+B power supply
Always
10 to 14 V
IG (D60-18) - Body ground
BR - Body ground
Ignition power supply
Ignition switch on (IG)
10 to 14 V
IG (D60-18) - Body ground
BR - Body ground
Ignition power supply
Ignition switch off
Below 1 V
LIN (D60-10) - Body ground
P - Body ground
LIN line
Always
10 kΩ or higher
E (D60-17) - Body ground
W-B - Body ground
Ground
Always
Below 1 Ω
| CHECK ECM |
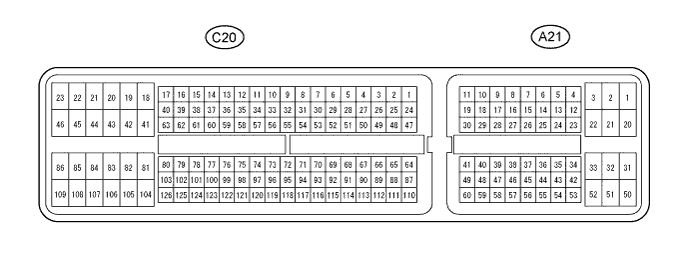
Disconnect the C20 and A21 ECM connectors.
Measure the voltages and resistances of the wire harness side connectors.
If the result is not as specified, there may be a malfunction on the wire harness side.Standard Symbols (Terminal No.)
Wiring Color
Terminal Description
Condition
Specified Condition
BATT (A21-20) - E1 (C20-104)
Y - W
Battery (for measuring battery voltage and for ECM memory)
Always
10 to 14 V
+B (A21-2) - E1 (C20-104)
B - W
Power source of ECM
Ignition switch on (IG)
10 to 14 V
IGSW (A21-28) - E1 (C20-104)
R - W
Ignition switch signal
Ignition switch on (IG)
10 to 14 V
E1 (C20-104) - Body ground
W - Body ground
Ground
Always
Below 1 Ω
E01 (C20-45) - Body ground
BR - Body ground
Ground
Always
Below 1 Ω
E02 (C20-44) - Body ground
BR - Body ground
Ground
Always
Below 1 Ω
E03 (C20-86) - Body ground
W - Body ground
Ground
Always
Below 1 Ω
ME01 (C20-43) - Body ground
BR - Body ground
Ground
Always
Below 1 Ω
Reconnect the A32 and C33 ECM connectors.
Measure the voltage of the connectors.
If the result is not as specified, the ECM may have a malfunction.Standard voltage Symbols (Terminal No.)
Wiring Color
Terminal Description
Condition
Specified Condition
STA (A21-48) - E1 (C20-104)
BR - W
Starter relay operation signal
Cranking
5.5 V or more
STSW (A21-14) - E1 (C20-104)
B - W
Starter relay operation signal
Shift lever p or N , ignition switch START
6.0 V or more
ACCR (C21-13) - E1 (C20-104)
G - W
ACC relay cut signal (output)
Cranking
Below 1.5 V
TACH (A21-15) - E1 (C20-104)
LG - W
Engine revolution signal (output)
Idling
Pulse generation
(see waveform 1)
STAR (C20-52) - E1 (C20-104)
O - W
Starter relay drive signal
Cranking
6.0 V or more
Inspect the connector using an oscilloscope.
Waveform 1
Item
Content
Symbols (Terminal No.)
TACH (A21-15) - E1 (C20-104)
Tool Setting
5 V/DIV., 10 msec./DIV.
Condition
Engine idling
- HINT:
- As the vehicle speed increases, the wavelength shortens.
| CHECK STEERING LOCK ECU |

Disconnect the D56 ECU connector.
Measure the voltage and resistance of the wire harness side connector.
Standard Symbols (Terminal No.)
Wiring Color
Terminal Description
Condition
Specified Condition
B (D56-7) - Body ground
R - Body ground
+B power supply
Always
10 to 14 V
IG2 (D56-6) - Body ground
R - Body ground
Ignition power supply
Ignition switch on (IG)
10 to 14 V
IG2 (D56-6) - Body ground
R - Body ground
Ignition power supply
Ignition switch off
Below 1 V
GND (D56-1) - Body ground
W-B - Body ground
Ground
Always
Below 1 Ω
SGND (D56-2) - Body ground
W-B - Body ground
Ground
Always
Below 1 Ω
- If the result is not as specified, there may be a malfunction on the wire harness side.
- If the result is not as specified, there may be a malfunction on the wire harness side.
Reconnect the D56 ECU connector.
Measure the voltage of the connector.
Standard voltage Symbols (Terminal No.)
Wiring Color
Terminal Description
Condition
Specified Condition
SLP1 (D56-4) - GND (D56-1)
GR - W-B
Steering lock actuator position signal
Steering lock locked
10 to 14 V
SLP1 (D56-4) - GND (D56-1)
GR - W-B
Steering lock actuator position signal
Steering lock released
Below 1 V
- If the result is not as specified, the ECU may have a malfunction.
- If the result is not as specified, the ECU may have a malfunction.