INSTALLATION
Removal / installation · Vehicles built from Nov 2006
Versions by build date: Aug 2005 – Oct 2006 from Nov 2006
| 1. INSTALL CONDENSER |

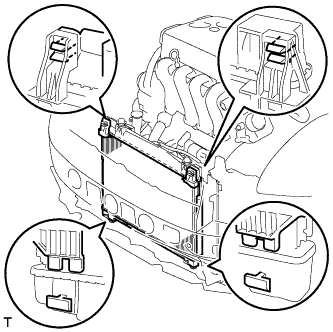  |
Engage the 2 claws and install the condenser into the vehicle.
- NOTICE:
- Do not damage the condenser or radiator when installing the condenser.
- HINT:
- If a new condenser is installed, add compressor oil to the condenser as follows.
- Compressor oil:
- ND-OIL8 or equivalent. Add 40 cc (1.35 fl. oz.)
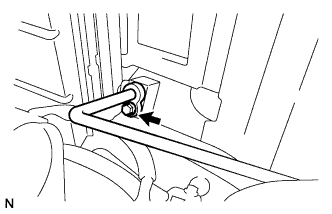
| 2. INSTALL LIQUID TUBE SUB-ASSEMBLY A (w/o Fan Shroud Ventilation Duct) |
 |
Remove the attached vinyl tape from the pipe and the connecting part of the cooler condenser.
Apply sufficient compressor oil to a new O-ring and the fitting surface of the pipe joint.
- Compressor oil:
- ND-OIL8 or equivalent
Install the O-ring onto the liquid tube.
Install the liquid tube onto the cooler condenser with the bolt.
- Torque:
- 5.4 N*m{ 55 kgf*cm , 48 in.*lbf }
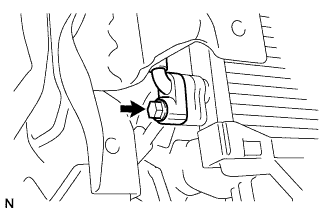
| 3. INSTALL LIQUID TUBE SUB-ASSEMBLY B (w/ Fan Shroud Ventilation Duct) |
 |
Remove the attached vinyl tape from the pipe and the connecting part of the cooler condenser.
Apply sufficient compressor oil to a new O-ring and the fitting surface of the pipe joint.
- Compressor oil:
- ND-OIL8 or equivalent
Install the O-ring onto the liquid tube.
Install the liquid tube onto the cooler condenser with the bolt.
- Torque:
- 5.4 N*m{ 55 kgf*cm , 48 in.*lbf }
Install the liquid tube bracket with the bolt.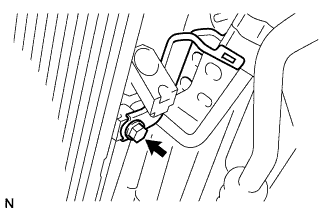
- Torque:
- 5.4 N*m{ 55 kgf*cm , 48 in.*lbf }
| 4. REMOVE FAN SHROUD VENTILATION DUCT ASSEMBLY (w/ Fan Shroud Ventilation Duct) |
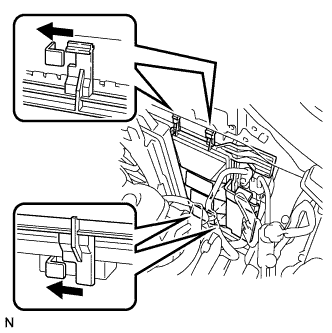 |
Engage the 4 claws and install the fan shroud ventilation duct.
| 5. INSTALL NO. 1 COOLER REFRIGERANT DISCHARGE HOSE |
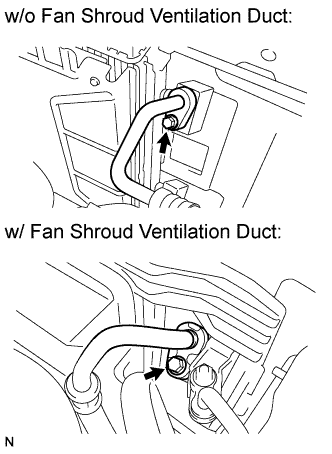 |
Remove the attached vinyl tape from the hose and the connecting part of the cooler condenser.
Apply sufficient compressor oil to a new O-ring and the fitting surface of the hose joint.
- Compressor oil:
- ND-OIL8 or equivalent
Install the O-ring onto the discharge hose.
Install the discharge hose onto the cooler condenser with the bolt.
- Torque:
- 5.4 N*m{ 55 kgf*cm , 48 in.*lbf }
| 6. INSTALL RADIATOR SUPPORT SUB-ASSEMBLY |
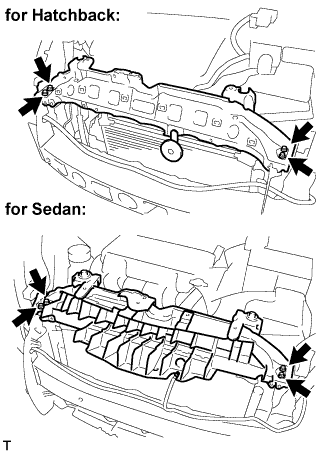 |
Install the radiator support sub-assembly upper with the 4 bolts.
- Torque:
- 5.5 N*m{ 56 kgf*cm , 49 in.*lbf }
Connect the horn assembly connector.
| 7. INSTALL HOOD LOCK ASSEMBLY |
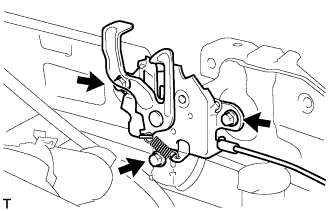 |
Install the hood lock assembly with the 3 bolts.
- Torque:
- 7.5 N*m{ 76 kgf*cm , 66 in.*lbf }
Install the hood lock control cable assembly with the 2 clamps.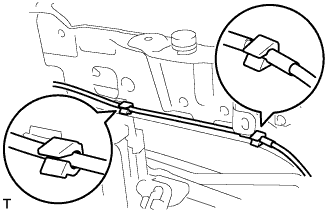
| 8. INSTALL NO. 1 COOLER COVER |
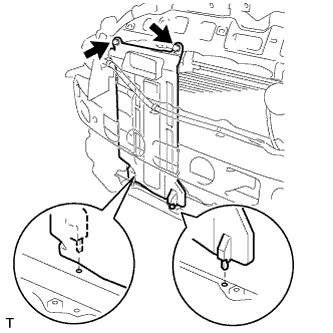 |
Insert the 2 pins of cooler cover No. 1 into the radiator support LWR.
Install cooler cover No. 1 with the 2 clips.
| 9. INSTALL RADIATOR SUPPORT ABSORBER UPPER |
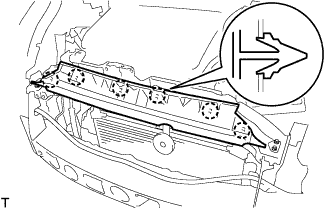 |
Engage the 6 claws and install the radiator support absorber upper.
| 10. INSTALL FRONT BUMPER COVER |
w/ Front Spoiler: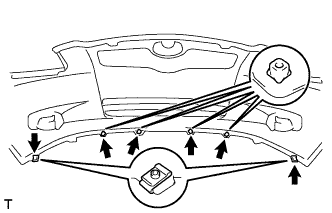
Install the 2 clips and the 4 screw grommets.
w/o Front Spoiler: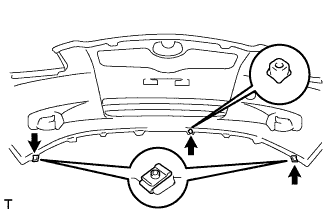
Install the 2 clips and the screw grommet.
w/ Fog Light:
Connect the 2 fog light connectors.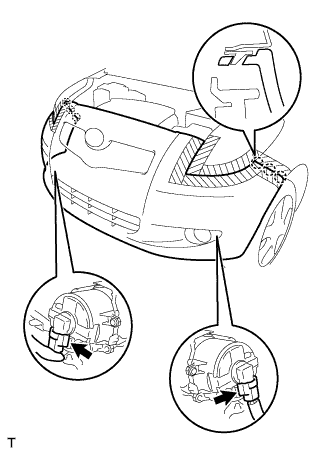
Engage the 6 claws and install the front bumper cover.
w/o Fog Light: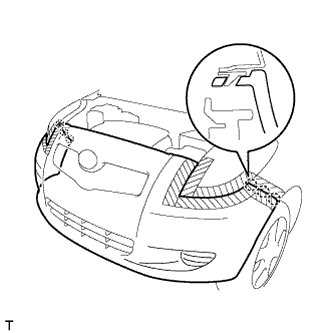
Engage the 6 claws and install the front bumper cover.
w/ Front Spoiler: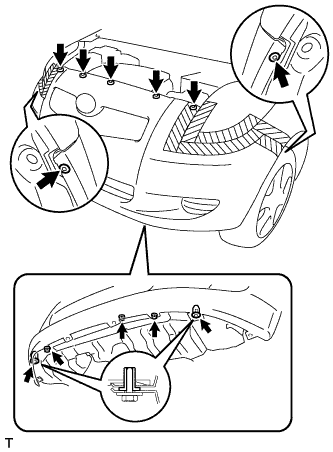
Install the 7 clips.
Install the 2 screw grommets.
Tighten the 3 screws.
w/o Front Spoiler: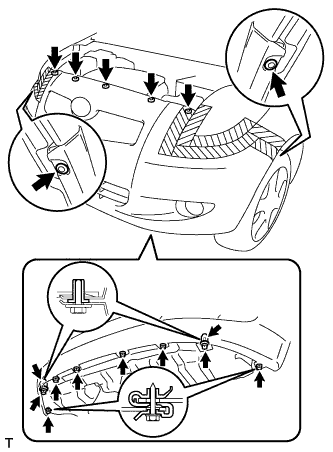
Install the 7 clips.
Install the 2 screw grommets.
Tighten the 8 screws.
Remove the protective tape.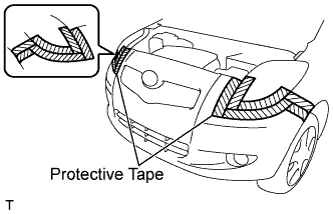
| 11. INSTALL FRONT BUMPER COVER (for Sport Package) |
Install the 2 clips, the 2 spring nuts and the screw grommet.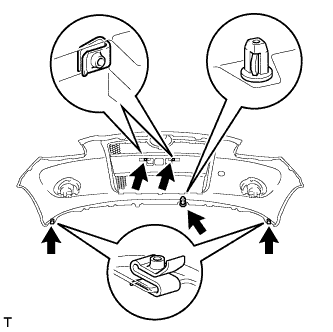
Connect the 2 fog light connectors.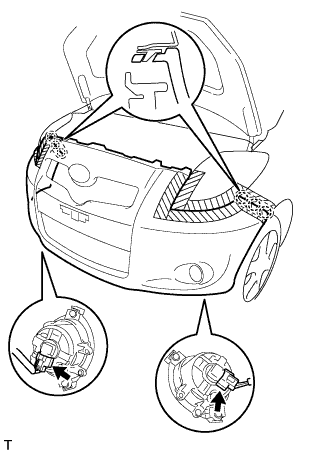
Engage the 6 claws and install the front bumper cover.
Install the 7 clips.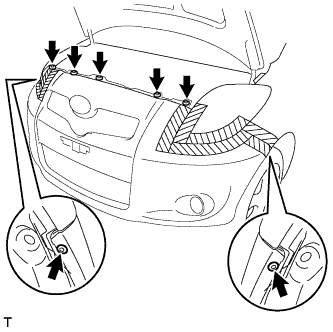
Install the 2 screw grommets.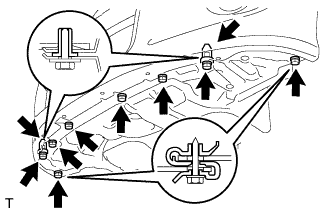
Install the 5 screws and the 3 bolts.
Remove the protective tape.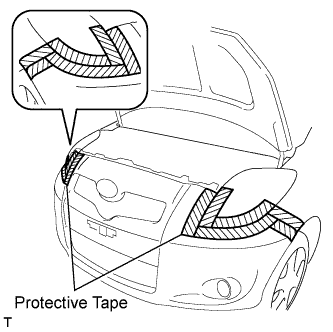
| 12. INSTALL FRONT SPOILER COVER RH (w/ Front Spoiler) |
Install the front spoiler cover with the 4 screws.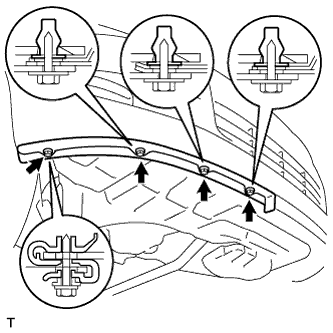
| 13. INSTALL FRONT SPOILER COVER LH (w/ Front Spoiler) |
Install the front spoiler cover with the 5 screws.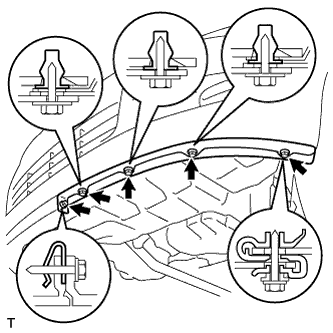
| 14. ADJUST HOOD LOCK ASSEMBLY |
Loosen the hood side hinge bolts.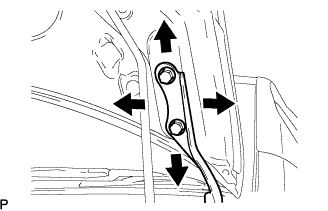
Move the hood to adjust the clearance to within the standard range.
Tighten the hood side hinge bolts after the adjustment.
- Torque:
- 13 N*m{ 133 kgf*cm , 10 ft.*lbf }
Adjust the height of the hood front end by turning the cushion rubber.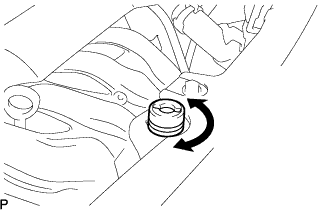
- HINT:
- The cushion rubber can be raised and lowered by turning it.
Adjust the hood lock.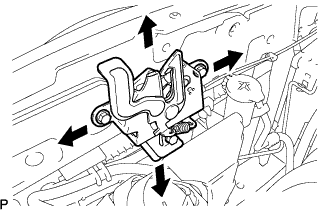
Loosen the 3 bolts.
Adjust the hood lock position so that the striker can enter it smoothly.
Tighten the 3 bolts after the adjustment.
- Torque:
- 7.5 N*m{ 76 kgf*cm , 66 in.*lbf }
| 15. CHARGE REFRIGERANT |
- SST
- 07110-58060
(07117-58060, 07117-58070, 07117-58080, 07117-58090, 09985-02100, 09985-02120, 07117-78050, 07117-88060, 07117-88070, 07117-88080)
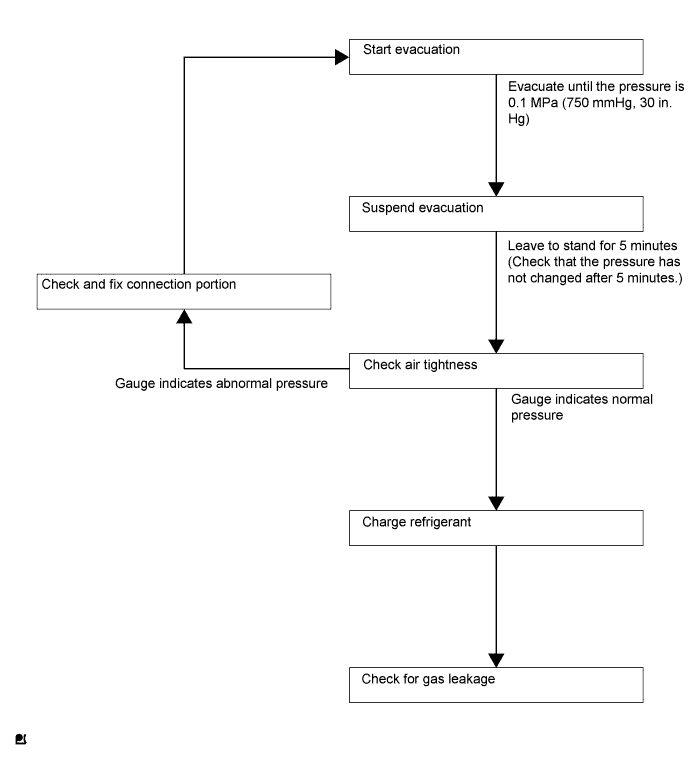
- NOTICE:
- Charge refrigerant in accordance with the equipment manual.
Perform vacuum purging using a vacuum pump.
Charge refrigerant HFC-134a (R134a).
- Standard:
- 330 to 390 g (11.64 to 13.76 oz.) w/o Fan Shroud Ventilation Duct
- 350 to 410 g (12.35 to 14.46 oz.) w/ Fan Shroud Ventilation Duct
- NOTICE:
- Do not start the engine before charging it with refrigerant as the cooler compressor doesn't work properly without sufficient refrigerant. This could cause the compressor to overheat.
- HINT:
- The relationship between the refrigerant charge amount and the pressure is as follows.
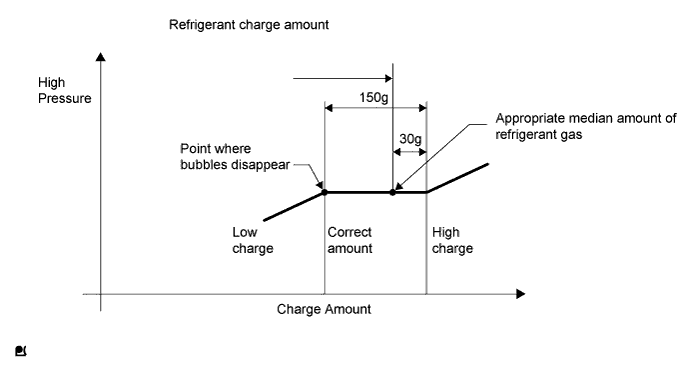
- High Charge Range:
If the refrigerant is overcharged, the pressure rises on the high-pressure side. High-pressure cut off frequently occurs. This causes insufficient cooling performance and also insufficient compressor lubrication.
- Low Charge Range:
Shortage of refrigerant causes insufficient cooling performance and low circulation of refrigerant oil, which shortens the compressor life. Operation with insufficient coolant raises the refrigerant temperature and causes heat deterioration of the rubber seals and hoses. Cracking and thus refrigerant leakage may occur.
- The relationship between the refrigerant charge amount and the pressure is as follows.
Install the caps onto the service valves on the refrigerant line.
| 16. WARM UP ENGINE |
- NOTICE:
- Warm up the engine at less than 2000 rpm for 1 minute or more after charging it with refrigerant.
| 17. INSPECT FOR REFRIGERANT LEAK |
After recharging the refrigerant gas, check for refrigerant gas leakage using a halogen leak detector.
Perform the operation as follows:
- Stop the engine.
- Secure good ventilation (the halogen leak detector may react to volatile gases other than refrigerant, such as evaporated gasoline or exhaust gas).
- Repeat the test 2 or 3 times.
- Make sure that some refrigerant remains in the refrigeration system.
When the compressor is off: approximately 392 to 588 kPa (4 to 6 kgf*cm2, 57 to 85 psi)
- HINT:
- It is impossible for the above pressure to be maintained if there is leakage.
- Stop the engine.
Using the halogen leak detector, check the refrigerant line, especially at the connection points, for leakage.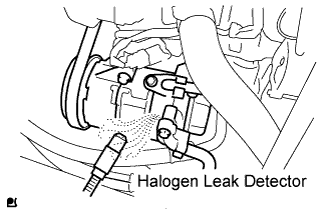
Bring the halogen leak detector close to the drain hose before performing the test.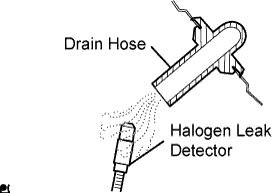
- HINT:
- After the blower motor has stopped, leave the cooling unit for at least 15 minutes.
- Place the halogen leak detector sensor under the drain hose.
- When bringing the halogen leak detector close to the drain hose, make sure that the halogen leak detector does not react to the volatile gases.
- After the blower motor has stopped, leave the cooling unit for at least 15 minutes.
If no gas leakage is detected from the drain hose, remove the blower motor from the cooling unit. Insert the halogen leak detector sensor into the unit and perform the test.
Disconnect the pressure switch connector and leave it for approximately 20 minutes. Bring the halogen leak detector close to the pressure switch and perform the test.