INSTALLATION
Removal / installation · Vehicles built from Jan 2006
- CAUTION:
- Some of these service operations affect the SRS airbag system. Read the precautionary notices concerning the SRS airbag system before servicing (Click here).
- NOTICE:
- Always use "Torx" socket wrench E10 when installing the rear seat.
- HINT:
- The procedure described below is for the RH side. Use the same procedure for both the RH and LH sides, unless otherwise specified.
| 1. INSTALL ROOF SIDE RAIL BRACKET RH |

Insert the 2 hooks into the body holes and install the roof side rail bracket.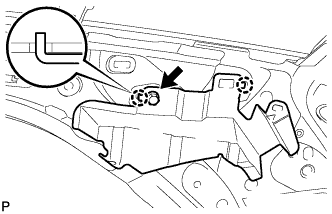

- Torque:
- 9.8 N*m{ 100 kgf*cm , 7 ft.*lbf }
Install the wire harness clamp.
| 2. INSTALL CURTAIN SHIELD AIRBAG BRACKET RH |
Insert the 2 hooks into the body holes and install the curtain shield airbag bracket.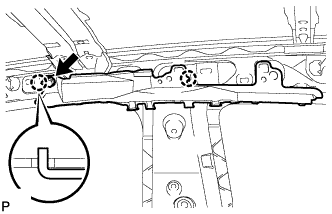
- Torque:
- 9.8 N*m{ 100 kgf*cm , 7 ft.*lbf }
| 3. INSTALL CURTAIN SHIELD AIRBAG ASSEMBLY |
Tighten the 2 bolts A.
- Torque:
- 14 N*m{ 145 kgf*cm , 10 ft.*lbf }
Tighten the 4 screws B.
Install front strap C.
- NOTICE:
- Attach double sided tape to the indicated area, with the strap pulled downward. When installing the strap, make sure that the front pillar garnish installation holes are not hidden by the strap of the curtain shield airbag.
Tighten the 2 bolts D.
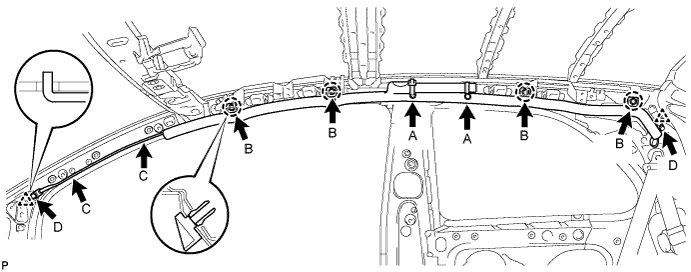
- Torque:
- 9.8 N*m{ 100 kgf*cm , 7 ft.*lbf }
Connect the airbag connector.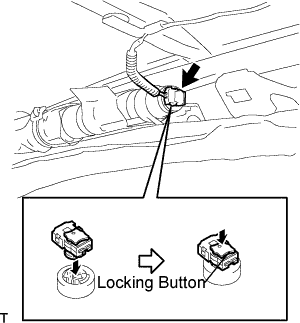
- NOTICE:
- Lock the locking button securely.
| 4. INSTALL ROOF HEADLINING ASSEMBLY |
Pull the roof headlining back into the vehicle through the back door.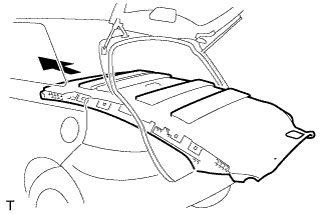
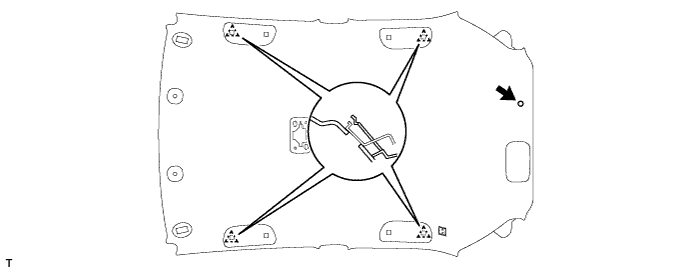
w/ Curtain Shield Airbag:
Engage the 4 hooks and install the roof headlining.
Install the clip.
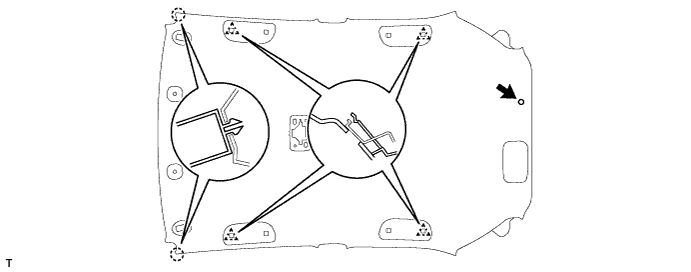
w/o Curtain Shield Airbag:
Engage the 2 claws and the 4 hooks and install the roof headlining.
Install the clip.
Install the 2 connectors.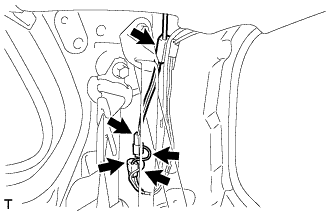
Connect the 2 connectors.
Install the antenna cord onto the antenna cord clamp.
for LHD: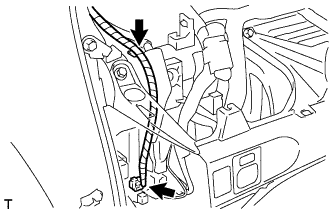
Connect the connector.
Install the wiring harness clamp.
for RHD: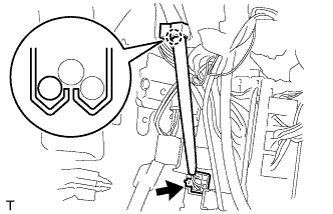
Connect the connector.
Install the roof wire into the claw of the junction block.
Install the wiring harness clamp.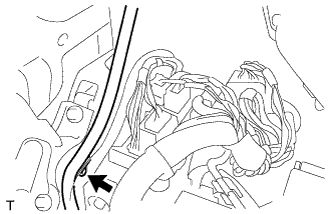
| 5. INSTALL INSTRUMENT PANEL BOX (for LHD) |
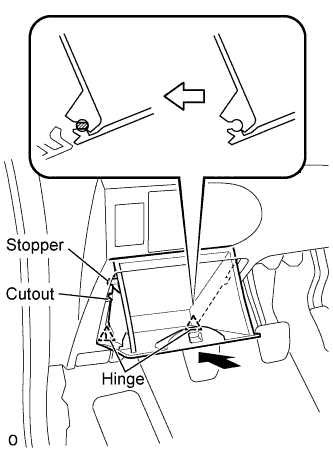 |
Insert the stopper of the instrument panel box from the cutout of the instrument panel lower.
Engage the 2 hinges with the instrument panel open.
Close the instrument panel box.
| 6. INSTALL INSTRUMENT UPPER PANEL SUB-ASSEMBLY |
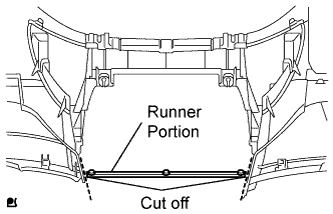 |
Using a nipper, cut off both ends of the runner portion shown in the illustration (When installing a new one).
Engage the 5 claws at the upper side of the instrument panel.
Engage the claw and the 3 clips at the lower side of the instrument panel.
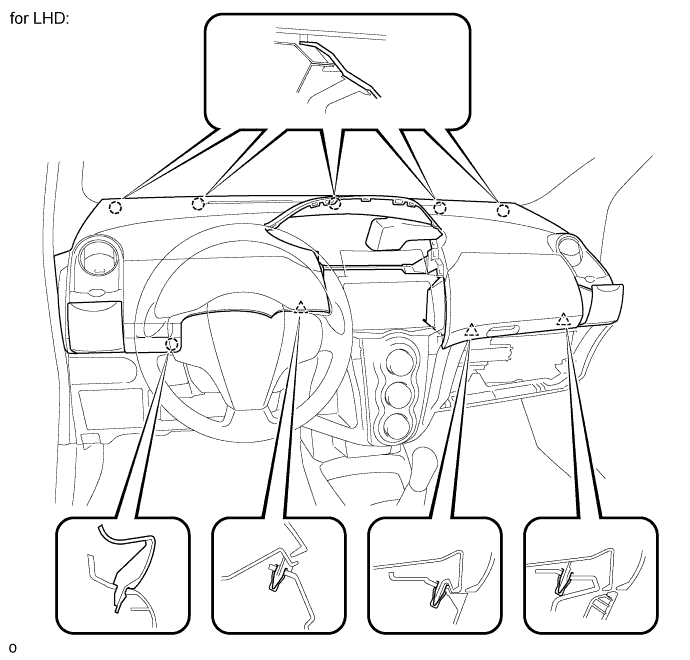
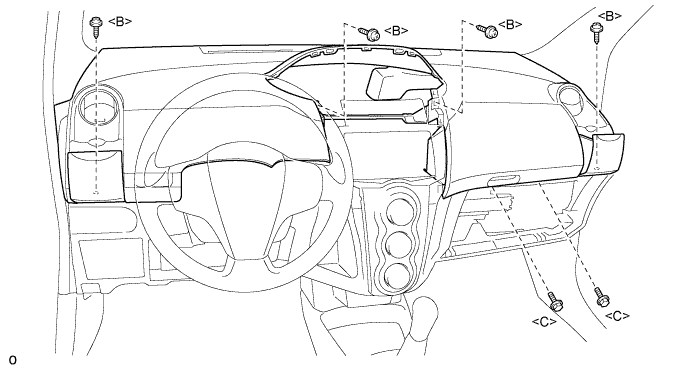
Install the instrument panel upper with the 2 <C> bolts and the 4 <B> screws.
- Torque:
- 20 N*m{ 204 kgf*cm , 15 ft.*lbf } for bolt
Connect the connectors.
Connect the passenger airbag connector and clamp.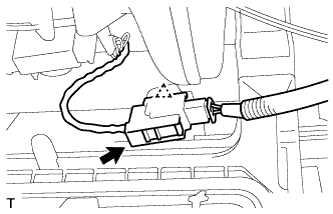
| 7. INSTALL GLOVE COMPARTMENT DOOR ASSEMBLY |
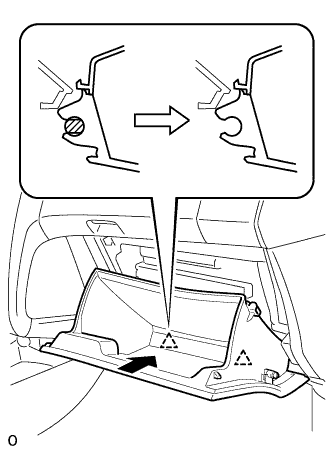 |
Engage the claw of the hinge portion in the horizontal direction to install the glove compartment door assembly.
- NOTICE:
- Engage the claw in the horizontal direction, otherwise, installation failure caused by excessive play around the hinge portion will result.
Slightly deform the upper portion of the glove compartment door assembly to engage the stopper.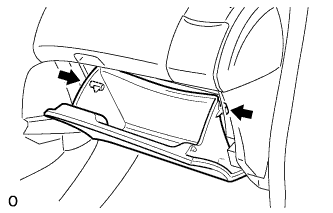
| 8. INSTALL NO. 1 SWITCH HOLE BASE (for LHD) |
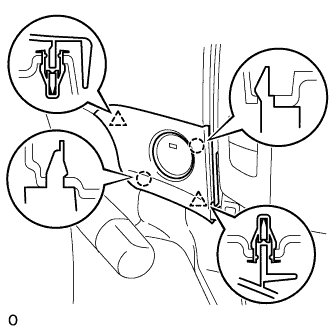 |
Disengage the 2 clips and 2 claws and install the switch hole base.
| 9. INSTALL COMBINATION METER ASSEMBLY |
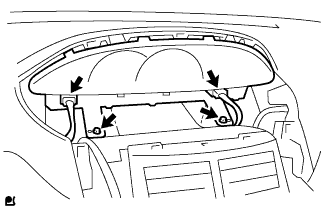 |
Install the combination meter assembly with the 2 screws.
Connect the 2 connectors.
| 10. INSTALL INSTRUMENT CLUSTER FINISH PANEL |
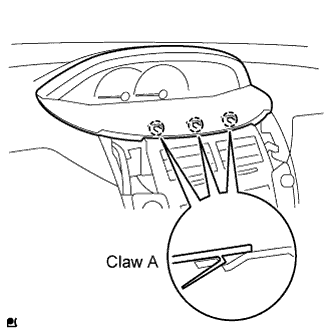 |
Fit the 3 A claws of the instrument cluster finish panel into the upper instrument cluster finish panel center.
Engage the 4 claws and 5 clips and install the instrument cluster finish panel.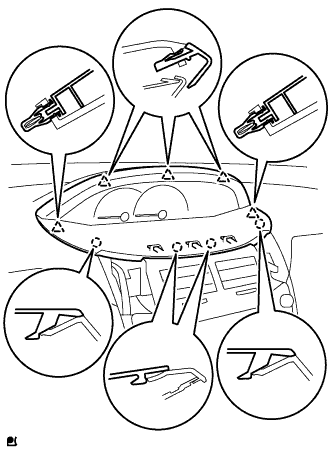
| 11. INSTALL INSTRUMENT PANEL FINISH PANEL END RH |
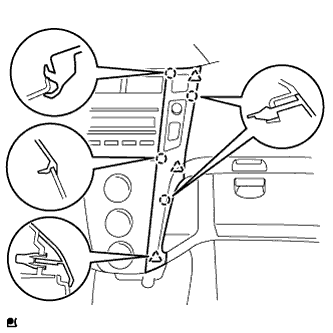 |
with CD player
Connect the connector.
Engage the 4 claws and 3 clips and install the instrument panel finish panel end RH.
Except CD player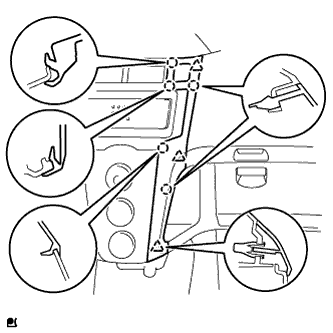
Connect the connector.
Engage the 5 claws and 3 clips and install the instrument panel finish panel end RH.
| 12. INSTALL INSTRUMENT PANEL FINISH PANEL END LH |
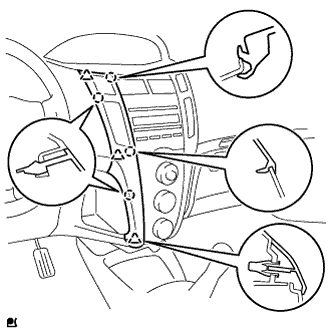 |
with CD player
Connect the connector.
Engage the 4 claws and 3 clips and install the instrument panel finish panel end LH.
Except CD player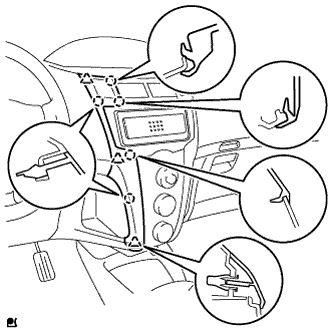
Connect the connector.
Engage the 5 claws and 3 clips and install the instrument panel finish panel end LH.
| 13. INSTALL FRONT PILLAR GARNISH RH |
w/ Curtain Shield Airbag: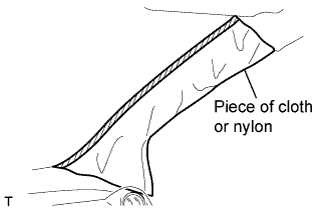
Remove the piece of cloth or nylon.
Insert the hook into the body hole.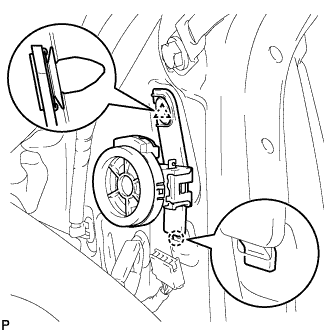
Engage the clip and install the front No. 2 speaker.
Connect the speaker connector.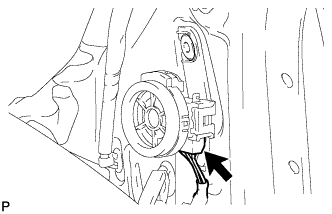
Install the 3 clamps.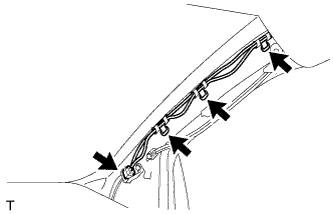
Connect the connector.
w/ Curtain Shield Airbag: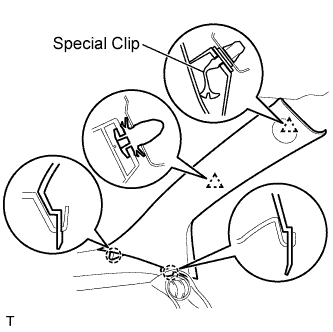
Install a new special clip and the clip onto a new front pillar garnish.
Engage the 2 clips and the 2 claws and install the front pillar garnish.
w/o Curtain Shield Airbag: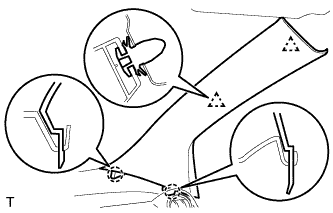
Engage the 2 clips and the 2 claws and install the front pillar garnish.
| 14. INSTALL FRONT PILLAR GARNISH LH |
w/ Curtain Shield Airbag: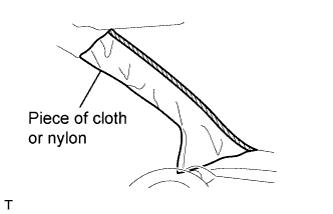
Remove the piece of cloth or nylon.
Insert the hook into the body hole.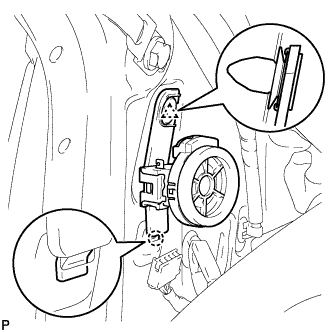
Engage the clip and install the front No. 2 speaker.
Connect the speaker connector.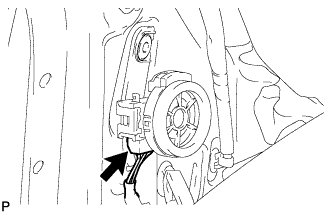
Install the 4 clamps.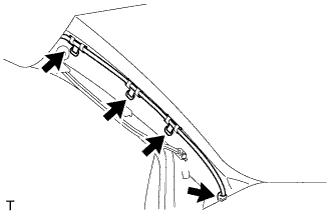
w/ Curtain Shield Airbag: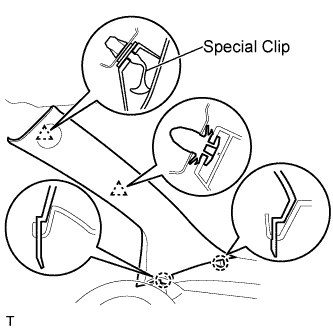
Install a new special clip and the clip onto a new front pillar garnish.
Engage the 2 clips and the 2 claws and install the front pillar garnish.
w/o Curtain Shield Airbag: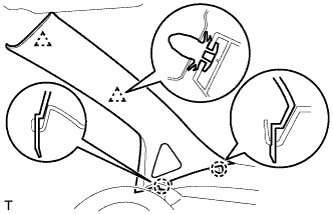
Engage the 2 clips and the 2 claws and install the front pillar garnish.
| 15. INSTALL MAP LIGHT ASSEMBLY |
Connect the map light connector.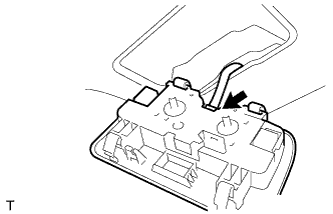
Engage the 4 claws and install the map light.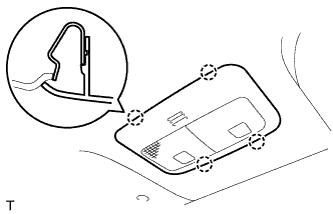
| 16. INSTALL ROOM LIGHT ASSEMBLY |
Engage the 4 claws and install the room light switch base.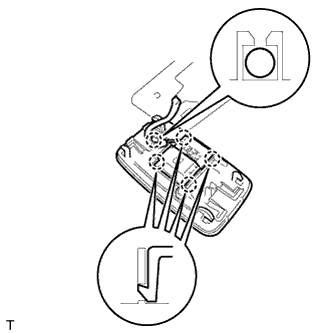
Install the roof wire onto the claw of the room light.
Engage the 4 claws and install the 2 covers.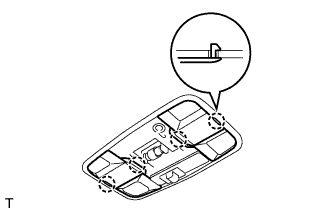
Engage the 4 claws and install the room light.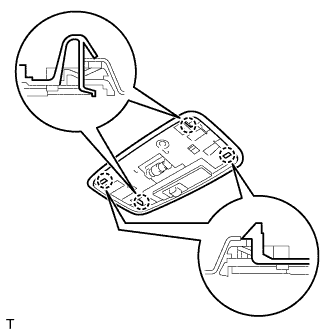
Engage the 4 claws and install the room light lens.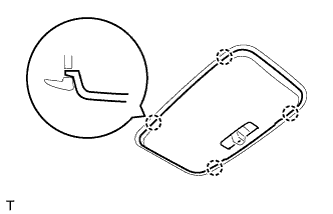
| 17. INSTALL VISOR HOLDER RH |
Engage the 2 springs and install the visor.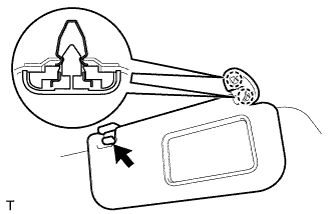
Install the visor shaft into the visor holder.
Engage the 4 claws and install the visor bracket cover.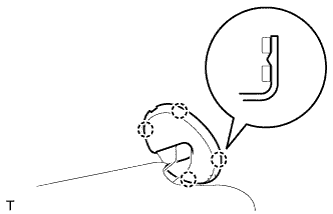
| 18. INSTALL VISOR HOLDER LH |
- HINT:
- Use the same procedure as for the RH side.
| 19. INSTALL VISOR ASSEMBLY RH |
Engage the 2 springs and install the visor.
Install the visor shaft into the visor holder.
Engage the 4 claws and install the visor bracket cover.
| 20. INSTALL VISOR ASSEMBLY LH |
- HINT:
- Use the same procedure as for the RH side.
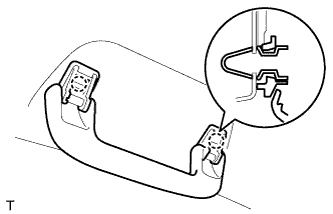
| 21. INSTALL ASSIST GRIP SUB-ASSEMBLY |
 |
- HINT:
- The number of the assist grips varies with the specifications.
Engage the 2 springs and install the assist grip.
| 22. REMOVE ASSIST GRIP COVER |
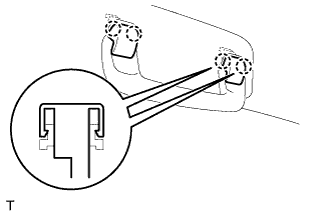 |
- HINT:
- The number of the assist grip covers varies with specifications.
Engage the 2 claws and install the assist grip cover.
| 23. INSTALL COAT HOOK (w/ Coat Hook) |
Engage the 2 claws and install the coat hook.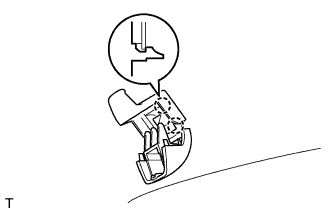
Engage the 2 claws and close the cover.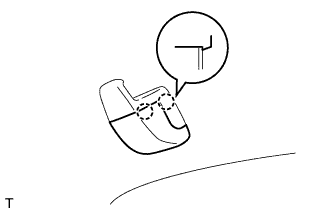
| 24. REMOVE SEAT BELT ANCHOR COVER |
| 25. INSTALL REAR ROOF SIDE RAIL GARNISH RH |
Engage the 4 clips and install the rear roof side rail garnish.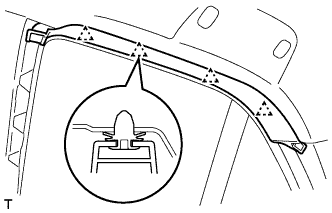
| 26. INSTALL REAR ROOF SIDE RAIL GARNISH LH |
- HINT:
- Use the same procedure as for the RH side.
| 27. INSTALL ROOF SIDE INNER GARNISH RH |
w/ Curtain Shield Airbag: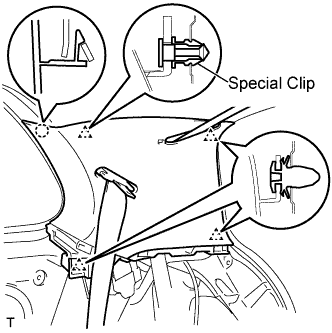
Install a new special clip onto the roof side inner garnish.
Pass the rear seat outer belt and the rear center seat outer belt through the slit in the roof side inner garnish.
Engage the 4 clips and the claw and install the roof side inner garnish.
w/o Curtain Shield Airbag: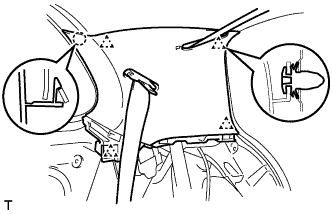
Pass the rear seat outer belt and the rear center seat outer belt through the slit in the roof side inner garnish.
Engage the 4 clips and the claw and install the roof side inner garnish.
| 28. INSTALL ROOF SIDE INNER GARNISH LH |
w/ Curtain Shield Airbag: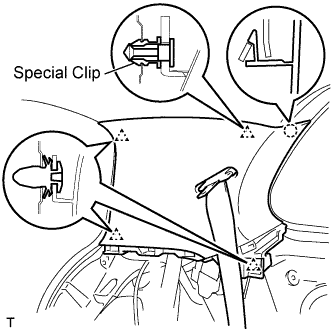
Install a new special clip onto the roof side inner garnish.
Pass the rear seat outer belt through the slit in the roof side inner garnish.
Engage the 4 clips and the claw and install the roof side inner garnish.
w/o Curtain Shield Airbag: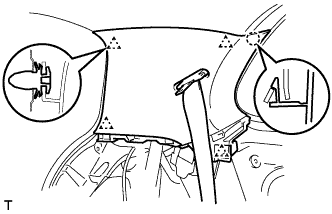
Pass the rear seat outer belt through the slit in the roof side inner garnish.
Engage the 4 clips and the claw and install the roof side inner garnish.
| 29. INSTALL REAR CENTER SEAT OUTER BELT ASSEMBLY |
Engage the 4 claws and install the center belt guide.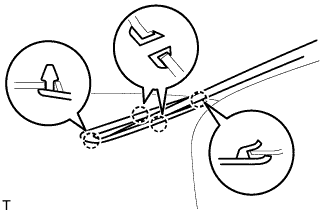
Install the through anchor with the bolt.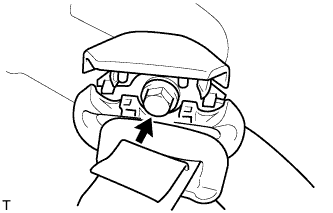
- Torque:
- 42 N*m{ 430 kgf*cm , 31 ft.*lbf }
Engage the 2 claws and close the slip joint cover.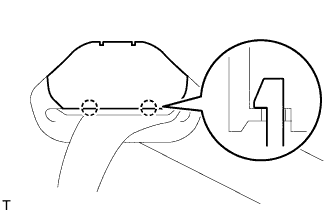
Install the 2 tongue plates.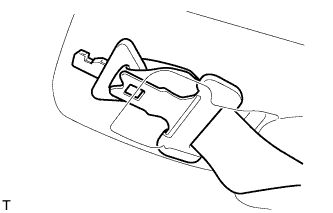
| 30. INSTALL CENTER PILLAR UPPER GARNISH RH |
Engage the 2 clips and install the center pillar upper garnish.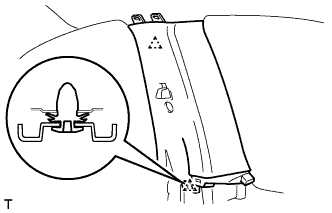
| 31. INSTALL CENTER PILLAR UPPER GARNISH LH |
- HINT:
- Use the same procedure as for the RH side.
| 32. INSTALL FRONT SEAT OUTER BELT ASSEMBLY RH |
Install the through anchor with the bolt.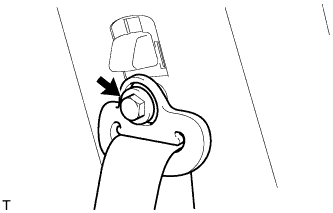
- Torque:
- 42 N*m{ 430 kgf*cm , 31 ft.*lbf }
| 33. INSTALL FRONT SEAT OUTER BELT ASSEMBLY LH |
- HINT:
- Use the same procedure as for the RH side.
| 34. INSTALL SEAT BELT ANCHOR COVER CAP |
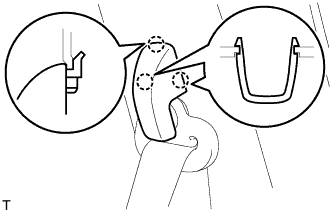 |
- HINT:
- Use the same procedure for both sides.
Engage the 3 claws and install the seat belt anchor cover cap.
| 35. INSTALL DECK SIDE TRIM PANEL ASSEMBLY RH |
Engage the 3 clips and the 3 claws and install the deck side trim panel.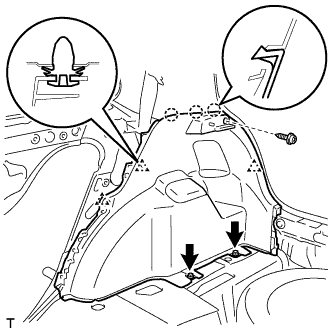
Tighten the 3 screws.
| 36. INSTALL DECK SIDE TRIM PANEL ASSEMBLY LH |
Connect the luggage compartment room light connector.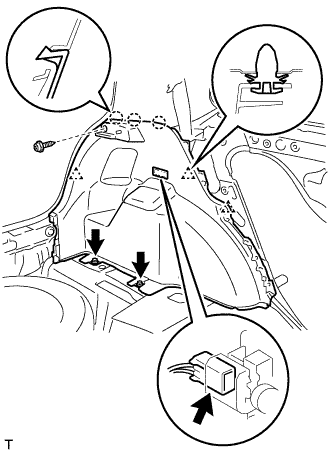
Engage the 3 clips and the 3 claws and install the deck side trim panel.
Tighten the 3 screws.
| 37. INSTALL REAR SEAT OUTER BELT ASSEMBLY RH |
Engage the clip and install the anchor plate.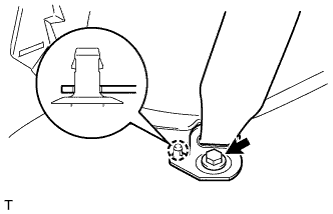
Tighten the bolt.
- Torque:
- 42 N*m{ 430 kgf*cm , 31 ft.*lbf }
| 38. INSTALL REAR SEAT OUTER BELT ASSEMBLY LH |
- HINT:
- Use the same procedure as for the RH side.
| 39. INSTALL REAR DECK TRIM COVER |
for Grand Tire: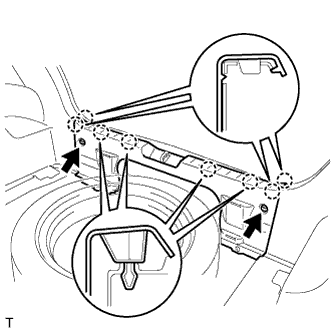
Engage the 8 claws and install the rear deck trim cover.
Install the 2 clips.
for Temper Spare Tire: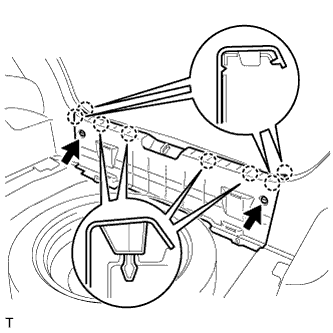
Engage the 8 claws and install the rear deck trim cover.
Install the 2 clips.
| 40. INSTALL FRONT QUARTER TRIM PANEL ASSEMBLY RH |
Engage the 8 clips, the retainer and the 10 claws and install the front quarter trim panel.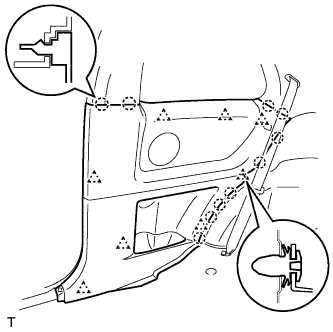
Install the belt of the rear seat outer belt onto the rear seat shoulder belt hanger.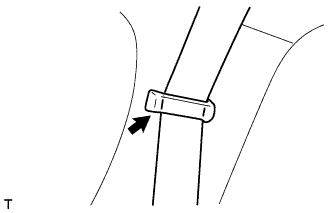
| 41. INSTALL FRONT QUARTER TRIM PANEL ASSEMBLY LH |
- HINT:
- Use the same procedure as for the RH side.
| 42. INSTALL FRONT SEAT OUTER BELT BAR SUB-ASSEMBLY RH |
Install the front seat outer belt bar with the 2 bolts.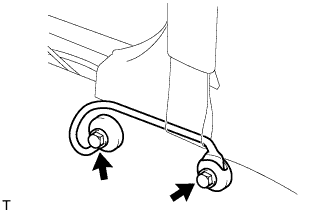
- Torque:
- 42 N*m{ 430 kgf*cm , 31 ft.*lbf }
| 43. INSTALL FRONT SEAT OUTER BELT BAR SUB-ASSEMBLY LH |
- HINT:
- Use the same procedure as for the RH side.
| 44. INSTALL FRONT DOOR OPENING TRIM WEATHERSTRIP RH |
Align the locating mark with the paint mark first, and install the front door opening trim weatherstrip, as shown in the illustration.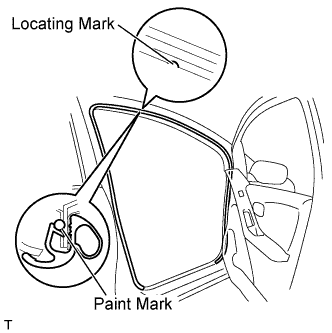
Paint mark: Area
Color
RH side
Blue
LH side
Pink
| 45. INSTALL FRONT DOOR OPENING TRIM WEATHERSTRIP LH |
- HINT:
- Use the same procedure as for the RH side.
| 46. INSTALL COWL SIDE TRIM BOARD RH |
Engage the claw and stud bolt and install the cowl side trim board.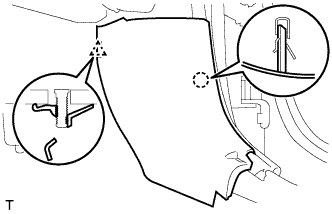
| 47. INSTALL COWL SIDE TRIM BOARD LH |
- HINT:
- Use the same procedure as for the RH side.
| 48. INSTALL INSTRUMENT PANEL UNDER COVER SUB-ASSEMBLY RH |
Engage the 4 claws and install the instrument panel under cover.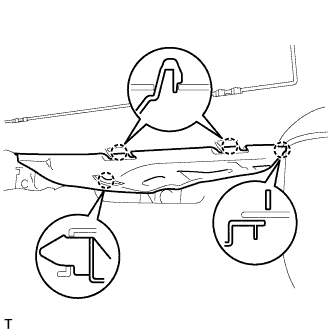
| 49. INSTALL INSTRUMENT PANEL UNDER COVER SUB-ASSEMBLY LH |
Engage the 3 claws and install the instrument panel under cover.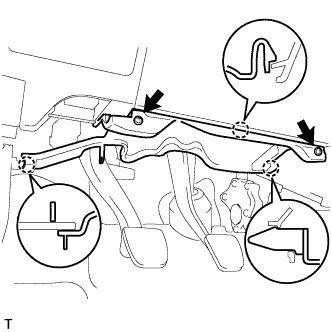
Tighten the 2 screws.
| 50. INSTALL FRONT DOOR SCUFF PLATE RH |
Engage the 8 claws and install the front door scuff plate.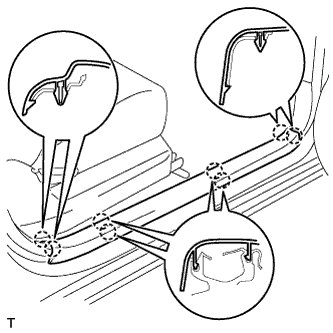
| 51. INSTALL FRONT DOOR SCUFF PLATE LH |
- HINT:
- Use the same procedure as for the RH side.
| 52. INSTALL REAR SEAT ASSEMBLY LH |
Insert the 2 locating pins through the 2 body holes and install the rear seat.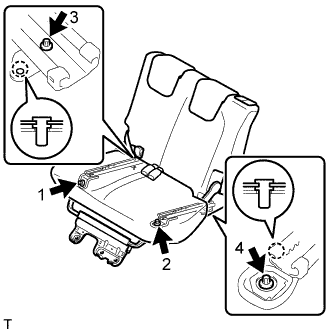
Using "Torx" socket wrench E10, install the 4 bolts in the sequence shown in the illustration.
- Torque:
- 37 N*m{ 375 kgf*cm , 27 ft.*lbf }
Install the rear seat cushion.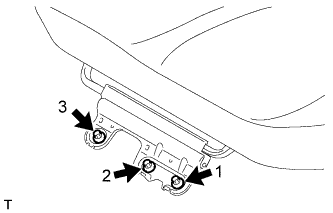
Using "Torx" socket wrench E10, install the 3 bolts in the sequence shown in the illustration.
- Torque:
- 37 N*m{ 375 kgf*cm , 27 ft.*lbf }
| 53. INSTALL REAR SEAT ASSEMBLY RH |
Insert the 2 locating pins through the 2 body holes and install the rear seat.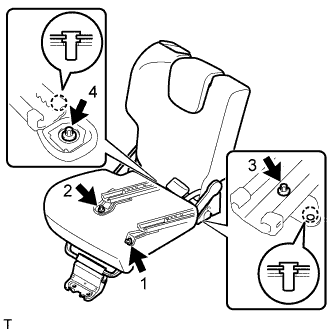
Using "Torx" socket wrench E10, install the 4 bolts in the sequence shown in the illustration.
- Torque:
- 37 N*m{ 375 kgf*cm , 27 ft.*lbf }
Install the rear seat cushion.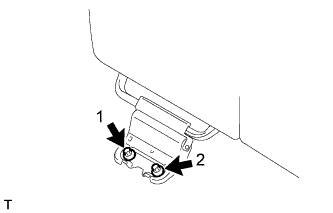
Using "Torx" socket wrench E10, install the 2 bolts in the sequence shown in the illustration.
- Torque:
- 37 N*m{ 375 kgf*cm , 27 ft.*lbf }
| 54. INSTALL NO. 2 REAR SEAT LEG COVER |
Engage the 6 claws and install the No. 2 rear seat leg cover.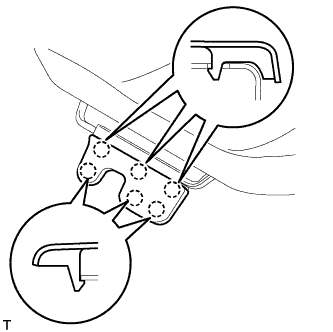
| 55. INSTALL NO. 1 REAR SEAT LEG COVER |
Engage the 4 claws and install the rear seat No. 1 leg cover.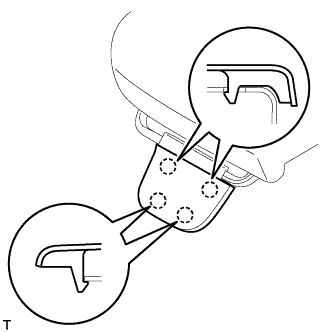
| 56. INSTALL DECK FLOOR BOX RH (w/ Deck Board) |
Set the deck floor box and lock the 2 knobs.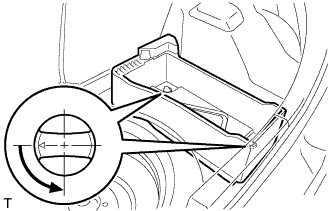
| 57. INSTALL DECK FLOOR BOX LH (w/ Deck Board) |
- HINT:
- Use the same procedure as for the RH side.
| 58. INSTALL SPARE WHEEL COVER ASSEMBLY (w/ Deck Board) |
Install the spare wheel cover.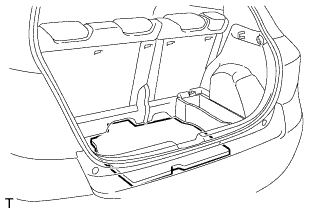
| 59. INSTALL DECK BOARD SUB-ASSEMBLY (w/ Deck Board) |
Set the deck board and lock the 2 knobs.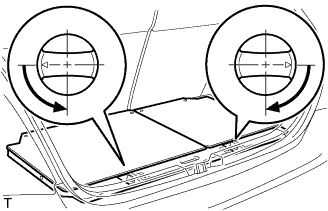
| 60. INSTALL REAR FLOOR CARPET ASSEMBLY (w/o Deck Board) |
Set the deck board and lock the 2 knobs.
| 61. INSTALL PACKAGE TRAY TRIM PANEL ASSEMBLY (w/ Package Tray Trim) |
Engage the 2 claws and install the package tray trim panel.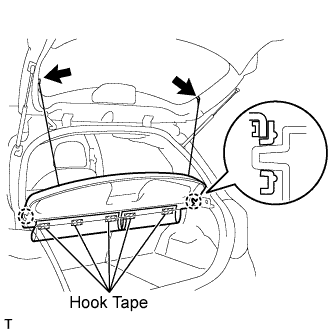
Install the 5 pieces of hook tape.
Install the 2 package tray trim suspenders.
| 62. CONNECT CABLE TO NEGATIVE BATTERY TERMINAL |
- Torque:
- 5.4 N*m{ 55 kgf*cm , 48 in.*lbf }
| 63. INSPECT SRS WARNING LIGHT |