INSTALLATION
Removal / installation · Vehicles built from Aug 2005
| 1. INSTALL TRANSAXLE CASE OIL SEAL NO. 2 |

Coat the lip of a new oil seal with MP grease.
Using SST and a hammer, install the front transaxle case oil seal.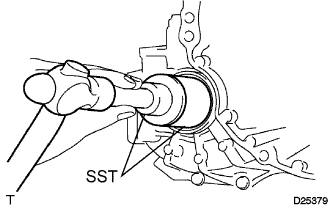

- SST
- 09517-12010
09630-24014 (09620-24051)
- Drive in depth:
- 3.1 mm (0.122 in.)
- NOTICE:
- Do not damage the oil seal lip.
| 2. INSTALL TRANSAXLE CASE OIL SEAL |
Coat the lip of a new oil seal with MP grease.
Using SST and a hammer, install the transaxle case oil seal.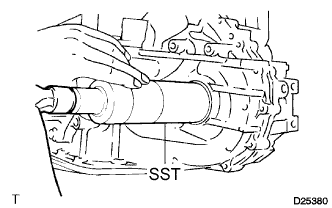
- SST
- 09316-60011
(09316-00011)
- Drive in depth:
- 3.1 mm (0.122 in.)
- NOTICE:
- Do not damage the oil seal lip.
| 3. INSTALL FRONT DRIVE SHAFT ASSEMBLY LH |
for Automatic Transaxle:
Coat the spline of the inboard joint with ATF.
for Manual Transaxle:
Coat the spline of the inboard joint with gear oil.
Align the inboard joint splines and install the drive shaft with a screwdriver and hammer.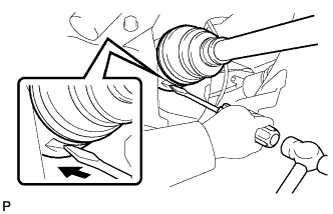
- NOTICE:
- Face the cut area of the front drive inboard joint hole snap ring downward.
- Do not damage the oil seal.
- Do not damage the inboard joint boot.
- Face the cut area of the front drive inboard joint hole snap ring downward.
- HINT:
- Confirm whether the drive shaft is securely driven in by checking the reaction force and sound.
| 4. INSTALL FRONT DRIVE SHAFT ASSEMBLY RH |
- HINT:
- The installation procedure for the RH side is the same as that for the LH side.
| 5. INSTALL FRONT SUSPENSION ARM SUB-ASSEMBLY LOWER NO.1 LH |
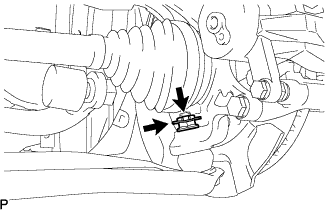 |
Install the lower arm onto the steering knuckle with a new castle nut.
- Torque:
- 98 N*m{ 1,000 kgf*cm , 72 ft.*lbf }
- NOTICE:
- If the holes for the clip are not aligned, tighten the nut by a further turn of up to 60°.
Install a new clip.
| 6. INSTALL FRONT SUSPENSION ARM SUB-ASSEMBLY LOWER NO.1 RH |
- HINT:
- The installation procedure for the RH side is the same as that for the LH side.
| 7. INSTALL TIE ROD END SUB-ASSEMBLY LH |
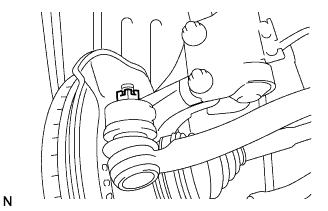 |
Install the tie rod end onto the steering knuckle with a new castle nut.
- Torque:
- 49 N*m{ 500 kgf*cm , 36 ft.*lbf }
- NOTICE:
- If the holes for the clip are not aligned, tighten the nut by a further turn of up to 60°.
Install a new cotter pin.
| 8. INSTALL TIE ROD END SUB-ASSEMBLY RH |
- HINT:
- The installation procedure for the RH side is the same as that for the LH side.
| 9. INSTALL FRONT STABILIZER LINK ASSEMBLY LH |
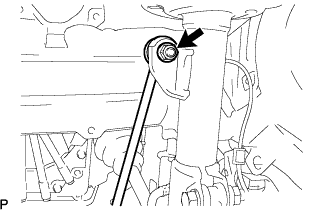 |
Install the stabilizer link with the nut.
- Torque:
- 74 N*m{ 755 kgf*cm , 55 ft.*lbf }
- HINT:
- If the ball joint turns together with the nut, use a socket hexagon wrench 6 to hold the stud.
| 10. INSTALL FRONT STABILIZER LINK ASSEMBLY RH |
- HINT:
- The installation procedure for the RH side is the same as that for the LH side.
| 11. INSTALL FRONT SPEED SENSOR LH |
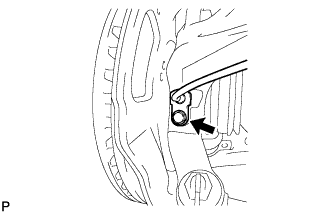 |
Install the speed sensor onto the steering knuckle with the bolt.
- Torque:
- 8.5 N*m{ 87 kgf*cm , 75 in.*lbf }
- NOTICE:
- Check that the speed sensor tip and installation portion are free of foreign matter.
- Install the speed sensor without turning it from its original installation angle.
- Check that the speed sensor tip and installation portion are free of foreign matter.
Install the flexible hose and speed sensor with the bolt.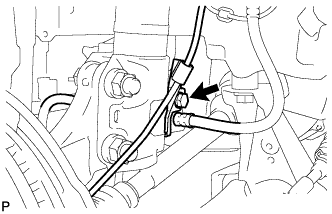
- Torque:
- 29 N*m{ 300 kgf*cm , 22 ft.*lbf }
- NOTICE:
- Install the flexible hose and speed sensor without twisting them.
| 12. INSTALL FRONT SPEED SENSOR RH |
- HINT:
- The installation procedure for the RH side is the same as that for the LH side.
| 13. INSTALL FRONT AXLE HUB NUT LH |
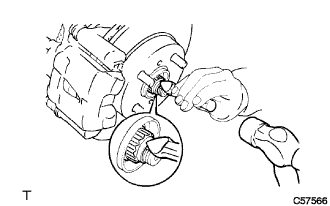 |
Using a 30 mm socket wrench, install a new axle hub nut.
- Torque:
- 216 N*m{ 2,203 kgf*cm , 160 ft.*lbf }
Using a chisel and hammer, caulk the axle hub nut.
| 14. INSTALL FRONT AXLE HUB NUT RH |
- HINT:
- The installation procedure for the RH side is the same as that for the LH side.
| 15. INSTALL FRONT WHEELS |
- Torque:
- 103 N*m{ 1,050 kgf*cm , 76 ft.*lbf }
| 16. CONNECT CABLE TO NEGATIVE BATTERY TERMINAL |
- Torque:
- 5.4 N*m{ 55 kgf*cm , 48 in.*lbf }
| 17. ADD AUTOMATIC TRANSAXLE FLUID |
- Fluid type:
- T-IV
- Capacity:
- 2.0 liters (2.1 US qts, 1.7 lmp. qts)
| 18. INSPECT AUTOMATIC TRANSAXLE FLUID |
 |
- HINT:
- Drive the vehicle until the engine and transaxle are at normal operating temperature.
- Fluid temperature:
- 70 to 80 °C (158 to 176 °F)
Park the vehicle on a level surface and engage the parking brake.
With the engine idling and the brake pedal depressed, shift the shift lever into all positions from P to L, and then return it to the P position.
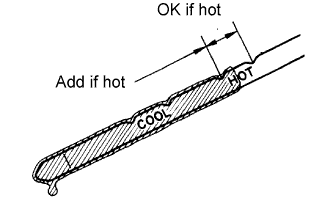
Pull out the oil level gauge and wipe it clean.
Push it fully back into the pipe.
Pull it out and check that the fluid level is within the HOT range.
If there is any leakage, repair or replace O-rings, FIPGs, oil seals, plugs or other parts.
| 19. CHECK AUTOMATIC TRANSAXLE FLUID LEAKAGE |
| 20. INSPECT FRONT WHEEL ALIGNMENT |
| 21. INSTALL ENGINE UNDER COVER RH |
| 22. INSTALL ENGINE UNDER COVER LH |