REMOVAL
Removal / installation · Vehicles built from Aug 2005
| 1. DISCONNECT CABLE FROM NEGATIVE BATTERY TERMINAL |
| 2. REMOVE FRONT WHEELS |
| 3. REMOVE ENGINE UNDER COVER LH |
| 4. REMOVE ENGINE UNDER COVER RH |
| 5. DRAIN AUTOMATIC TRANSAXLE FLUID |

Remove the drain plug and gasket, and drain the automatic transaxle fluid.
Install a new gasket and the drain plug.
- Torque:
- 49 N*m{ 500 kgf*cm , 36 ft.*lbf }
| 6. REMOVE FRONT AXLE HUB NUT LH |
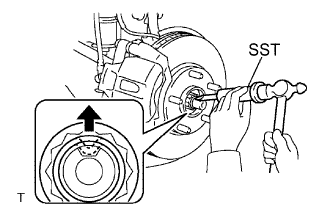  |
Using SST and a hammer, release the staked part of the axle hub nut.
- SST
- 09930-00010
- NOTICE:
- Insert SST into the groove with the flat surface facing up.
- Do not damage the tip of SST using grinders.
- Completely unstake the staked part before removing the axle hub nut.
- Do not damage the threads of the drive shaft.
- Insert SST into the groove with the flat surface facing up.
Using a 30 mm socket wrench, remove the axle hub nut.
| 7. REMOVE FRONT AXLE HUB NUT RH |
- HINT:
- The removal procedure for the RH side is the same as that for the LH side.
| 8. SEPARATE FRONT SPEED SENSOR LH |
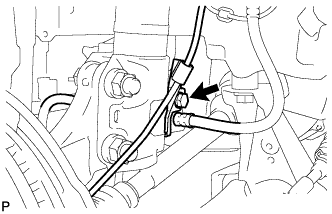 |
Remove the bolt and separate the speed sensor and flexible hose.
Remove the bolt and separate the speed sensor from the steering knuckle.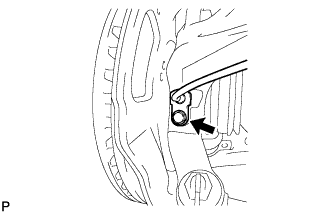
- NOTICE:
- Keep the speed sensor tip and installation portion free of foreign matter.
- Remove the speed sensor without turning it from its original installation angle.
- Keep the speed sensor tip and installation portion free of foreign matter.
| 9. SEPARATE FRONT SPEED SENSOR RH |
- HINT:
- The separation procedure for the RH side is the same as that for the LH side.
| 10. SEPARATE FRONT STABILIZER LINK ASSEMBLY LH |
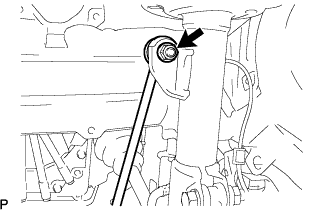 |
Remove the nut and separate the stabilizer link from the shock absorber.
- HINT:
- If the ball joint turns together with the nut, use a socket hexagon wrench 6 to hold the stud.
| 11. SEPARATE FRONT STABILIZER LINK ASSEMBLY RH |
- HINT:
- The separation procedure for the RH side is the same as that for the LH side.
| 12. SEPARATE TIE ROD END SUB-ASSEMBLY LH |
Remove the cotter pin and castle nut.
Using SST, separate the tie rod end from the steering knuckle.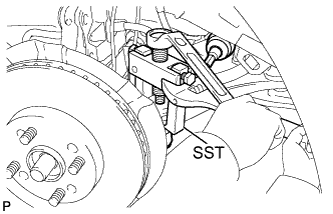
- SST
- 09628-62011
- NOTICE:
- Do not damage the tie rod end dust cover.
| 13. SEPARATE TIE ROD END SUB-ASSEMBLY RH |
- HINT:
- The separation procedure for the RH side is the same as that for the LH side.
| 14. SEPARATE FRONT SUSPENSION ARM SUB-ASSEMBLY LOWER NO.1 LH |
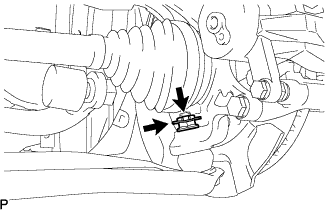 |
Remove the clip and castle nut.
Using SST, separate the lower arm.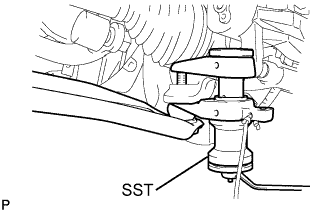
- SST
- 09628-00011
- NOTICE:
- Do not damage the lower ball joint dust cover.
- Suspend SST with a piece of string or the equivalent.
- Do not damage the lower ball joint dust cover.
| 15. SEPARATE FRONT SUSPENSION ARM SUB-ASSEMBLY LOWER NO.1 RH |
- HINT:
- The separation procedure for the RH side is the same as that for the LH side.
| 16. REMOVE FRONT DRIVE SHAFT ASSEMBLY LH |
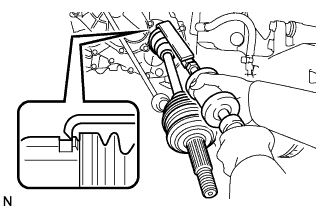 |
Using SST, remove the drive shaft.
- SST
- 09520-01010
09520-24010 (09520-32040)
- NOTICE:
- Do not damage the oil seal.
- Do not damage the inboard joint boot.
- Do not drop the drive shaft.
- Do not damage the oil seal.
| 17. REMOVE FRONT DRIVE SHAFT ASSEMBLY RH |
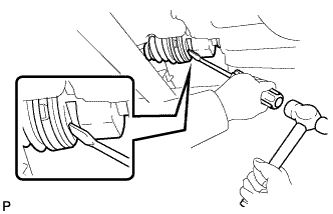 |
Using a screwdriver and hammer, remove the drive shaft.
- NOTICE:
- Do not damage the oil seal.
- Do not damage the inboard joint boot.
- Do not drop the drive shaft.
- Do not damage the oil seal.
| 18. REMOVE FRONT TRANSAXLE CASE OIL SEAL |
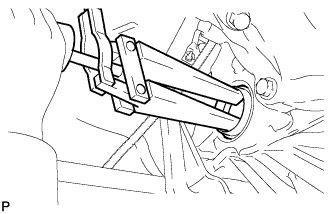 |
Using SST, remove the front transaxle case oil seal.
- SST
- 09308-00010
| 19. REMOVE TRANSAXLE CASE OIL SEAL |
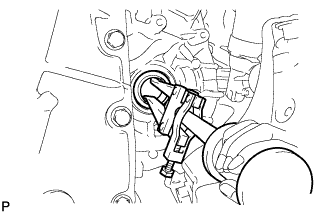 |
Using SST, remove the transaxle case oil seal.
- SST
- 09308-00010