INSTALLATION
Removal / installation · Vehicles built from Jan 2006
| 1. INSTALL TRANSMISSION CONTROL CABLE ASSEMBLY |

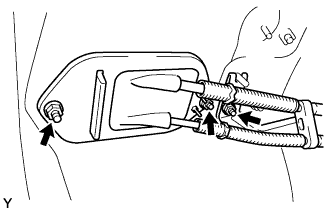  |
Install the control cable with the 3 nuts.
- Torque:
- 5.0 N*m{ 51 kgf*cm , 44 in.*lbf }
Install the control shift cable onto the shift lever retainer.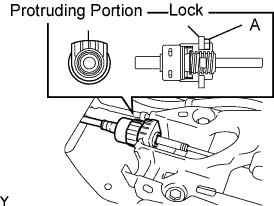
- NOTICE:
- Install the cable with the protruding portion of the cable outer facing upward.
- After installing, check that the lock of the cable outer is protruding beyond portion A, as shown in the illustration.
- Install the cable with the protruding portion of the cable outer facing upward.
Connect the control shift cable to the shift lever.
Install the control shift cable onto the control cable bracket with a new clip.
Connect the control shift cable and install the washer and clip.
Install the control select cable onto the shift lever retainer.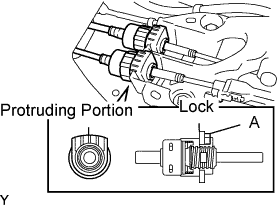
- NOTICE:
- Install the cable with the protruding portion of the cable outer facing upward.
- After installing, check that the lock of the cable outer is protruding beyond portion A, as shown in the illustration.
- Install the cable with the protruding portion of the cable outer facing upward.
Connect the control select cable to the shift lever with the clip.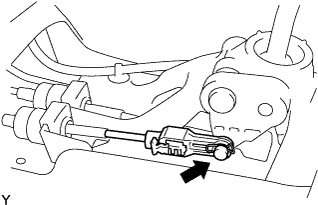
- NOTICE:
- Connect the control select cable so that the adjusting mechanism lock of the control select cable is installed on the left side of the vehicle.
- Insert the clip in the direction shown in the illustration.
- Connect the control select cable so that the adjusting mechanism lock of the control select cable is installed on the left side of the vehicle.
Install the control select cable onto the control cable bracket with a new clip.
Connect the control select cable and install the washer and clip.
Adjust the length of the control select cable.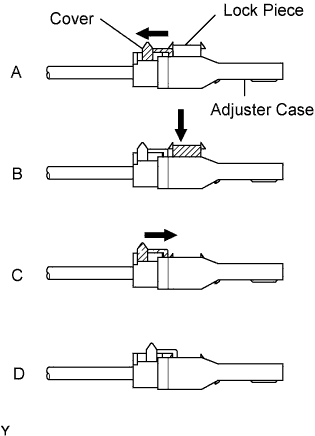
Slide the adjuster case cover in the direction shown in the illustration (Illustration A).
Gently pull the cable rod toward the rear of the vehicle by hand to pull the cable taut.
Press the lock piece into the adjuster case and lock it (Illustration B).
Slide the cover in the direction shown in the illustration (Illustration C).
- NOTICE:
- Slide the cover past the protrusion portion of the lock piece (Illustration D).
| 2. INSTALL NO. 1 FRONT FLOOR HEAT INSULATOR |
Install floor heat insulator No. 1 with the 2 bolts and nut.
- Torque:
- 5.5 N*m{ 56 kgf*cm , 49 in.*lbf }
| 3. INSTALL FRONT EXHAUST PIPE ASSEMBLY (for Leaded Gasoline Specification Vehicle) |
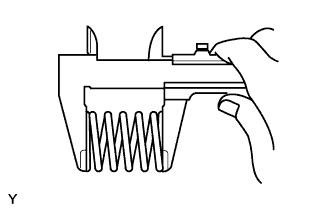 |
Using vernier calipers, measure the free length of the compression spring.
- Minimum length (Front side:
- 40.5 mm (1.594 in.)
- Minimum length (Rear side):
- 38.5 (1.516 in.)
Using a plastic hammer and a wooden block, tap in a new exhaust pipe gasket until its surface is flush with the exhaust manifold.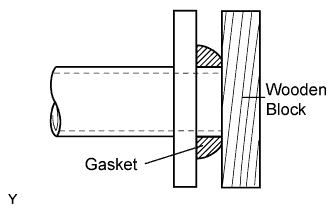
- NOTICE:
- Install the exhaust pipe gasket in the correct direction.
- Do not damage the outer surface of the exhaust pipe gasket.
- Do not reuse the exhaust pipe gasket.
- Do not push in the gasket with the exhaust pipe when connecting it.
- Install the exhaust pipe gasket in the correct direction.
Install the 3 No. 4 exhaust pipe supports.
Install the exhaust front pipe assembly and a new exhaust pipe gasket with the 4 compression springs and 4 bolts.
- Torque:
- 43 N*m{ 439 kgf*cm , 32 ft.*lbf }
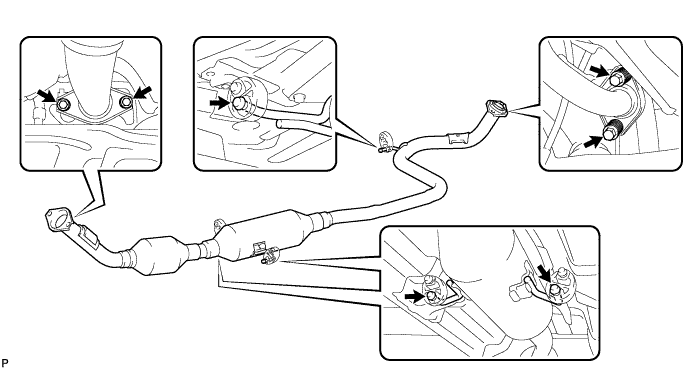
| 4. INSTALL FRONT EXHAUST PIPE ASSEMBLY (for Unleaded Gasoline Specification Vehicle) |
|
|
Using vernier calipers, measure the free length of the compression spring.
- Minimum length (Front side:
- 40.5 mm (1.594 in.)
- Minimum length (Rear side):
- 38.5 (1.516 in.)
Using a plastic hammer and a wooden block, tap in a new exhaust pipe gasket until its surface is flush with the exhaust manifold.
- NOTICE:
- Install the exhaust pipe gasket in the correct direction.
- Do not damage the outer surface of the exhaust pipe gasket.
- Do not reuse the exhaust pipe gasket.
- Do not push in the gasket with the exhaust pipe when connecting it.
- Install the exhaust pipe gasket in the correct direction.
Install the 3 No. 4 exhaust pipe supports.
Install the exhaust front pipe assembly and a new exhaust pipe gasket with the 4 compression springs and 4 bolts.
- Torque:
- 43 N*m{ 439 kgf*cm , 32 ft.*lbf }
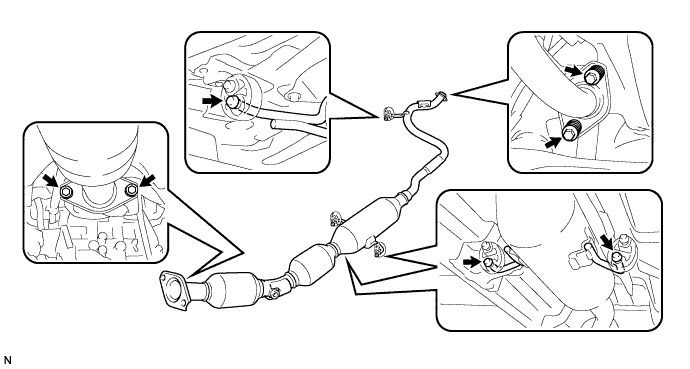
| 5. CONNECT OXYGEN SENSOR CONNECTOR (for Unleaded Gasoline Specification Vehicle) |
| 6. INSTALL REAR CONSOLE BOX ASSEMBLY |
Engage the 4 claws and install the rear console box.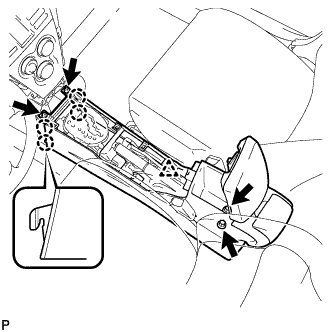
Install the 2 bolts and 2 screws.
Connect the clamp.
| 7. INSTALL CONSOLE BOX CARPET |
Install the console box carpet.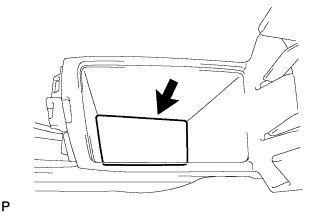
| 8. INSTALL CONSOLE UPPER REAR PANEL SUB-ASSEMBLY |
Connect the connector.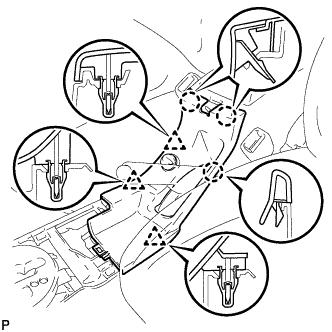
Engage the 3 clips and 3 claws and install the console upper rear panel.
| 9. INSTALL UPPER CONSOLE PANEL SUB-ASSEMBLY |
Engage the 5 clips and the claw and install the upper console panel.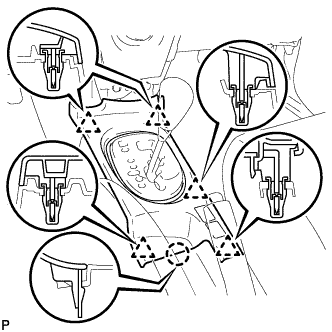
| 10. INSTALL SHIFT LEVER KNOB SUB-ASSEMBLY |
Install the shift lever knob.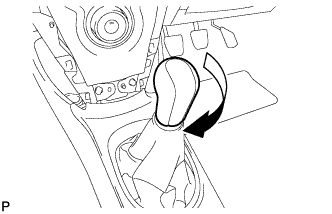
| 11. INSTALL INSTRUMENT PANEL FINISH PANEL LOWER CENTER |
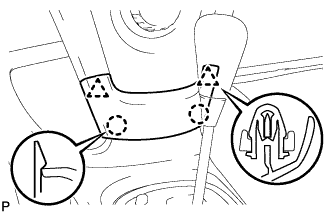 |
Engage the 2 claws and 2 clips and install the instrument panel finish panel lower center.
| 12. CONNECT CABLE TO NEGATIVE BATTERY TERMINAL |
- Torque:
- 5.4 N*m{ 55 kgf*cm , 48 in.*lbf }