REMOVAL
Removal / installation · Vehicles built from Jan 2006
| 1.
DISCONNECT CABLE FROM NEGATIVE BATTERY TERMINAL |
|
| 3.
REMOVE REAR BRAKE DRUM SUB-ASSEMBLY
|
 |
Release the parking brake and remove the rear brake drum.
If the rear brake drum cannot be removed easily, perform the following procedure.
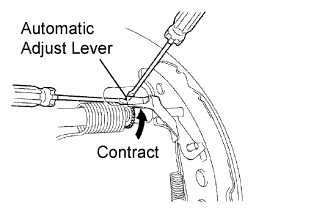
- Remove the hole plug and insert a screwdriver through the hole into the backing plate, and hold the automatic adjust lever away from the adjuster.
Using another screwdriver, contract the brake shoe by turning the adjusting bolt.
| 4.
DISCONNECT SKID CONTROL SENSOR WIRE
|
|
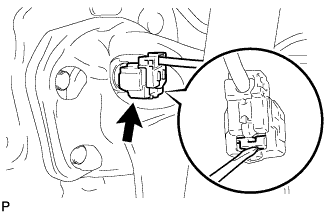
Using a screwdriver, remove the claw of the connector lock portion and disconnect the skid control sensor wire connector.
- NOTICE:
- Do not remove the connector cover from the connector because the skid control sensor wire may be damaged.
| 5.
REMOVE REAR AXLE HUB AND BEARING ASSEMBLY
|
|
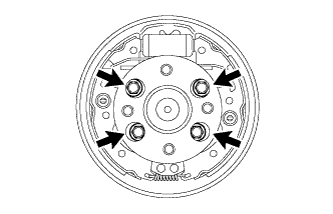
Remove the 4 bolts and remove the axle hub and bearing from the axle beam.
- NOTICE:
- Suspend the backing plate with a piece of rope.
| 6.
REMOVE SKID CONTROL SENSOR |
|
Install the 4 hub nuts and the 4 hub bolts onto the rear axle hub, and then fix the rear axle hub in a vise between aluminum plates.
- NOTICE:
- If the skid control sensor is dropped or heavily damaged, replace the rear axle hub and bearing.
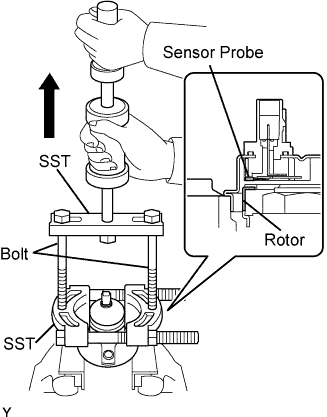
Using a 3 mm pin punch and hammer, remove the 2 pins from SST (09520-00031) and remove the attachment (09521-00010).
Using SST and the 2 bolts (90101-12007), remove the skid control sensor from the rear axle hub.
- SST
- 09520-00031
(09520-00040)
09521-00020
09950-00020
- NOTICE:
- Pull the skid control sensor off straight, being careful not to bring it into contact with the skid control sensor rotor.
- If the skid control sensor rotor is damaged or deformed, replace the rear axle hub and bearing.
- Do not damage the skid control sensor or rear axle hub contact surfaces.
- Keep the sensor rotor free of foreign matter.