ADJUSTMENT
Removal / installation · Vehicles built from Jan 2006
| 1. REMOVE REAR WHEEL |
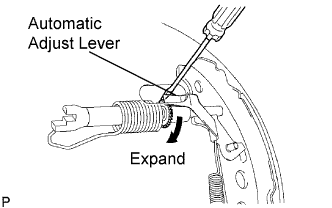
| 2. ADJUST REAR DRUM BRAKE SHOE CLEARANCE |

  |
Provisionally install the 2 hub nuts.
Remove the hole plug, and turn the adjuster to expand the shoe until the drum locks.
Using a screwdriver, release the adjuster 12 notches.
Install the hole plug.
| 3. INSTALL REAR WHEEL |
- Torque:
- 103 N*m{ 1,050 kgf*cm , 76 ft.*lbf }
| 4. INSPECT PARKING BRAKE LEVER TRAVEL |
Slowly pull the parking brake lever to the fully applied position, counting the number of clicks.
- Parking brake lever travel:
- 6 to 9 clicks at 200 N (20 kgf, 45 lbf)
| 5. REMOVE INSTRUMENT PANEL FINISH PANEL LOWER CENTER |
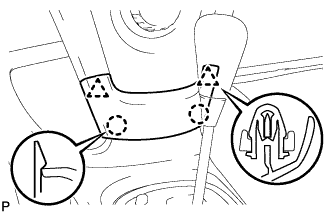 |
Disengage the 2 claws and 2 clips and remove the instrument panel finish panel lower center.
| 6. REMOVE SHIFT LEVER KNOB SUB-ASSEMBLY (for Manual Transaxle) |
Remove the shift lever knob.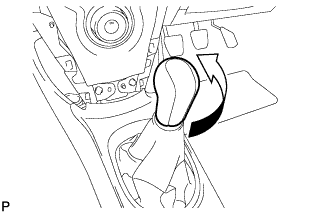
| 7. REMOVE UPPER CONSOLE PANEL SUB-ASSEMBLY |
Shift the shift lever into the N position.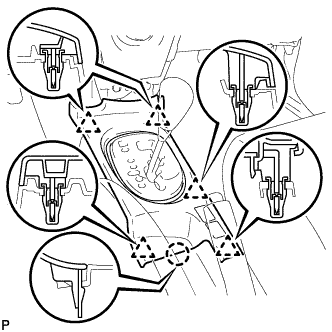
Disengage the 5 clips and the claw and remove the upper console panel.
| 8. REMOVE CONSOLE UPPER REAR PANEL SUB-ASSEMBLY |
Disengage the 3 clips and 3 claws.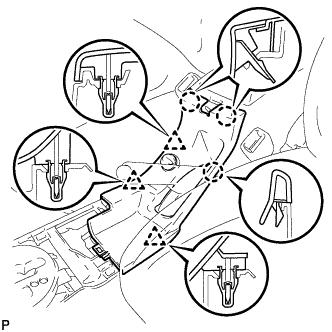
Disconnect the connector and remove the console upper rear panel.
| 9. REMOVE CONSOLE BOX CARPET |
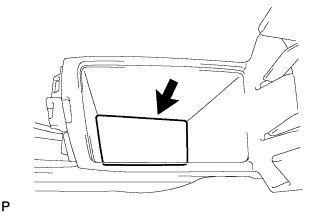 |
Remove the console box carpet.
| 10. REMOVE REAR CONSOLE BOX ASSEMBLY |
Disconnect the clamp.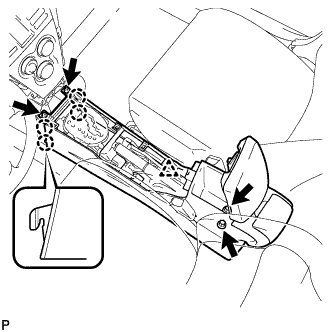
Remove the 2 bolts and 2 screws.
Disengage the 4 claws and remove the rear console box.
| 11. ADJUST PARKING BRAKE LEVER TRAVEL |
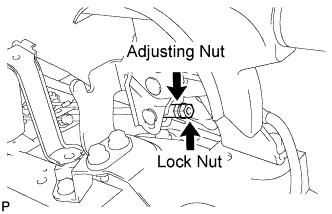 |
Loosen the lock nut and turn the adjusting nut until the parking brake lever travel is corrected to within the specified range.
- Parking brake lever travel:
- 6 to 9 clicks at 200 N (20 kgf, 45 lbf)
Tighten the lock nut.
- Torque:
- 5.4 N*m{ 55 kgf*cm , 48 in.*lbf }
Operate the parking brake lever 3 to 4 times, and check the parking brake lever travel.
Check whether the parking brake drags or not.
When operating the parking brake lever, check that the brake warning light illuminates.
- Standard:
- Brake warning light always illuminates at the first click.
| 12. INSTALL REAR CONSOLE BOX ASSEMBLY |
Engage the 4 claws and install the rear console box.
Install the 2 bolts and 2 screws.
Connect the clamp.
| 13. INSTALL CONSOLE BOX CARPET |
Install the console box carpet.
| 14. INSTALL CONSOLE UPPER REAR PANEL SUB-ASSEMBLY |
Connect the connector.
Engage the 3 clips and 3 claws and install the console upper rear panel.
| 15. INSTALL UPPER CONSOLE PANEL SUB-ASSEMBLY |
Engage the 5 clips and the claw and install the upper console panel.
| 16. INSTALL SHIFT LEVER KNOB SUB-ASSEMBLY (for Manual Transaxle) |
Install the shift lever knob.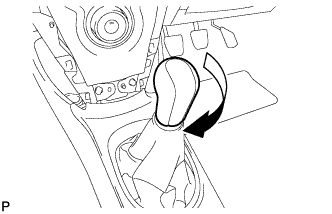
| 17. INSTALL INSTRUMENT PANEL FINISH PANEL LOWER CENTER |
|
|
Engage the 2 claws and 2 clips and install the instrument panel finish panel lower center.