REASSEMBLY
Removal / installation · Vehicles built from Nov 2005
Versions by build date: Aug 2005 – Oct 2005 from Nov 2005
| 1. INSTALL NO. 2 LUGGAGE COMPARTMENT DOOR NAME PLATE (for TMC Made) |

Clean the attachment surface.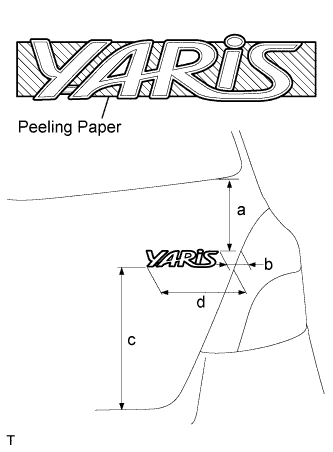

Using an infrared light, heat the double-sided adhesive tape remaining on the back door panel.
- HINT:
- Heat at 40 to 60°C (104 to 140°F) for 1 to 2 minutes.
Using a shop rag or piece of cloth, rub the remaining double-sided adhesive tape off the back door panel while it is hot from the infrared light.
- NOTICE:
- Installing the No. 2 luggage compartment door name plate while any double-sided tape remains on the back door panel may cause adhesion failure. Therefore, completely remove the double-sided tape.
Using a non-residue solvent, clean the attachment surface.
Install a new No. 2 luggage compartment door name plate as shown in the illustration.
- Installation position:
Mark
Measurement (along surface)
a
158.8 mm (6.252 in.)
b
40.3 mm (1.587 in.)
c
255.9 mm (10.075 in.)
d
157.6 mm (6.205 in.)
- NOTICE:
- Install the No. 2 luggage compartment door name plate in an environment where the ambient temperature is over 20°C (68°F). If it is below 20°C (68°F), using an infrared light, heat the back door panel and the No. 2 luggage compartment door name plate up to 20 to 30°C (68 to 86°F) and install the No. 2 luggage compartment door name plate.
| 2. INSTALL NO. 1 LUGGAGE COMPARTMENT DOOR NAME PLATE (for TMC Made) |
Clean the attachment surface.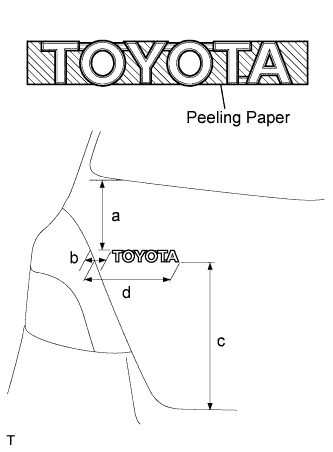
Using an infrared light, heat the double-sided adhesive tape remaining on the back door panel.
- HINT:
- Heat at 40 to 60°C (104 to 140°F) for 1 to 2 minutes.
Using a shop rag or piece of cloth, rub the remaining double-sided adhesive tape off the back door panel while it is hot from the infrared light.
- NOTICE:
- Installing the No. 1 luggage compartment door name plate while any double-sided tape remains on the back door panel may cause adhesion failure. Therefore, completely remove the double-sided tape.
Using a non-residue solvent, clean the attachment surface.
Install a new No. 1 luggage compartment door name plate as shown in the illustration.
- Installation position:
Mark
Measurement (along surface)
a
158.5 mm (6.24 in.)
b
41.7 mm (1.642 in.)
c
266.1 mm (10.476 in.)
d
156.4 mm (6.157 in.)
- NOTICE:
- Install the No. 1 luggage compartment door name plate in an environment where the ambient temperature is over 20°C (68°F). If it is below 20°C (68°F), using an infrared light, heat the back door panel and the No. 1 luggage compartment door name plate up to 20 to 30°C (68 to 86°F) and install the No. 1 luggage compartment door name plate.
| 3. INSTALL SYMBOL EMBLEM (for TMC Made) |
Clean the attachment surface.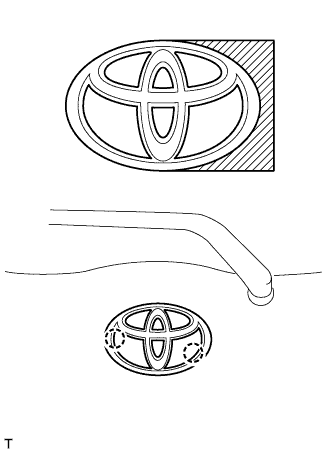
Using an infrared light, heat the double-sided adhesive tape remaining on the back door panel.
- HINT:
- Heat at 40 to 60 °C (104 to 140°F) for 1 to 2 minutes.
Using a shop rag or piece of cloth, rub the remaining double-sided adhesive tape off the back door panel while it is hot from the infrared light.
- NOTICE:
- Installing the symbol emblem while any double-sided tape remains on the back door panel may cause adhesion failure. Therefore, completely remove the double-sided tape.
Using a non-residue solvent, clean the attachment surface.
Insert the 2 bosses into the back door panel and install the symbol emblem.
- NOTICE:
- Install the symbol emblem in an environment where the ambient temperature is over 20°C (68°F). If it is below 20°C (68°F), using an infrared light, heat the back door panel and symbol emblem up to 20 to 30°C (68 to 86°F) and install the symbol emblem.
| 4. INSTALL NO. 2 LUGGAGE COMPARTMENT DOOR NAME PLATE (for TMMF Made) |
Clean the attachment surface.
Using an infrared light, heat the double-sided adhesive tape remaining on the luggage compartment door panel.
- HINT:
- Heat at 40 to 60°C (104 to 140°F) for 1 to 2 minutes.
Using a shop rag or piece of cloth, rub the remaining double-sided adhesive tape off the luggage compartment door panel while it is hot from the infrared light.
- NOTICE:
- Installing the No. 2 luggage compartment door name plate while any double-sided tape remains on the luggage compartment door panel may cause adhesion failure. Therefore, completely remove the double-sided tape.
Using a non-residue solvent, clean the attachment surface.
Install a new No. 2 luggage compartment door name plate as shown in the illustration.
- Installation position:
Mark
Measurement (along surface)
a
158.8 mm (6.252 in.)
b
40.3 mm (1.587 in.)
c
255.9 mm (10.075 in.)
d
157.6 mm (6.205 in.)
- NOTICE:
- Install the No. 2 luggage compartment door name plate in an environment where the ambient temperature is over 20°C (68°F). If it is less than 20°C (68°F), using an infrared light, heat the luggage compartment door panel and No. 2 luggage compartment door name plate up to 20 to 30°C (68 to 86°F) and install the No. 2 luggage compartment door name plate.
| 5. INSTALL NO. 6 LUGGAGE COMPARTMENT DOOR NAME PLATE (for TMMF Made) |
Clean the attachment surface.
Using an infrared light, heat the double-sided adhesive tape remaining on the luggage comparment door panel.
- HINT:
- Heat at 40 to 60°C (104 to 140°F) for 1 to 2 minutes.
Using a shop rag or piece of cloth, rub the remaining double-sided adhesive tape off the luggage compartment door panel while it is hot from the infrared light.
- NOTICE:
- Installing the No. 6 luggage compartment door name plate while any double-sided tape remains on the luggage compartment door panel may cause adhesion failure. Therefore, completely remove the double-sided tape.
Using a non-residue solvent, clean the attachment surface.
Install a new No. 6 luggage compartment door name plate as shown in the illustration.
- Installation position:
Mark
Measurement (along surface)
a
158.5 mm (6.24 in.)
b
41.7 mm (1.642 in.)
c
266.1 mm (10.476 in.)
d
156.4 mm (6.157 in.)
- NOTICE:
- Install the No. 6 luggage compartment door name plate in an environment where the ambient temperature is over 20°C (68°F). If it is less than 20°C (68°F), using an infrared light, heat the luggage compartment door panel and No. 6 luggage compartment door name plate up to 20 to 30°C (68 to 86°F) and install the No. 6 luggage compartment door name plate.
| 6. INSTALL NO. 1 LUGGAGE COMPARTMENT DOOR EMBLEM (for TMMF Made) |
Clean the attachment surface.
Using an infrared light, heat the double-sided adhesive tape remaining on the luggage compartment door panel.
- HINT:
- Heat at 40 to 60 °C (104 to 140°F) for 1 to 2 minutes.
Using a shop rag or piece of cloth, rub the remaining double-sided adhesive tape off the luggage compartment door panel while it is hot from the infrared light.
- NOTICE:
- Installing the No. 1 luggage compartment door emblem while any double-sided tape remains on the luggage compartment door panel may cause adhesion failure. Therefore, completely remove the double-sided tape.
Using a non-residue solvent, clean the attachment surface.
Insert the 2 bosses into the luggage compartment door panel and install the No. 1 luggage compartment door emblem.
- NOTICE:
- Install the No. 1 luggage compartment door emblem in an environment where the ambient temperature is over 20°C (68°F). If it is less than 20°C (68°F), using an infrared light, heat the luggage compartment door panel and No. 1 luggage compartment door emblem up to 20 to 30°C (68 to 86°F) and install the symbol emblem.
| 7. INSTALL BACK DOOR LOCK ACTUATOR ASSEMBLY (w/o Entry and Start System) |
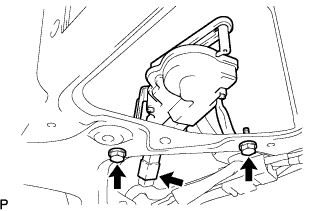 |
Install the back door lock actuator with the 2 bolts.
- Torque:
- 7.0 N*m{ 71 kgf*cm , 62 in.*lbf } (for TMC Made)
- Torque:
- 7.5 N*m{ 76 kgf*cm , 66 in.*lbf } (for TMMF Made)
Connect the connector.
| 8. INSTALL BACK DOOR OUTSIDE HANDLE (w/o Entry and Start System) |
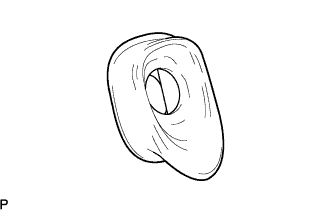 |
Install the back door outside handle onto the back door panel.
| 9. INSTALL BACK DOOR LOCK CYLINDER ASSEMBLY (w/o Entry and Start System) |
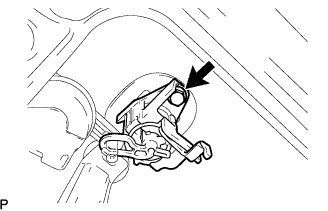 |
Install the back door lock cylinder with the bolt.
- Torque:
- 7.0 N*m{ 71 kgf*cm , 62 in.*lbf }
| 10. INSTALL BACK DOOR OUTSIDE HANDLE (w/ Entry and Start System) |
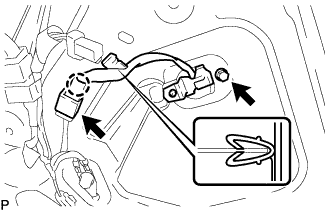 |
Install the back door outside handle onto the back door panel with the bolt.
- Torque:
- 7.0 N*m{ 71 kgf*cm , 62 in.*lbf }
Engage the claw and the clamp.
Connect the connector.
| 11. INSTALL BACK DOOR LOCK ASSEMBLY |
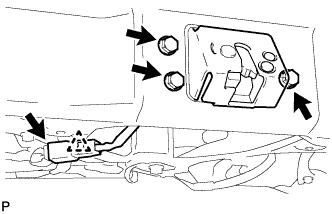 |
Install the back door lock with the 3 bolts.
- Torque:
- 7.5 N*m{ 76 kgf*cm , 66 in.*lbf }
Connect the connector and the clamp.
| 12. INSTALL BACK DOOR PANEL NO.2 PROTECTOR |
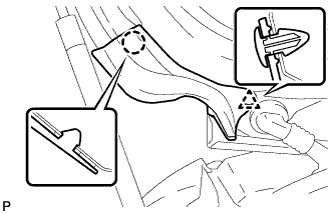 |
Apply Primer G to the installation part of back door panel protector No. 2.
- NOTICE:
- Allow the primer to dry for 3 minutes or more.
- Throw away any leftover Primer G.
- Do not apply too much Primer G.
- Allow the primer to dry for 3 minutes or more.
Engage the claw and clip and install the protector onto the back door panel, as shown in the illustration.
| 13. INSTALL BACK DOOR PANEL NO.1 PROTECTOR |
- HINT:
- Use the same procedure as described for the No. 2 protector.
| 14. INSTALL REAR WIPER MOTOR (for TMC Made) |
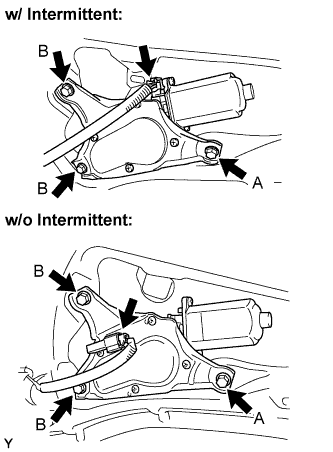 |
Install the rear wiper motor with the 3 bolts.
- Torque:
- 5.5 N*m{ 56 kgf*cm , 49 in.*lbf }
Connect the connector.
| 15. INSTALL REAR WIPER MOTOR GROMMET (for TMC Made) |
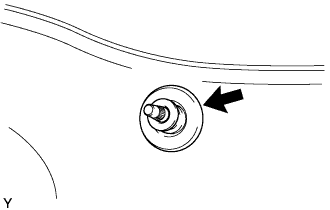 |
Install the rear wiper motor grommet.
| 16. INSTALL REAR WIPER ARM AND BLADE ASSEMBLY (for TMC Made) |
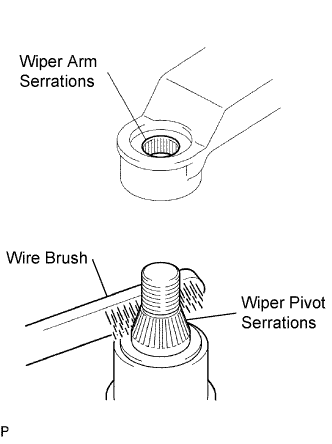 |
Scrape any metal powder off the serrated part of the wiper arm with a round file or the equivalent (when reinstalling).
Clean the wiper pivot serrations with a wire brush.
Operate the wiper, then stop the windshield wiper motor in the automatic stop position.
Install the rear wiper arm into the position shown in the illustration with the nut.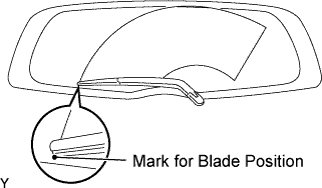
- Torque:
- 5.5 N*m{ 56 kgf*cm , 49 in.*lbf }
- HINT:
- Hold the arm hinge down by hand while tightening the nut.
Close the rear wiper arm head cap.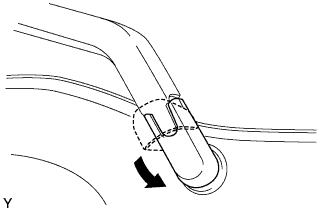
| 17. INSTALL NO. 1 REAR WIPER LINK PIVOT WASHER (for TMMF Made) |
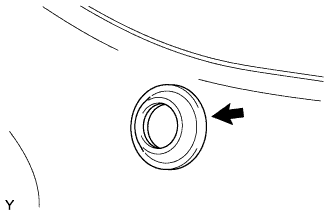 |
Install the rear wiper motor grommet.
| 18. INSTALL REAR WIPER MOTOR COVER (w/ Cover) |
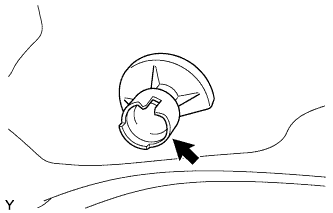 |
Install the rear wiper motor cover.
| 19. INSTALL REAR WIPER MOTOR (for TMMF Made) |
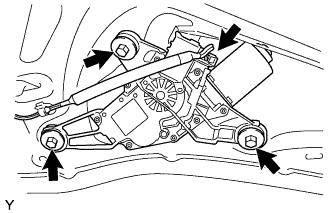 |
Install the rear wiper motor with the 3 bolts.
- Torque:
- 5.5 N*m{ 56 kgf*cm , 49 in.*lbf }
Connect the connector.
| 20. INSTALL REAR WIPER ARM AND BLADE ASSEMBLY (for TMMF Made) |
|
|
Scrape any metal powder off the serrated part of the wiper arm with a round file or the equivalent (when reinstalling).
Clean the wiper pivot serrations with a wire brush.
Operate the wiper, then stop the windshield wiper motor in the automatic stop position.
Install the rear wiper arm into the position shown in the illustration with the nut.
- Torque:
- 15 N*m{ 153 kgf*cm , 11 ft.*lbf }
- HINT:
- Hold the arm hinge down by hand while tightening the nut.
Close the rear wiper arm head cap.
| 21. INSTALL BACK DOOR TRIM BOARD ASSEMBLY |
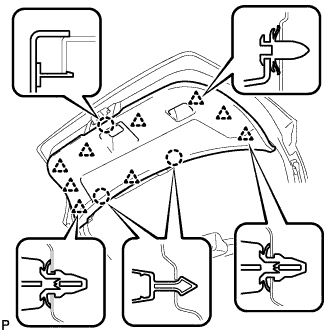 |
Engage the 3 claws and 9 clips and install the back door trim board.
Slide the handle plate of the back door trim board to engage it.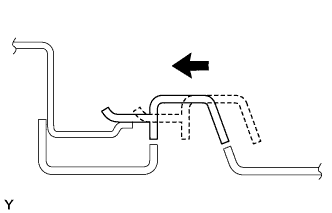
| 22. INSTALL HIGH MOUNTED STOP LIGHT ASSEMBLY |
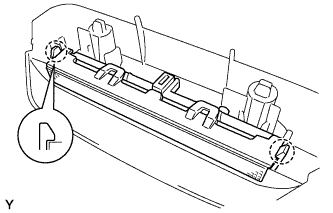 |
Engage the 2 claws and install the high mounted stop light.
| 23. INSTALL CENTER STOP LIGHT COVER |
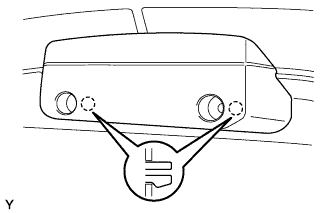 |
Connect the connector.
Engage the 2 claws.
Install the center stop light cover with the 2 screws.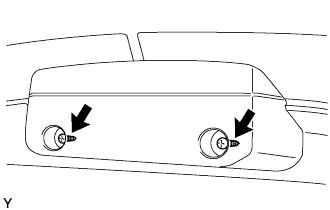
- NOTICE:
- When reusing the center stop light cover, replace the screws with 90159-60303 screws to avoid insecure installation.
Engage the 4 claws and install the rear light cover.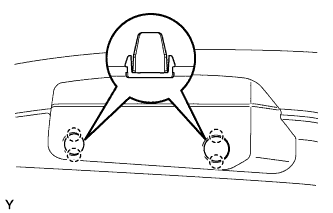
| 24. CONNECT CABLE TO NEGATIVE BATTERY TERMINAL |
- Torque:
- 5.4 N*m{ 55 kgf*cm , 48 in.*lbf }