INSTALLATION
Removal / installation · Vehicles built from Aug 2005
| 1. INSTALL WATER PUMP ASSEMBLY |

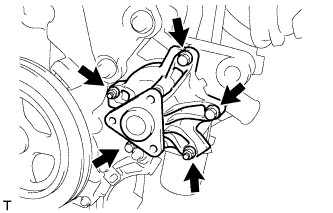  |
Install the water pump assembly through a new gasket with the 3 bolts and 2 nuts.
- Torque:
- 11 N*m{ 112 kgf*cm , 8.1 ft.*lbf }
| 2. INSTALL WATER PUMP PULLEY |
Provisionally install the water pump pulley with the 3 bolts.
Using SST, hold the water pump pulley.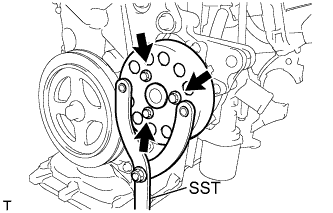
- SST
- 09960-10010
(09962-01000, 09963-00700)
Tighten the 3 bolts to the specified torque.
- Torque:
- 15 N*m{ 153 kgf*cm , 11 ft.*lbf }
| 3. INSTALL ENGINE MOUNTING INSULATOR SUB-ASSEMBLY RH |
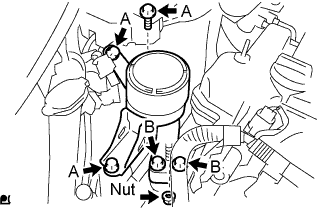 |
Install the engine mounting insulator sub-assembly RH with the 5 bolts and nut.
- Torque:
- 45 N*m{ 459 kgf*cm , 33 ft.*lbf } for bolt A
- 52 N*m{ 530 kgf*cm , 38 ft.*lbf } for bolt B and nut
| 4. INSTALL GENERATOR ASSEMBLY |
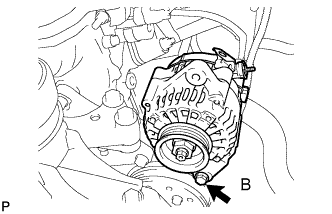 |
Provisionally install the generator with fixing bolt B.
Provisionally install the fan belt adjusting slider with fan belt adjusting slider fixing bolts A and B, then move the generator toward the cylinder block and tighten bolt B.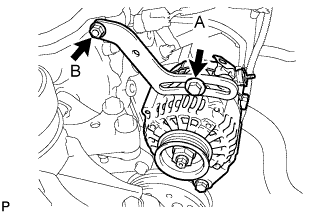
- Torque:
- 11 N*m{ 112 kgf*cm , 8.1 ft.*lbf }
Install the connector and wire harness clamp.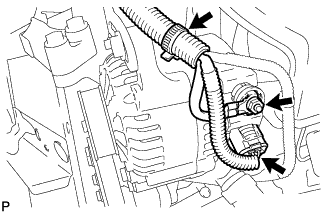
Install terminal B with the nut.
- Torque:
- 9.8 N*m{ 100 kgf*cm , 7.2 ft.*lbf }
Install the terminal cap.
| 5. INSTALL FAN AND GENERATOR V BELT |
Provisionally install the fan and generator V belt onto each pulley.
- NOTICE:
- Make sure that the V-belt is securely fitted into the rib groove of the pulley.
| 6. ADJUST FAN AND GENERATOR V BELT |
Insert an adjusting bar between the engine mounting bracket and generator assembly. Push the adjusting bar towards the vehicle front to adjust the generator V belt tension.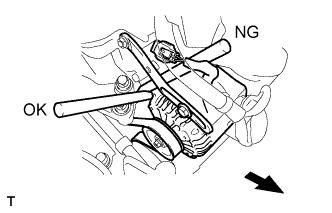
- NOTICE:
- Do not insert the adjusting bar between the camshaft timing oil control valve assembly and generator assembly. It could damage the camshaft timing oil control valve assembly.
First tighten bolt A, then tighten bolt B.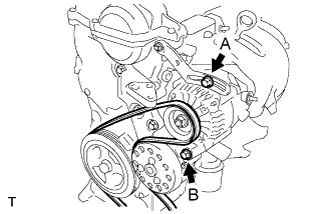
- Torque:
- 19 N*m{ 189 kgf*cm , 14 ft.*lbf } for bolt A
- 54 N*m{ 551 kgf*cm , 40 ft.*lbf } for bolt B
| 7. INSPECT FAN AND GENERATOR V BELT |
Check the V belt deflection and tension.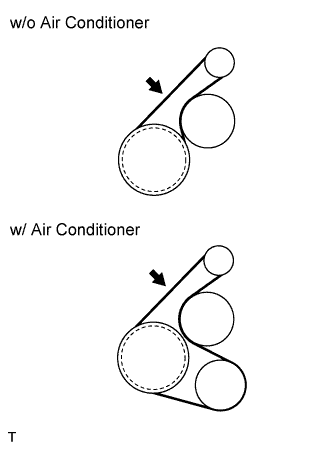
- Deflection:
Item
Specified Condition
New belt
7.0 to 8.5 mm (0.28 to 0.33 in)
Used belt
11 to 13 mm (0.43 to 0.51 in)
- Tension:
Item
Specified Condition
New belt
539 to 637 N (55 to 65 kg, 121 to 143 ld)
Used belt
245 to 392 N (25 to 40 kg, 55 to 88 ld)
- HINT:
- Check the V belt deflection at the specified point.
- Check the drive belt deflection at the specified point.
- When installing a new belt, set its tension to the specified value.
- When inspecting a belt which has been used for over 5 minutes, apply the Used Belt specifications.
- When reinstalling a belt which has been used for over 5 minutes, adjust its deflection and tension to the intermediate values of each Used Belt specification.
- V-ribbed belt tension and deflection should be checked after 2 revolutions of engine cranking.
- When using a belt tension gauge, confirm its accuracy by using a master gauge first.
- Check the V belt deflection at the specified point.
| 8. CONNECT CABLE TO NEGATIVE BATTERY TERMINAL |
- Torque:
- 5.4 N*m{ 55 kgf*cm , 48 in.*lbf }
| 9. ADD ENGINE COOLANT |
Tighten all the plugs.
Pour engine coolant into the radiator assembly until it overflows.
- Capacity:
- M/T 4.8 liters (5.1 USqts, 4.5 lmp. qts)
- A/T 4.7 liters (5.0 USqts, 4.4 lmp. qts)
- NOTICE:
- Do not substitute water for engine coolant.
- HINT:
- Use of improper engine coolant may damage the engine coolant system.
- Use only Toyota Super Long Life Coolant or similar high quality ethylene glycol based non-silicate, non-amine, non-nitrite, and non-borate engine coolant with long-life hybrid organic acid technology (coolant with long-life hybrid organic acid technology consists of a combination of low phosphates and organic acids).
- Use of improper engine coolant may damage the engine coolant system.
Check the engine coolant level inside the radiator assembly by squeezing the inlet and outlet radiator hoses several times by hand. If the engine coolant level goes down, add engine coolant.
Install the radiator cap sub-assembly securely.
Slowly pour engine coolant into the radiator reservoir until it reaches the FULL line.
Warm up the engine until the cooling fan operates.
Set the air conditioning as follows while warming up the engine.
Item
Manual air conditioning system
Automatic air conditioning system
Set control as follows
Fan speed - Any setting except "OFF"
Temperature - Toward WARM
Air conditioning switch "OFF"
Fan speed - Any setting except "OFF"
Temperature - To the highest temperature
Air conditioning switch "OFF"
"AUTO" switch "OFF"
Maintain the engine speed at 2,000 to 2,500 rpm and warm up the engine until the cooling fan operates.
Stop the engine and wait until the coolant cools down.
If the engine coolant level is below the full level, perform steps (b) through (g) again and repeat the operation until the engine coolant level stays at the full level.
Recheck the engine coolant level inside the radiator reservoir tank assembly. If it is below the full level, add the engine coolant.
Visually check for engine coolant leakage.
| 10. CHECK FOR ENGINE COOLANT LEAKAGE |
- CAUTION:
- To avoid the danger of being burned, do not remove the radiator cap sub-assembly while the engine and radiator assembly are still hot. Thermal expansion will cause hot engine coolant and steam to blow out from the radiator assembly.
Fill the radiator assembly with engine coolant, then attach a radiator cap tester.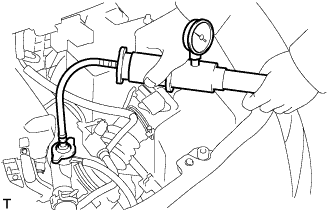
Pump the tester to 137 kPa (1.4 kgf/cm2, 19.9 psi), then check that the pressure does not drop.
If the pressure drops, check the hoses, radiator assembly and water pump assembly for leakage. If there are no signs or traces of external engine coolant leakage, check the heater core, cylinder block and head.
| 11. INSTALL ENGINE UNDER COVER RH |