Home › BODY ELECTRICAL › LIGHTING › LIGHTING SYSTEMBack-up Light Circuit
Circuit diagnosis · Vehicles built Aug 2005 – Oct 2006
Versions by build date: Aug 2005 – Oct 2006 from Nov 2006
DESCRIPTION
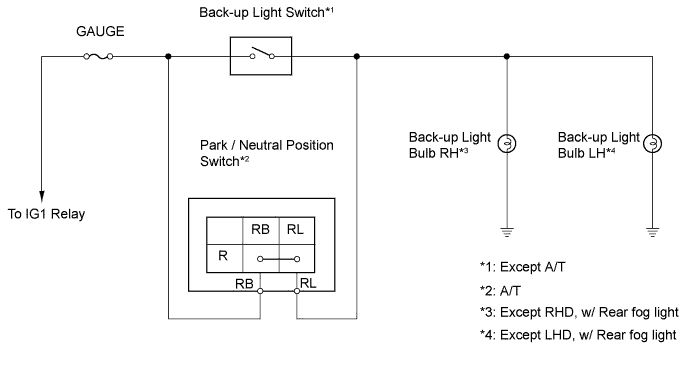
A/T models: The park/neutral position switch turns on when the shift lever is moved into the R position, causing the back-up light to illuminate. M/T models: The back-up light switch turns on when the shift lever is moved into the R position, causing the back-up light to illuminate. WIRING DIAGRAM
INSPECTION PROCEDURE
1. INSPECT FUSE (GAUGE)
Remove the GAUGE fuse from the main body ECU.
Measure the resistance.
Standard resistance:
Below 1 Ω
Reinstall the GAUGE fuse.
NG
OK
2. INSPECT BULB (BACK-UP LIGHT BULB)
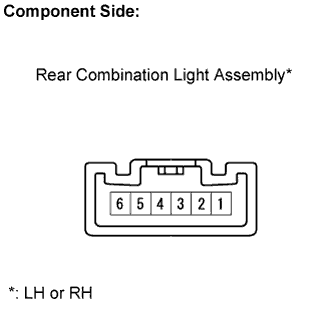
Hatchback:
Remove the rear combination light assembly. Apply battery voltage to the terminals and check that the back-up light illuminates.
Standard:
Measurement Condition
Standard
Positive battery - Terminal 1
Back-up light illuminates
Reinstall the rear combination light assembly.
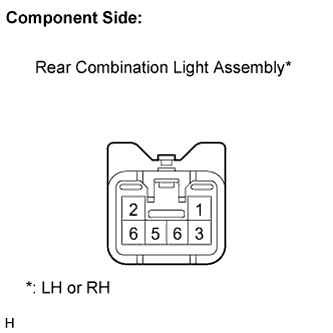
Sedan:
Remove the rear combination light assembly. Apply battery voltage to the terminals and check that the back-up light illuminates.
Standard:
Measurement Condition
Standard
Positive battery - Terminal 5
Back-up light illuminates
Reinstall the rear combination light assembly.
NG
OK
3. CHECK VEHICLE TYPE
Check transaxle type.
Result:
Transaxle Type
Proceed to
A/T
A
M/T
B
M-MT
C
B
C
A
4. INSPECT PARK / NEUTRAL POSITION SWITCH
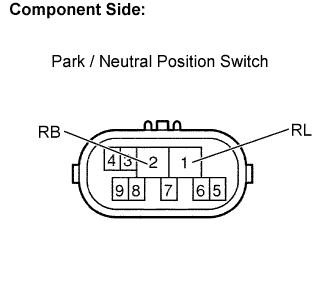
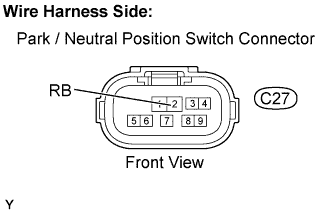
Disconnect the C27 park / neutral position switch connector. Measure the resistance.
Standard resistance:
Tester Condition
Shift Position
Specified Condition
2 (RB) - 1 (RL)
R
Below 1 Ω
2 (RB) - 1 (RL)
Except R
10 kΩ or higher
Reconnect the park / neutral position switch connector.
NG
REPLACE PARK/NEUTRAL POSITION SWITCH
OK
5. CHECK HARNESS AND CONNECTOR (GAUGE FUSE - PARK/NEUTRAL POSITION SWITCH)
Disconnect the C27 park / neutral position switch connector. Measure the voltage.
Standard voltage:
Tester Condition
Condition
Specified Condition
C27-2 (RB) - Body ground
Ignition switch on (IG)
10 to 14 V
Disconnect the C27 park / neutral position switch connector.
NG
REPAIR OR REPLACE HARNESS OR CONNECTOR
OK
6. CHECK HARNESS AND CONNECTOR (PARK/NEUTRAL POSITION SWITCH - REAR COMBINATION LIGHT)
Hatchback:
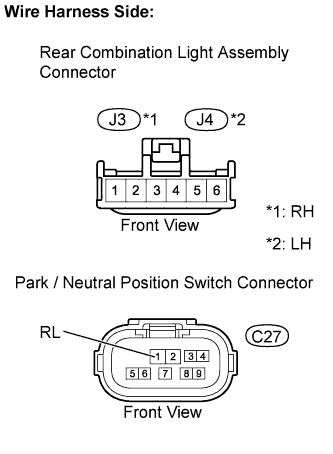
Disconnect the C27 park/neutral position switch connector. Disconnect the J3 or J4 rear combination light assembly connector.
Measure the resistance.
Standard resistance:
Tester Condition
Specified Condition
C27-1 (RL) - J3-1
Below 1 Ω
C27-1 (RL) - J4-1
Below 1 Ω
C27-1 (RL) or J3-1 - Body ground
10 kΩ or higher
C27-1 (RL) or J4-1 - Body ground
10 kΩ or higher
Reconnect the park / neutral position switch connector.
Reconnect the rear combination light assembly connector.
Sedan:
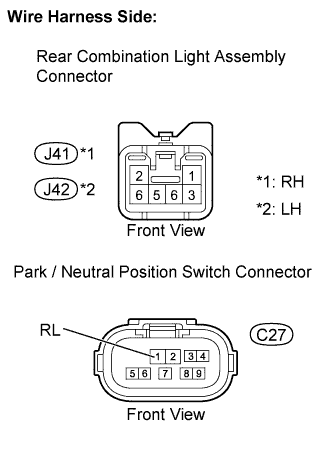
Disconnect the C27 park/neutral position switch connector. Disconnect the J41 or J42 rear combination light assembly connector.
Measure the resistance.
Standard resistance:
Tester Condition
Specified Condition
C27-1 (RL) - J41-5
Below 1 Ω
C27-1 (RL) - J42-5
Below 1 Ω
C27-1 (RL) or J41-5 - Body ground
10 kΩ or higher
C27-1 (RL) or J42-5 - Body ground
10 kΩ or higher
Reconnect the park / neutral position switch connector.
Reconnect the rear combination light assembly connector.
NG
REPAIR OR REPLACE HARNESS OR CONNECTOR
OK
REPAIR OR REPLACE HARNESS OR CONNECTOR (REAR COMBINATION LIGHT ASSEMBLY - BODY GROUND)
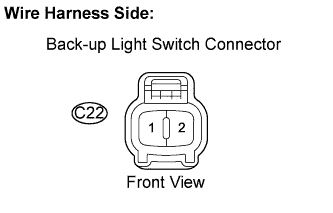
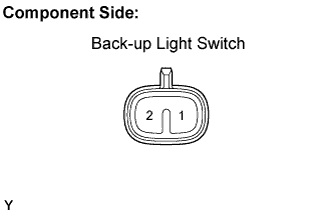
7. INSPECT BACK-UP LIGHT SWITCH
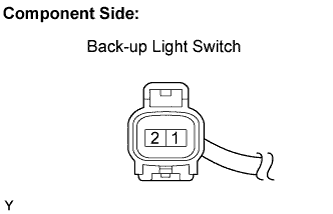
Disconnect the C22 back-up light switch connector. Measure the resistance.
Standard resistance:
Shift Position
Tester Condition
Specified Condition
R
2 - 1
Below 1 Ω
Except R
2 - 1
10 kΩ or higher
Reconnect the back-up light switch connector.
NG
REPLACE BACK-UP LIGHT SWITCH
OK
8. CHECK HARNESS AND CONNECTOR (GAUGE FUSE - BACK-UP LIGHT SWITCH)
Disconnect the C22 back-up light switch connector. Measure the voltage.
Standard voltage:
Tester Condition
Condition
Specified Condition
C22-2 - Body ground
Ignition switch on (IG)
10 to 14 V
Reconnect the back-up light switch connector.
NG
REPAIR OR REPLACE HARNESS OR CONNECTOR
OK
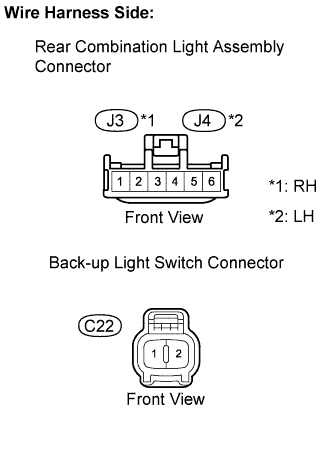
9. CHECK HARNESS AND CONNECTOR (BACK-UP LIGHT SWITCH - REAR COMBINATION LIGHT ASSEMBLY)
Hatchback:
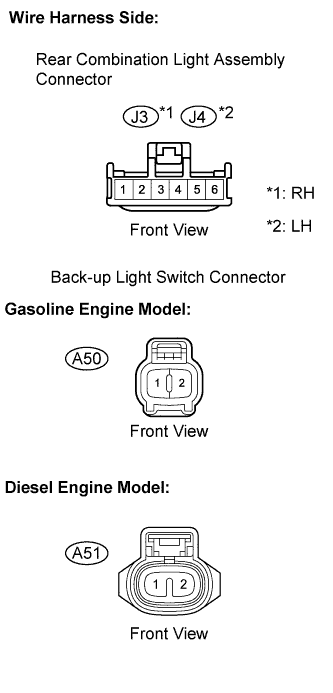
Disconnect the C22 back-up light switch connector. Disconnect the J3 or J4 rear combination light assembly connectors.
Measure the resistance.
Standard resistance:
Tester Condition
Specified Condition
C22-1 - J3-1
Below 1 Ω
C22-1 - J4-1
Below 1 Ω
C22-1 or J3-1 - Body ground
10 kΩ or higher
C22-1 or J4-1 - Body ground
10 kΩ or higher
Reconnect the back-up light switch connector.
Reconnect the rear combination light assembly connectors.
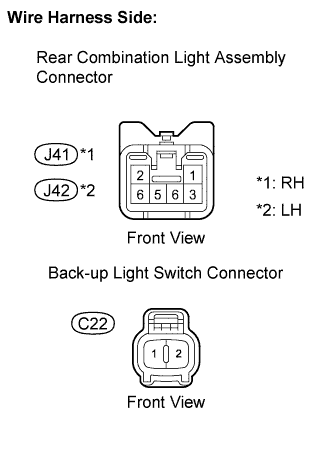
Sedan:
Disconnect the C22 back-up light switch connector. Disconnect the J41 or J42 rear combination light assembly connectors.
Measure the resistance.
Standard resistance:
Tester Condition
Specified Condition
C22-1 - J41-5
Below 1 Ω
C22-1 - J42-5
Below 1 Ω
C22-1 or J41-5 - Body ground
10 kΩ or higher
C22-1 or J42-5 - Body ground
10 kΩ or higher
Reconnect the back-up light switch connector.
Reconnect the rear combination light assembly connectors.
NG
REPAIR OR REPLACE HARNESS OR CONNECTOR
OK
REPAIR OR REPLACE HARNESS OR CONNECTOR (REAR COMBINATION LIGHT ASSEMBLY - BODY GROUND)
10. INSPECT BACK-UP LIGHT SWITCH
Gasoline engine model:
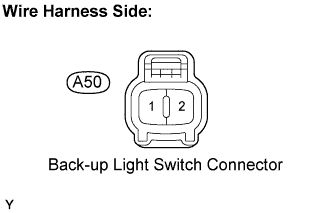
Disconnect the A50 back-up light switch connector.
Measure the resistance.
Standard resistance:
Shift Position
Tester Condition
Specified Condition
R
2 - 1
Below 1 Ω
Except R
2 - 1
10 kΩ or higher
Reconnect the back-up light switch connector.
Diesel engine model:
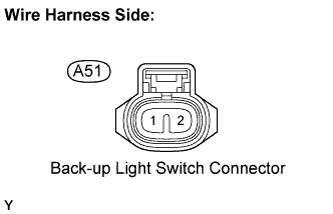
Disconnect the A51 back-up light switch connector.
Measure the resistance.
Standard resistance:
Shift Position
Tester Condition
Specified Condition
R
2 - 1
Below 1 Ω
Except R
2 - 1
10 kΩ or higher
Reconnect the back-up light switch connector.
NG
REPLACE BACK-UP LIGHT SWITCH
OK
11. CHECK HARNESS AND CONNECTOR (GAUGE FUSE - BACK-UP LIGHT SWITCH)
Gasoline engine model:
Disconnect the A50 back-up light switch connector.
Measure the voltage.
Standard voltage:
Tester Condition
Condition
Specified Condition
A50-2 - Body ground
Ignition switch on (IG)
10 to 14 V
Reconnect the back-up light switch connector.
Diesel engine model:
Disconnect the A51 back-up light switch connector.
Measure the voltage.
Standard voltage:
Tester Condition
Condition
Specified Condition
A51-2 - Body ground
Ignition switch on (IG)
10 to 14 V
Reconnect the back-up light switch connector.
NG
REPAIR OR REPLACE HARNESS OR CONNECTOR
OK
12. CHECK HARNESS AND CONNECTOR (BACK-UP LIGHT SWITCH - REAR COMBINATION LIGHT ASSEMBLY)
Gasoline engine model:
Disconnect the A50 back-up light switch connector.
Disconnect the J3 or J4 rear combination light assembly connectors.
Measure the resistance.
Standard resistance:
Tester Condition
Specified Condition
A50-1 - J3-1
Below 1 Ω
A50-1 - J4-1
Below 1 Ω
A50-1 or J3-1 - Body ground
10 kΩ or higher
A50-1 or J4-1 - Body ground
10 kΩ or higher
Reconnect the back-up light switch connector.
Reconnect the rear combination light assembly connectors.
Diesel engine model:
Disconnect the A50 back-up light switch connector.
Disconnect the J3 or J4 rear combination light assembly connectors.
Measure the resistance.
Standard resistance:
Tester Condition
Specified Condition
A51-1 - J3-1
Below 1 Ω
A51-1 - J4-1
Below 1 Ω
A51-1 or J3-1 - Body ground
10 kΩ or higher
A51-1 or J4-1 - Body ground
10 kΩ or higher
Reconnect the back-up light switch connector.
Reconnect the rear combination light assembly connectors.
NG
REPAIR OR REPLACE HARNESS OR CONNECTOR
OK
REPAIR OR REPLACE HARNESS OR CONNECTOR (REAR COMBINATION LIGHT ASSEMBLY - BODY GROUND)