Warning Buzzer does not Sound
Circuit diagnosis · Vehicles built from Jan 2006
DESCRIPTION
The combination meter assembly controls the buzzers in accordance with signals from the front seat inner belt assembly, the main body ECU and the TL-P relay.WIRING DIAGRAM
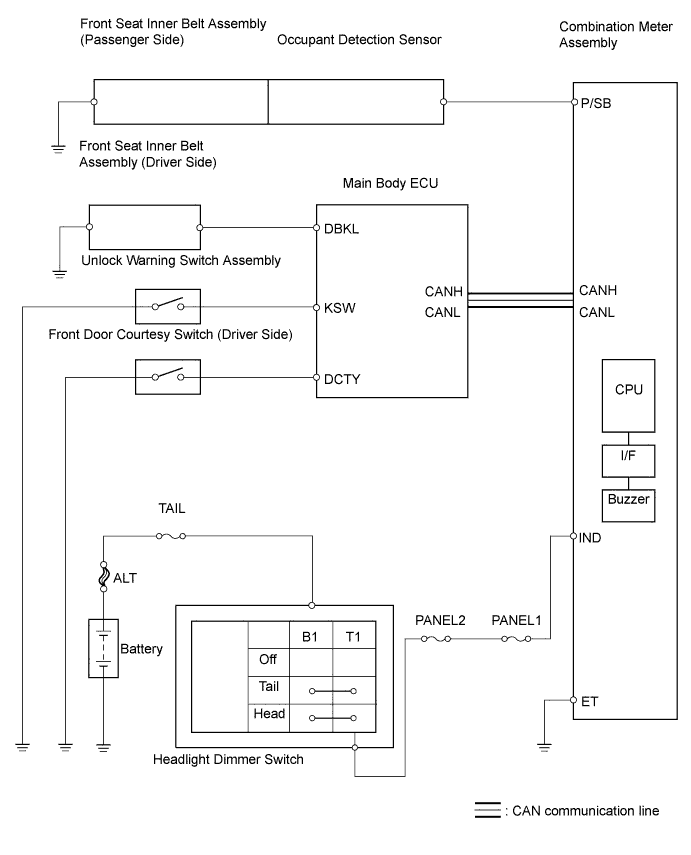

INSPECTION PROCEDURE
| 1. CHECK BUZZER (SEAT BELT, KEY REMINDER, TAIL LIGHT REMINDER) |

Check that the seat belt warning, key reminder and taillight reminder warning buzzers sound.
- Result:
Result
Proceed to
Seat belt warning buzzer does not sound
(where equipped with seat belt warning system)
A
Key reminder warning buzzer does not sound
(where equipped with key reminder warning system)
B
Taillight reminder warning buzzer does not sound
(Meter illuminations normal)
C
No warning buzzers sound
D
- HINT:
- Seat belt warning buzzer on: Ignition switch ON, seat belt is unfastened, and vehicle speed is 20km/h (12.4mph) or more.
- Key reminder warning buzzer on: Ignition switch is OFF, key is in ignition key cylinder, and driver side door is open.
- Taillight reminder warning buzzer on: Ignition switch is OFF, key is not in ignition key cylinder, and driver side door is open.
- Seat belt warning buzzer on: Ignition switch ON, seat belt is unfastened, and vehicle speed is 20km/h (12.4mph) or more.
|
|
||||
|
|
||||
|
|
||||


| A | |
 |
| 2. CHECK SEAT BELT WARNING BUZZER |
Check which seat belt warning buzzer (driver or front passenger) does not sound.
- Result:
Result
Proceed to
Driver side
A
Passenger side
B
|
|
||||
| A | |
|
| 3. READ VALUE USING INTELLIGENT TESTER (D-SEAT BUCKLE SW) |
Connect the intelligent tester to the DLC3.
Turn the ignition switch ON and turn the tester on.
Read the Data List according to the prompts displayed on the tester
- Main Body:
Item
Measurement Item/Range (Display)
Normal Condition
Diagnostic Note
D Seat Buckle SW
Buckle switch (Driver side) /
UNSET: Driver seat belt is not fastened
SET: Driver seat belt is fastened
NG: Data is not determined
UNSET / SET
-
|
|
||||
| NG | |
|
| 4. CHECK FRONT SEAT INNER BELT ASSEMBLY (DRIVER SIDE) |
LHD: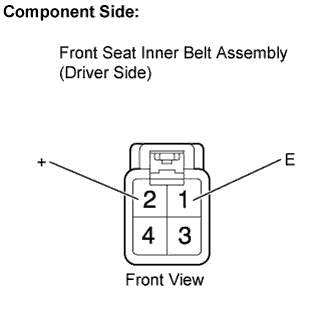
Disconnect the J35 front seat inner belt assembly (driver side) connector.
Measure the resistance.
- Standard resistance:
Tester connection
Condition
Specified Condition
1 (E) - 2 (+)
Tongue plate fastened
Below 1Ω
1 (E) - 2 (+)
Tongue plate released
10 kΩ or higher
Reconnect the front seat inner belt assembly (driver side) connector.
RHD:
Disconnect the J34 front seat inner belt assembly (driver side) connector.
Measure the resistance.
- Standard resistance:
Tester connection
Condition
Specified Condition
1 (E) - 2 (+)
Tongue plate fastened
Below 1Ω
1 (E) - 2 (+)
Tongue plate released
10 kΩ or higher
Reconnect the front seat inner belt assembly (driver side) connector.
|
|
||||
| OK | |
|
| 5. CHECK HARNESS AND CONNECTOR (FRONT SEAT INNER BELT ASSEMBLY (DRIVER SIDE) - MAIN BODY ECU) |
LHD:
Disconnect the J35 front seat inner belt assembly (driver side) connector.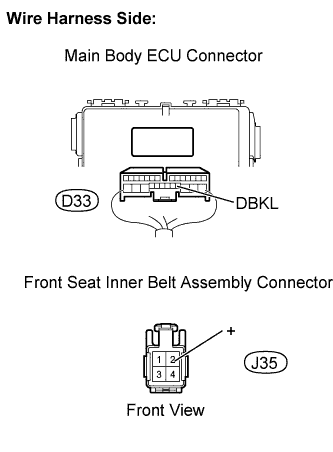
Disconnect the D33 main body ECU connector.
Measure the resistance.
- Standard resistance:
Tester Connection
Specified Condition
D33-9 (DBKL) - J35-2 (+)
Below 1Ω
D33-9 (DBKL) or J35-2 (+) - Body ground
10 kΩ or higher
Reconnect the front seat inner belt assembly (driver side) connector.
Reconnect the main body ECU connector.
RHD: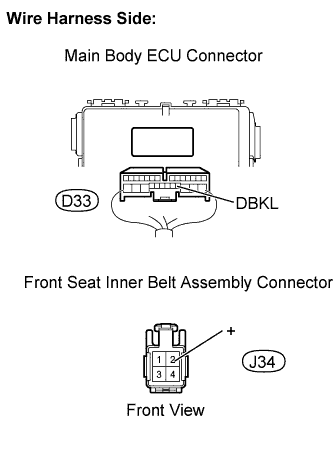
Disconnect the J34 front seat inner belt assembly (driver side) connector.
Disconnect the D33 main body ECU connector.
Measure the resistance.
- Standard resistance:
Tester Connection
Specified Condition
D33-9 (DBKL) - J34-2 (+)
Below 1Ω
D33-9 (DBKL) or J34-2 (+) - Body ground
10 kΩ or higher
Reconnect the front seat inner belt assembly (driver side) connector.
Reconnect the main body ECU connector.
|
|
||||
| OK | ||
 |
||
| ||
| 6. READ VALUE USING INTELLIGENT TESTER (P-SEAT BELT BUCKLE SW) |
Connect the intelligent tester to the DLC3.
Turn the ignition switch ON and turn the tester on.
Read the Data List according to the prompts displayed on the tester.
- Combination Meter:
Item
Measurement Item/Range (Display)
Normal Condition
Diagnostic Note
P-Seatbelt Buckle SW
Buckle switch (Passenger side) /
UNSET: Front passenger seat belt is not fastened
SET: Front passenger seat belt is fastened
UNSET / SET
-
|
|
||||
| NG | |
|
| 7. CHECK FRONT SEAT INNER BELT ASSEMBLY (PASSENGER SIDE) |
LHD: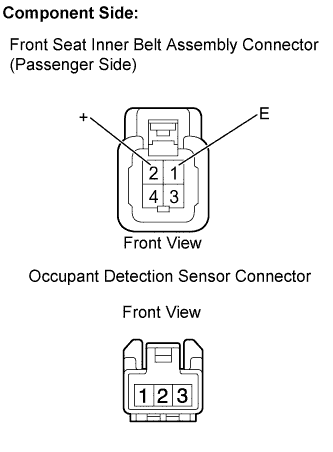
Disconnect the J34 front seat inner belt assembly (passenger side) connector.
Disconnect the occupant detection sensor connector.
Measure the resistance.
- Standard resistance:
Tester Connection
Condition
Specified Condition
1 (E) - Occupant detection sensor connector-1
Tongue plate fastened
10 kΩ or higher
1 (E) - Occupant detection sensor connector-1
Tongue plate unfastened
Below 1Ω
1 (E) - Body ground
Always
10 kΩ or higher
Occupant detection sensor connector-1 - Body ground
Always
10 kΩ or higher
2 (+) - Occupant detection sensor connector-3
Always
Below 1Ω
2 (+) or Occupant detection sensor connector-3 - Body ground
Always
10 kΩ or higher
Reconnect the front seat inner belt assembly (passenger side) connector.
Reconnect the occupant detection sensor connector.
RHD:
Disconnect the J35 front seat inner belt assembly (passenger side) connector.
Disconnect the occupant detection sensor connector.
Measure the resistance.
- Standard resistance:
Tester Connection
Condition
Specified Condition
1 (E) - Occupant detection sensor connector-1
Tongue plate fastened
10 kΩ or higher
1 (E) - Occupant detection sensor connector-1
Tongue plate unfastened
Below 1Ω
1 (E) - Body ground
Always
10 kΩ or higher
Occupant detection sensor connector-1 - Body ground
Always
10 kΩ or higher
2 (+) - Occupant detection sensor connector-3
Always
Below 1Ω
2 (+) or Occupant detection sensor connector-3 - Body ground
Always
10 kΩ or higher
Reconnect the front seat inner belt assembly (passenger side) connector.
Reconnect the occupant detection sensor connector.
|
|
||||
| OK | |
|
| 8. CHECK OCCUPANT DETECTION SENSOR |
Disconnect the occupant detection sensor connector.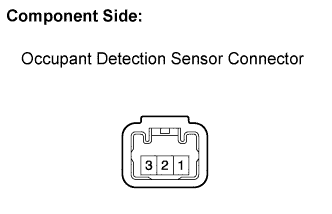
Measure the resistance.
- Measure the resistance:
Tester Connection
Condition
Specified Condition
1 - 3
Front passenger seat unoccupied
10 kΩ or higher
1 - 3
Front passenger seat occupied
Below 1Ω
Reconnect the occupant detection sensor connector.
|
|
||||
| OK | |
|
| 9. CHECK HARNESS AND CONNECTOR (FRONT SEAT INNER BELT ASSEMBLY - COMBINATION METER ASSEMBLY) |
LHD: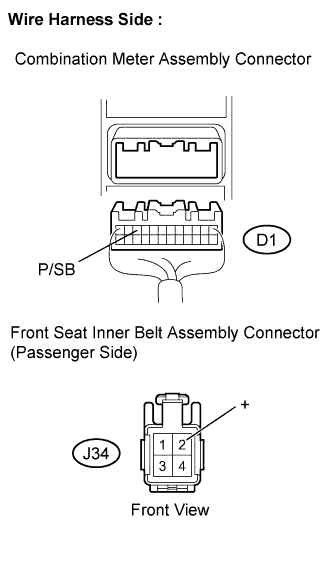
Disconnect the J34 front seat inner belt assembly (passenger side) connector.
Disconnect the D1 combination meter assembly connector.
Measure the resistance.
- Standard resistance:
Tester Connection
Specified Condition
J34-2 (+) - D1-10 (P/SB)
Below 1Ω
Reconnect the front seat inner belt assembly (passenger side) connector.
Reconnect the combination meter assembly connector.
RHD: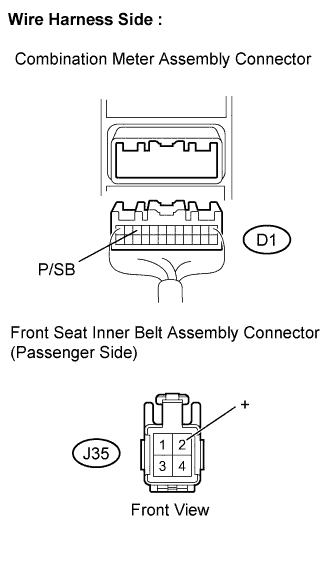
Disconnect the J35 front seat inner belt assembly (passenger side) connector.
Disconnect the D1 combination meter assembly connector.
Measure the resistance.
- Standard resistance:
Tester Connection
Specified Condition
J35-2 (+) - D1-10 (P/SB)
Below 1Ω
Reconnect the front seat inner belt assembly (passenger side) connector.
Reconnect the combination meter assembly connector.
|
|
||||
| OK | ||
|
||
| ||
| 10. READ VALUE OF INTELLIGENT TESTER (D DOOR COURTESY SW) |
Connect the intelligent tester to the DLC3.
Turn the ignition switch ON and turn the tester on.
Read the Data List according to the prompts displayed on the tester.
- Main Body:
Item
Measurement Item/Range (Display)
Normal Condition
Diagnostic Note
D Door Courtesy SW
Front door courtesy switch (Driver side) ON / OFF
ON: Front door open
OFF: Front door closed
-
|
|
||||
| NG | |
|
| 11. INSPECT FRONT DOOR COURTESY SWITCH (DRIVER SIDE) |
Remove the front door courtesy switch (driver side).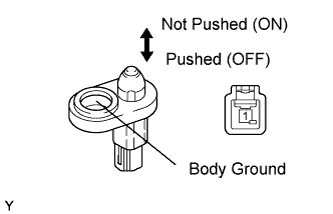
Measure the resistance.
- Standard resistance:
Tester Connection
Condition
Specified Condition
1 - Body ground
Not pushed (ON)
Below 1Ω
1 - Body ground
Pushed (OFF)
10 kΩ or higher
Reinstall the front door courtesy switch (driver side).
|
|
||||
| OK | |
|
| 12. CHECK HARNESS AND CONNECTOR (FRONT DOOR COURTESY SWITCH - MAIN BODY ECU) |
LHD: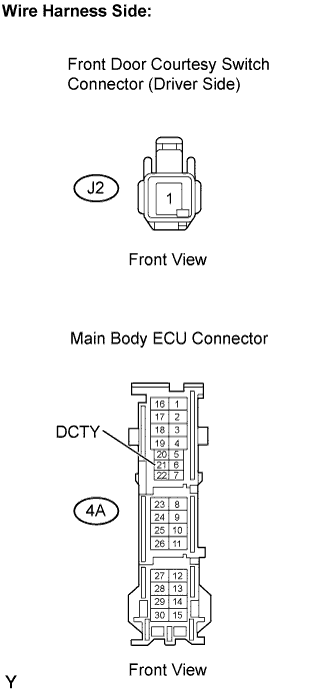
Disconnect the J2 front door courtesy switch connector.
Disconnect the 4A main body ECU connector.
Measure the resistance.
- Standard resistance:
Tester Connection
Specified Condition
J2-1 - 4A-21 (DCTY)
Below 1Ω
Reconnect the front door courtesy switch connector.
Reconnect the main body ECU connector.
RHD: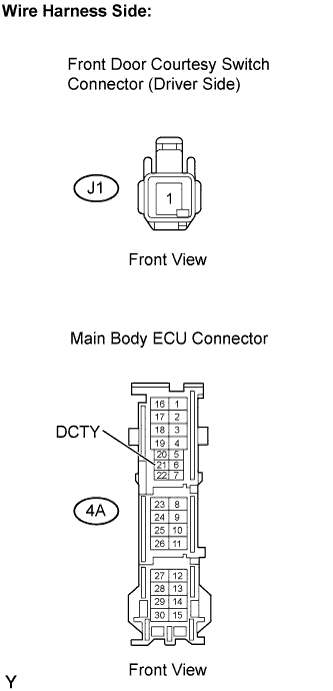
Disconnect the J1 front door courtesy switch connector.
Disconnect the 4A main body ECU connector.
Measure the resistance.
- Standard resistance:
Tester Connection
Specified Condition
J1-1 - 4A-21 (DCTY)
Below 1Ω
Reconnect the front door courtesy switch connector.
Reconnect the main body ECU connector.
|
|
||||
| OK | ||
|
||
| ||
| 13. INSPECT COMBINATION METER ASSEMBLY |
Disconnect the D84 combination meter assembly connector.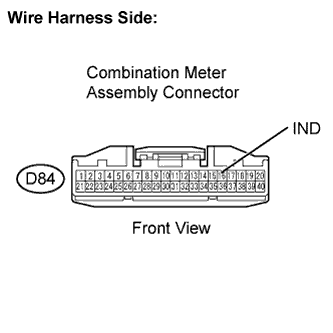
Measure the voltage.
- Standard voltage:
Tester Connection
Condition
Specified Condition
D84-16 (IND) - Body ground
Headlight dimmer switch tail or head position
10 to 14 V
Reconnect the combination meter assembly connector.
|
|
||||
| NG | |
|
| 14. CHECK HARNESS AND CONNECTOR (COMBINATION METER ASSEMBLY - MAIN BODY ECU) |
Disconnect the D84 combination meter assembly connector.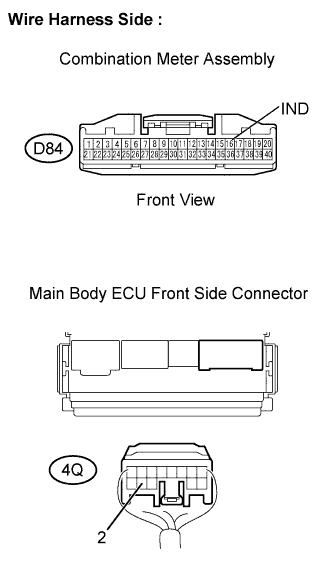
Disconnect the 4Q main body ECU connector.
Measure the resistance.
- Standard resistance:
Tester Connection
Specified Condition
D84-16 (IND) - 4Q-2
Below 1 Ω
Reconnect the combination meter assembly connector.
Reconnect the main body ECU connector.
|
|
||||
| OK | ||
|
||
| ||