INSTALLATION
Removal / installation · Vehicles built from Nov 2005
| 1. INSTALL CHAIN SUB-ASSEMBLY |

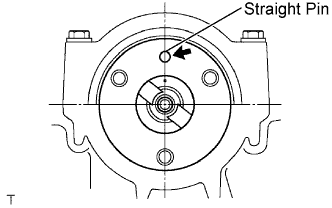  |
Turn the camshaft to set the straight pin in the position shown in the illustration.
- NOTICE:
- When turning the camshaft to set the pin in the position, turn the crankshaft to set the key in the 70° BTDC position.
Turn the crankshaft to set the key in the position shown in the illustration.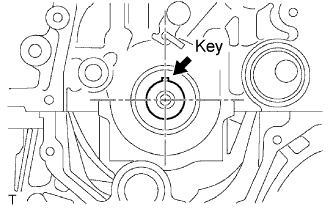
Align the yellow mark plate on the chain with the timing marks on the camshaft timing sprocket and crankshaft timing sprocket.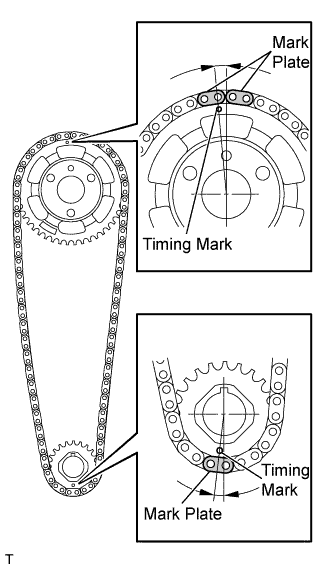
Install the chain, camshaft timing sprocket and crankshaft timing sprocket together onto the engine.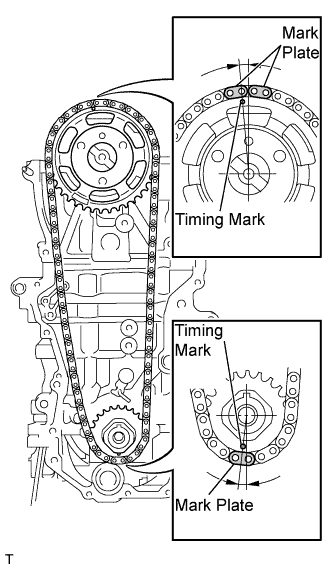
Fix the camshaft timing sprocket, using SST and install the camshaft timing sprocket with the 3 bolts.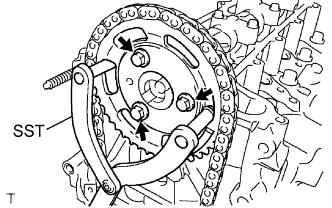
- SST
- 09960-10010
- Torque:
- 20 N*m{ 204 kgf*cm , 15 ft.*lbf }
| 2. INSTALL CHAIN VIBRATION DAMPER NO. 1 |
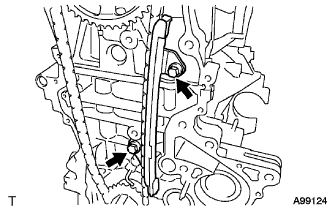 |
Install the chain vibration damper with the 2 bolts.
- Torque:
- 20 N*m{ 204 kgf*cm , 15 ft.*lbf }
| 3. INSTALL CHAIN TENSIONER SLIPPER |
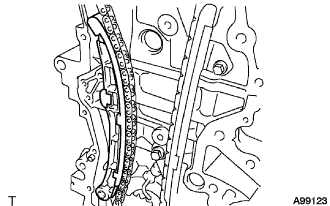 |
Install the chain tensioner slipper onto the cylinder block.
| 4. INSTALL CHAIN TENSIONER ASSEMBLY NO. 1 |
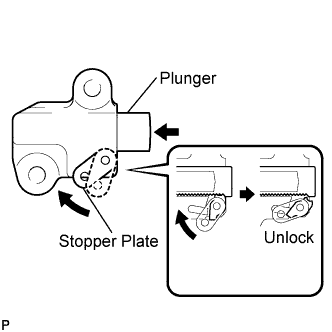 |
Pull up the stopper plate to unlock the plunger.
Push in the plunger to the end with plunger unlocked.
Pull down the stopper plate with the plunger pushed to the end to lock the plunger.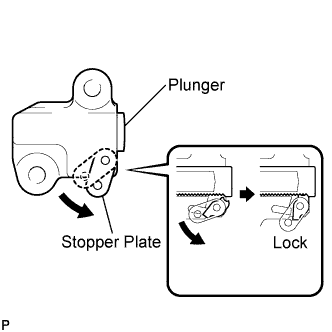
Insert a 2.5 mm (0.098 in.) diameter bar into the hole in the stopper plate with the plunger locked.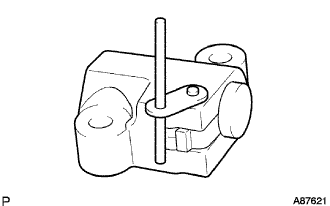
- HINT:
- If the stopper plate is not completely pulled down and a 2.5 mm (0.098 in.) diameter bar cannot be inserted, unlock and pull out the plunger slightly. The stopper plate can then be completely pulled down and a 2.5 mm (0.098 in.) diameter bar can be inserted easily.
install the chain tensioner with the 2 bolts.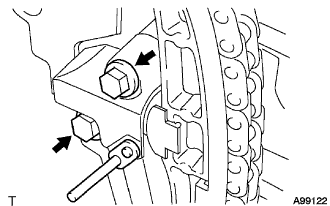
- Torque:
- 9.0 N*m{ 92 kgf*cm , 80 in.*lbf }
Remove the 2.5 mm (0.098 in.) diameter bar from the chain tensioner.
Check that the mark plates and timing marks are in the positions shown in the illustration.
| 5. INSTALL OIL PUMP SEAL |
Using SST and a hammer, tap in the new oil seal until its surface is flush with the oil pump edge.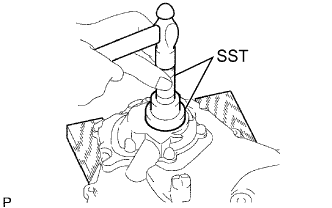
- SST
- 09223-22010
- NOTICE:
- Tap in the oil seal vertically.
Apply MP grease to a new oil seal lip.
- NOTICE:
- Keep the lip free of foreign objects.
| 6. INSTALL OIL PUMP ASSEMBLY |
Install 2 new O-rings onto the 2 portions as shown in the illustration.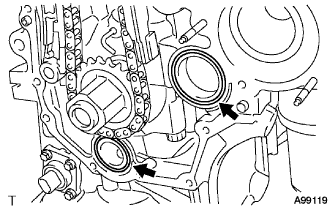
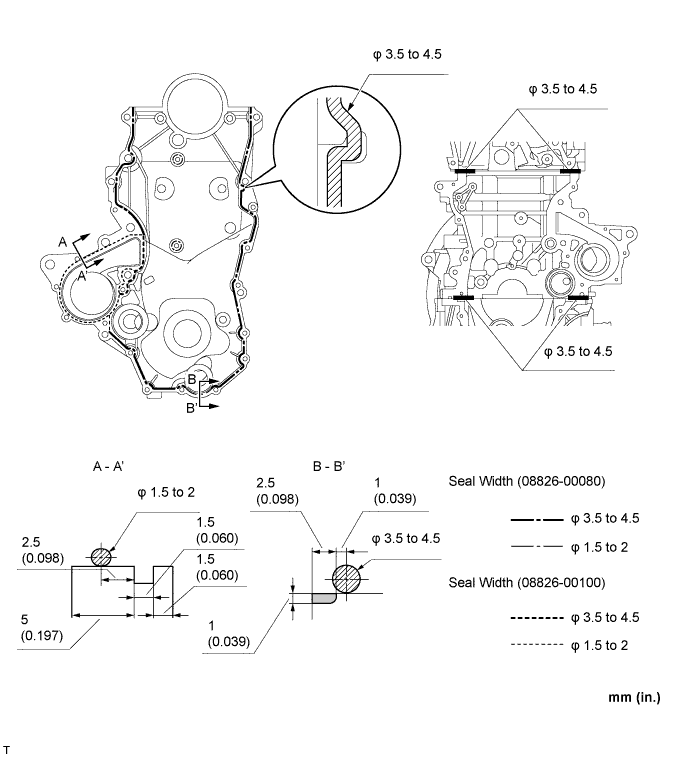
Apply seal packing to the engine body and oil pump as shown in the illustration below.
- Seal packing:
- Part No. 08826-00100 or equivalent for Water pump
Part No. 08826-00080 or equivalent for othes
- NOTICE:
- Remove any oil from the contact surface.
- Install the oil pan within 3 minutes, and tighten the bolts within 15 minutes of applying seal packing.
- Remove any oil from the contact surface.
Align the keyway of the oil pump drive rotor with the rectangular portion of the crankshaft, then slide the oil pump into place.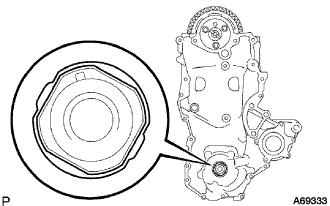
Install the oil pump assembly with the 16 bolts and nut as shown in the illustration.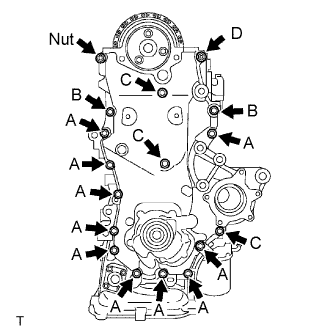
- Torque:
- Bolt A:
- 11 N*m{ 112 kgf*cm , 8 ft.*lbf }
- Bolt B:
- 24 N*m{ 245 kgf*cm , 18 ft.*lbf }
- Bolt C:
- 11 N*m{ 112 kgf*cm , 8 ft.*lbf }
- Bolt D:
- 24 N*m{ 245 kgf*cm , 18 ft.*lbf }
- Nut:
- 24 N*m{ 245 kgf*cm , 18 ft.*lbf }
- NOTICE:
- Be careful not to let the chain come into contact with the seal packing when installing the oil pump.
- Install the engine mounting bracket RH and water pump within 15 minutes of installing the oil pump.
- Be careful not to let the chain come into contact with the seal packing when installing the oil pump.
- HINT:
- The bolt lengths are as follows.
- Bolt A: 20 mm (0.79 in.)
- Bolt B: 30 mm (1.18 in.)
- Bolt C: 35 mm (1.38 in.)
- Bolt D (double ended bolt): 20 and 14 mm (0.79 and 0.55 in.)
| 7. INSTALL CRANKSHAFT DAMPER SUB-ASSEMBLY |
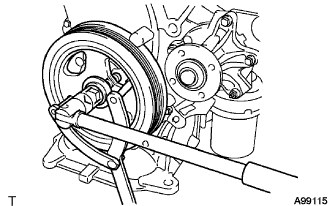 |
Align the key with the key groove of the crankshaft damper, and slide the crankshaft damper to the crankshaft.
Using SST, fix the crankshaft damper.
- SST
- 09960-10010
(09962-01000, 09963-01000)
Tighten the bolt to the specified torque.
- Torque:
- 180 N*m{ 1,835 kgf*cm , 133 ft.*lbf }
| 8. INSTALL TIMING CHAIN COVER NO.2 |
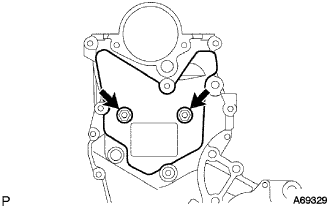 |
Install the timing cover No. 2 with the 2 bolts.
- Torque:
- 5.5 N*m{ 56 kgf*cm , 49 in.*lbf }
| 9. INSTALL WATER PUMP ASSEMBLY |
Install a new gasket and the water pump with the 3 bolts and 2 nuts.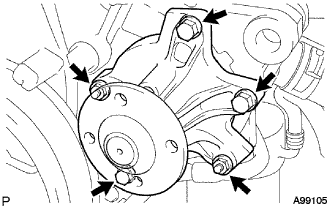
- Torque:
- 11 N*m{ 112 kgf*cm , 8 ft.*lbf }
| 10. INSTALL WATER PUMP PULLEY |
Temporarily install the water pump pulley with the 4 bolts.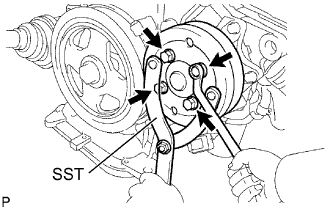
Using SST, hold the water pump pulley.
- SST
- 09960-10010
(09962-01000, 09963-00700)
Tighten the 4 bolts to the specified torque.
- Torque:
- 15 N*m{ 153 kgf*cm , 11 ft.*lbf }
| 11. INSTALL TRANSVERSE ENGINE ENGINE MOUNTING BRACKET |
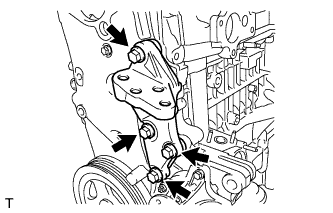 |
Install the engine mounting bracket with the 4 bolts.
- Torque:
- 55 N*m{ 561 kgf*cm , 41 in.*lbf }
| 12. INSTALL ENGINE MOUNTING INSULATOR SUB-ASSEMBLY RH |
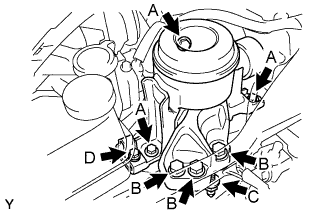 |
Install the engine mounting insulator RH with the 7 bolts and nut.
- Torque:
- 52 N*m{ 530 kgf*cm , 38 ft.*lbf } for bolt A
- 88 N*m{ 897 kgf*cm , 65 ft.*lbf } for bolt B
- 52 N*m{ 530 kgf*cm , 38 ft.*lbf } for nut C
- 20 N*m{ 199 kgf*cm , 14 ft.*lbf } for bolt D
| 13. INSTALL VACUUM PUMP ASSEMBLY |
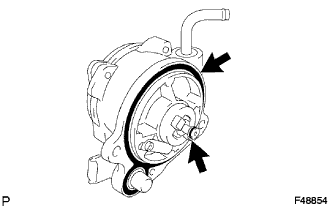 |
Coat 2 new O-rings with engine oil, and place them onto the vacuum pump.
Apply engine oil to the oil pipe at the tip of the vacuum pump.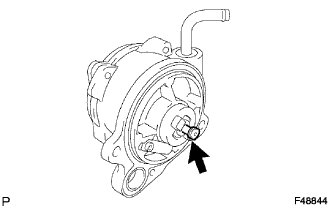
Install the vacuum pump so that the coupling teeth A on the side of the vacuum pump can engage with the tip groove of camshaft B.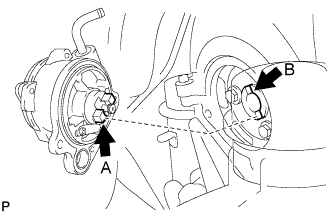
Install 2 new bolts onto the vacuum pump.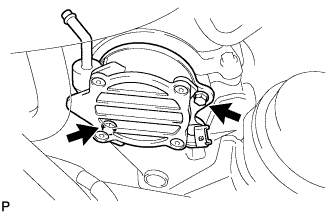
- Torque:
- 21 N*m{ 214 kgf*cm , 16 ft.*lbf }
Connect the vacuum hose with the clip to the vacuum pump.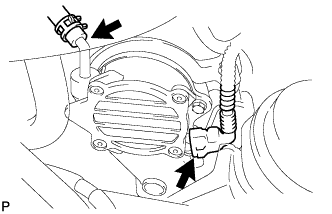
Connect the cam position sensor connector.
| 14. INSTALL CYLINDER HEAD COVER SUB-ASSEMBLY |
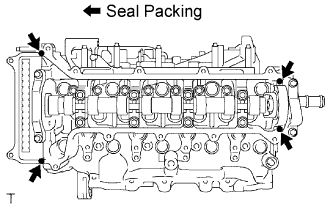 |
Apply seal packing to the 4 locations as shown in the illustration, then install the cylinder head cover.
- Seal packing:
- Part No. 08826-00080 or the equivalent
- NOTICE:
- Remove any oil from the contact surface.
- Remove any oil from the contact surface.
- Install the cylinder head cover within 3 minutes, and tighten the bolts within 15 minutes of applying the seal packing.
- Install the cylinder head cover within 3 minutes, and tighten the bolts within 15 minutes of applying the seal packing.
Temporarily tighten the cylinder head cover with the 12 bolts.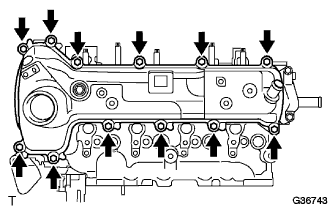
Tighten the 12 bolts to the specified torque as shown in the illustration.
- Torque:
- 13 N*m{ 133 kgf*cm , 10 ft.*lbf }
Install the connector to vacuum reservoir tube with the 2 bolts.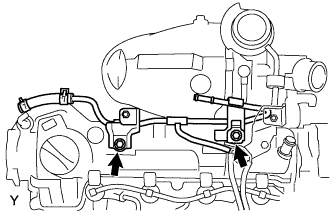
- Torque:
- 11 N*m{ 112 kgf*cm , 8 ft.*lbf }
Connect the ventilation hose to the cylinder head.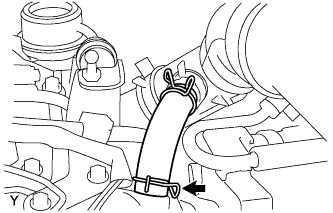
Connect the vacuum hose shown in the illustration.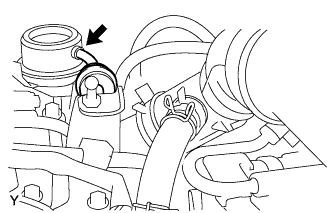
Connect the 3 vacuum hoses shown in the illustration.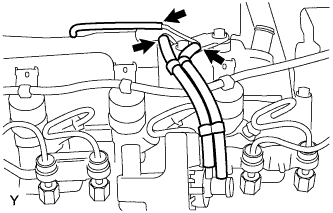
Connect the hose shown in the illustration.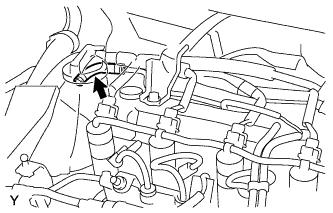
Connect the hose shown in the illustration.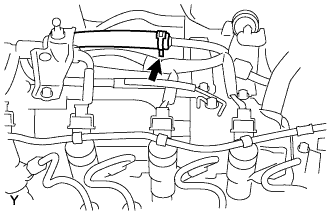
Install the 3 bolts and wire harness clamp shown in the illustration, and connect the engine wire harness.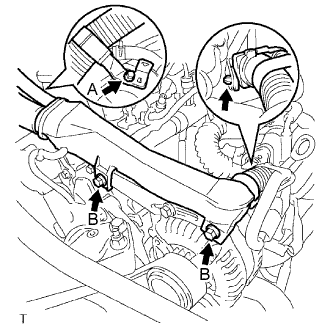
- Torque:
- Bolt A:
- 11 N*m{ 112 kgf*cm , 8.1 ft.*lbf }
- Bolt B:
- 13 N*m{ 131 kgf*cm , 9.5 ft.*lbf }
Connect the common rail connector.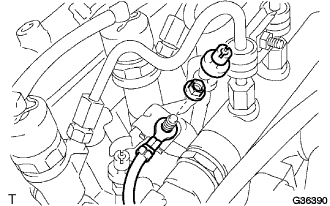
Install the wire harness with the screw grommet and the nut.
- Torque:
- 1.6 N*m{ 16 kgf*cm , 14 in.*lbf }
Connect the VSV connector and wire harness clamp shown in the illustration.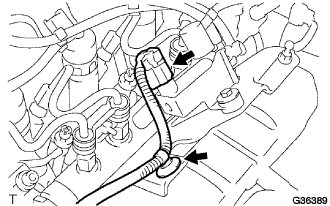
Connect the wire harness clamp shown in the illustration.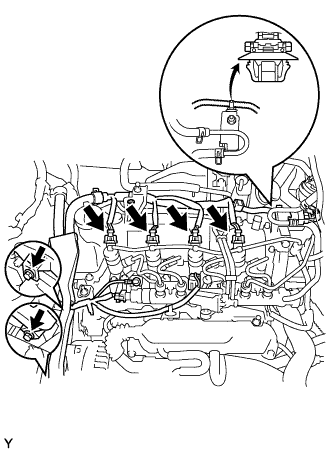
Connect the supply pump connector.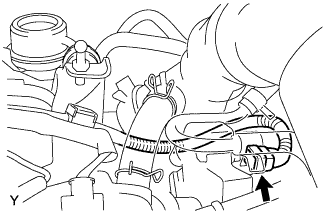
Connect the injector connector.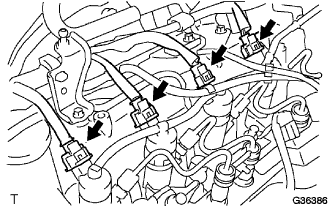
| 15. INSTALL GENERATOR ASSEMBLY |
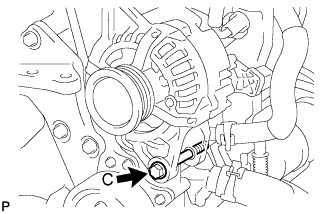 |
Provisionally install the generator with fixing bolt C.
Provisionally install the fan belt adjusting slider with fan belt adjusting slider fixing bolt A and nut B, then move the generator toward the cylinder block and tighten bolt B.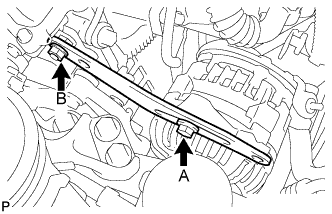
- Torque:
- 19 N*m{ 189 kgf*cm , 14 ft.*lbf } for Bolt B
Install the connector.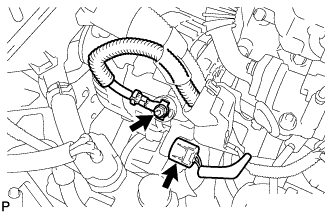
Install terminal B with the nut.
- Torque:
- 9.8 N*m{ 100 kgf*cm , 87 in.*lbf }
Install the terminal cap.
| 16. INSTALL FAN AND GENERATOR V BELT |
Temporarily install the fan and generator V belt onto each pulley.
- NOTICE:
- Before installing the V belt, check each pulley for any kind of liquid and chips.
- Before installing the V belt, check each pulley for any kind of liquid and chips.
- Check that the ribs of the V belt are correctly fitted into the grooves of the pulleys.
- Check that the ribs of the V belt are correctly fitted into the grooves of the pulleys.
| 17. ADJUST FAN AND GENERATOR V BELT |
Insert a bar between the generator and the engine. Pull the bar toward the front of the vehicle and adjust the tension.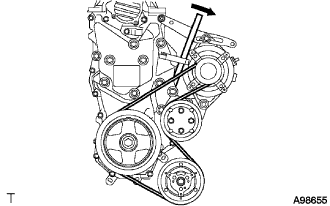
Tighten bolt A, then tighten bolt B.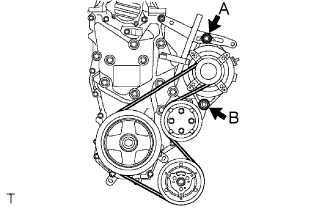
- Torque:
- Bolt A:
- 19 N*m{ 189 kgf*cm , 14 ft.*lbf }
- Bolt B:
- 32 N*m{ 326 kgf*cm , 24 ft.*lbf }
| 18. INSPECT FAN AND GENERATOR V BELT |
Inspect the fan and generator V belt deflection.
- Pressing force:
- 98 N (10kgf, 221 lbf)
New belt
mm (in.)
Used belt
mm (in.)
5.0 to 6.0
(0.197 to 0.236)
7.0 to 8.5
(0.276 to 0.335)
Inspection the fan and generator V belt tension.
New belt
mm (in.)
Used belt
mm (in.)
980 to 1176
(100 to 120, 220 to 264)
490 to 686
(50 to 70, 110 to 154)
- NOTICE:
- Check the V belt deflection at the specified point.
- Check the V belt deflection at the specified point.
- When installing a new belt, set its tension value as specified.
- When installing a new belt, set its tension value as specified.
- When checking a belt used for over 5 minutes, confirm that the deflection value is within the specified range for a used belt.
- When checking a belt used for over 5 minutes, confirm that the deflection value is within the specified range for a used belt.
- When reinstalling a belt used for over 5 minutes, check whether its deflection value is within the specified range for the used belt.
- When reinstalling a belt used for over 5 minutes, check whether its deflection value is within the specified range for the used belt.
- When using a belt tension gauge, confirm its accuracy first by using a master gauge.
- When using a belt tension gauge, confirm its accuracy first by using a master gauge.
| 19. CONNECT CABLE TO NEGATIVE BATTERY TERMINAL |
- Torque:
- 5.4 N*m{ 55 kgf*cm , 48 in.*lbf }
| 20. ADD ENGINE COOLANT |
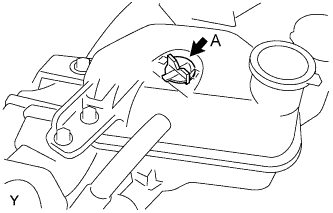 |
Remove air bleed valve A.
Fill the cooling system with coolant up to line B.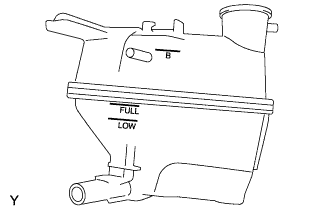
- Capacity:
- 4.7 liters (5.0 US qts, 4.1 lmp. qts)
- HINT:
- Use of improper coolant may damage the engine cooling system.
- Use only Toyota Super Long Life Coolant or similar high quality ethylene glycol based non-silicate, non-amine, non-nitrite, and non-borate engine coolant with long-life hybrid organic acid technology (coolant with long-life hybrid organic acid technology consists of a combination of low phosphates and organic acids).
- Use of improper coolant may damage the engine cooling system.
- NOTICE:
- Do not substitute plain water for engine coolant.
Tighten air bleed valve A.
Install the radiator cap.
Warm up the engine.
Set the air conditioning as follows while warming up the engine.
Item
Manual air conditioning system
Automatic air conditioning system
Set control as follows
Fan speed - Any setting except "OFF"
Temperature - Toward WARM
Air conditioning switch "OFF"
Fan speed - Any setting except "OFF"
Temperature - To the highest temperature
Air conditioning switch "OFF"
"AUTO" switch "OFF"
Run the engine at 3,000 rpm for 5 seconds and idling for 45 seconds alternately.
Do the above operation for 7 minutes or more.
After the engine cools down, check that the coolant level is between LOW and FULL lines.
| 21. CHECK ENGINE COOLANT LEAK |
- CAUTION:
- To avoid the danger of being burned, do not remove the radiator cap sub-assembly while the engine and radiator assembly are still hot. Thermal expansion will cause hot engine coolant and steam to blow out from the radiator assembly.
Fill the radiator assembly with engine coolant, then attach a radiator cap tester.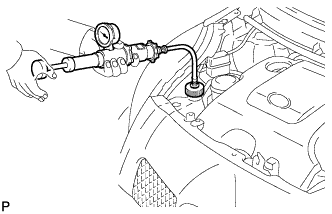
Pump it to 137 kPa (1.4 kgf/cm2, 19.9 psi), then check that the pressure does not drop.
If the pressure drops, check the hoses, radiator assembly and water pump assembly for leakage. If there are no signs or traces of external engine coolant leakage, check the heater core, cylinder block and head.
| 22. INSPECT ENGINE OIL LEVEL |
Warm up the engine. Then stop the engine, and wait 5 minutes.
Check that the engine oil level is between the 2 marks on the oil level gage.
If low, check for leakage and top up oil to the upper mark.- NOTICE:
- Do not add engine oil to above the upper mark.
| 23. CHECK ENGINE OIL LEAKAGE |
| 24. INSTALL ENGINE COVER SUB-ASSEMBLY NO. 1 |
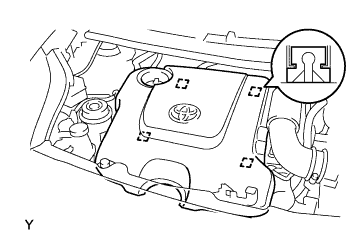 |
Engage the 4 pins and install engine cover No. 1.
| 25. INSTALL ENGINE UNDER COVER |
Provisionally install the engine under cover with the 5 bolts, 4 screws and 2 clips.
Tighten the 4 screws.
Tighten the 5 bolts.
- Torque:
- 5.0 N*m{ 51 kgf*cm , 44 in.*lbf }
| 26. INSTALL FRONT WHEEL RH |
- Torque:
- 103 N*m{ 1,050 kgf*cm , 76 ft.*lbf }