INSTALLATION
Removal / installation · Vehicles built from Nov 2005
| 1. REGISTRATION OF INJECTOR COMPENSATION CODE (REPLACEMENT OF THE NEW INJECTORS) |
| 2. INSTALL INJECTOR ASSEMBLY |

  |
- NOTICE:
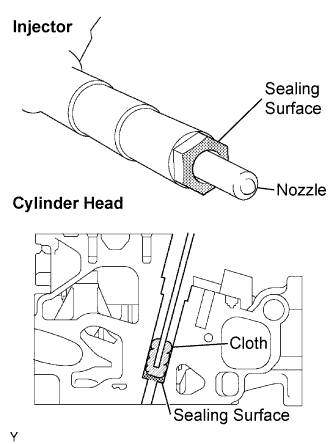
- When installing, clean the sealing surface of the injector, injection pipe and common rail.
- When replacing the injectors, the injection pipes must also be replaced.
- Replace the injection pipe with a new one when the injection pipe has been removed and reinstalled more than 5 times.
- Replace the injector with one with the same part number and install it onto the cylinder.
- When installing, clean the sealing surface of the injector, injection pipe and common rail.
Using a cloth and solvent, wipe away any carbon from the sealing surface of the injector and injector installation hole, as shown in the illustration.
- NOTICE:
- Do not damage the sealing surface.
- Do not touch the injector nozzle.
- Do not damage the sealing surface.
Install 4 new nozzle seats onto the cylinder head.
Install the injector onto the cylinder head.
- NOTICE:
- Fit the injectors into the seats.
Install the 4 nozzle holder clamp seats onto the cylinder head.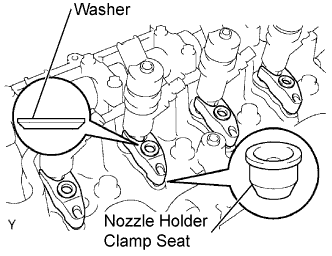
Install the 4 nozzle holder clamps onto the injectors.
Set the washer on the nozzle holder clamp, as shown illustration.
Temporarily tighten the 4 nozzle holder clamp bolts.
Temporarily install the 4 injection pipes onto the injector and common rail.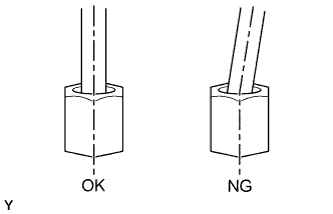
- NOTICE:
- Install the pipe and union nut vertically, not at a tilt.
Tighten the 4 nozzle holder clamp bolts.
- Torque:
- 26 N*m{ 265 kgf*cm , 19 in.*lbf }
Using SST, tighten the injection pipe union nut of the injection pipe on the common rail side.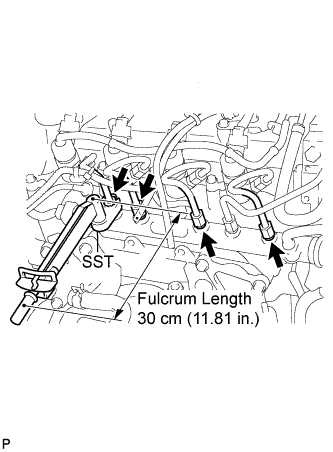
- SST
- 09023-38401
- Torque:
- With SST:
- 23 N*m{ 235 kgf*cm , 17 in.*lbf }
- Without SST:
- 25 N*m{ 255 kgf*cm , 18 in.*lbf }
- HINT:
- Use a torque wrench with a fulcrum length of 30 cm (11.81 in.).
- After the injection pipe has been reassembled, check that the used pipe has no deflection and is installed properly, then replace the used pipe with a new one.
- Use a torque wrench with a fulcrum length of 30 cm (11.81 in.).
Using a spanner (13 mm), hold the injector steadily, and using SST, tighten the injection pipe union nut of the injection pipe on the injector side.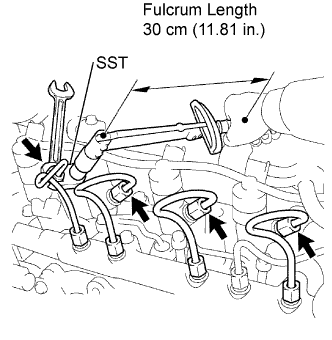
- SST
- 09023-38401
- Torque:
- With SST:
- 23 N*m{ 235 kgf*cm , 17 in.*lbf }
- Without SST:
- 25 N*m{ 255 kgf*cm , 18 in.*lbf }
- HINT:
- Use a torque wrench with a fulcrum length of 30 cm (11.81 in.).
- After the injection pipe has been reassembled, check that the used pipe has no deflection and is installed properly, then replace the used pipe with a new one.
- Use a torque wrench with a fulcrum length of 30 cm (11.81 in.).
Connect the 4 injector connectors.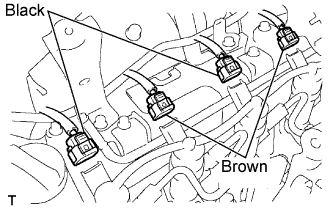
- NOTICE:
- Connect the black connector of the injector to injector No. 1 and No. 3, and brown connector to No. 2 and No. 4.
| 3. INSTALL NOZZLE LEAKAGE PIPE ASSEMBLY |
 |
- NOTICE:
- Never reuse the nozzle leakage pipe once it has been removed from the injectors and supply pump.
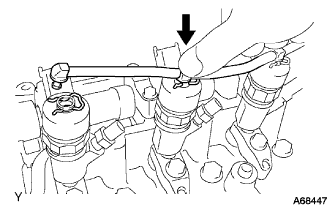
- Push the nozzle leakage pipe until it makes a click sound.
- Never reuse the nozzle leakage pipe once it has been removed from the injectors and supply pump.
Install 5 new retainer springs onto the injectors and supply pump.
Push the new nozzle leakage pipe into each injector and supply pump.
| 4. INSTALL INJECTION PIPE CLAMP NO. 2 |
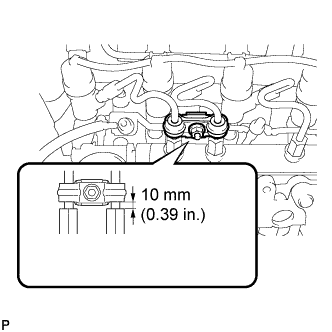 |
Install injection pipe clamp No. 2 with the nut as shown in the illustration.
- Torque:
- 9.0 N*m{ 92 kgf*cm , 80 in.*lbf }
| 5. INSTALL INJECTION PIPE CLAMP NO. 1 |
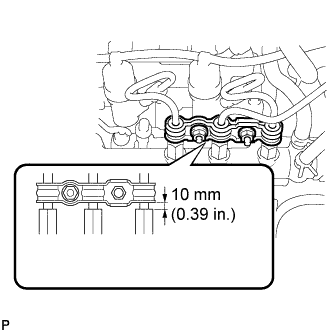 |
Install injection pipe clamp No. 1 with the 2 nuts as shown in the illustration.
- Torque:
- 9.0 N*m{ 92 kgf*cm , 80 in.*lbf }
| 6. INSTALL VACUUM REGULATING VALVE ASSEMBLY |
Install the vacuum regulating valve with the 3 bolts.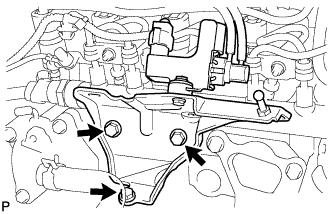
- Torque:
- 20 N*m{ 204 kgf*cm , 15 in.*lbf }
Connect the vacuum regulating valve connector and 2 vacuum hoses.
| 7. INSTALL GLOW PLUG NO. 1 CONNECTOR |
| 8. INSTALL EGR COOLER ASSEMBLY |
| 9. INSTALL OIL LEVEL GAGE GUIDE |
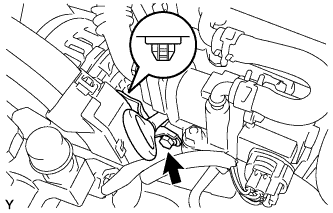 |
Install the bolt and the oil level gauge guide.
| 10. CONNECT CABLE TO NEGATIVE BATTERY TERMINAL |
- Torque:
- 5.4 N*m{ 55 kgf*cm , 48 in.*lbf }
| 11. ADD ENGINE COOLANT |
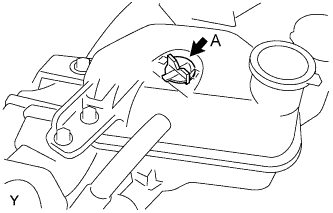 |
Remove air bleed valve A.
Fill the cooling system with coolant up to line B.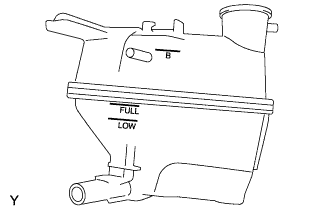
- Capacity:
- 4.7 liters (5.0 US qts, 4.1 lmp. qts)
- HINT:
- Use of improper coolant may damage the engine cooling system.
- Use only Toyota Super Long Life Coolant or similar high quality ethylene glycol based non-silicate, non-amine, non-nitrite, and non-borate engine coolant with long-life hybrid organic acid technology (coolant with long-life hybrid organic acid technology consists of a combination of low phosphates and organic acids).
- Use of improper coolant may damage the engine cooling system.
- NOTICE:
- Do not substitute plain water for engine coolant.
Tighten air bleed valve A.
Install the radiator cap.
Warm up the engine.
Set the air conditioning as follows while warming up the engine.
Item
Manual air conditioning system
Automatic air conditioning system
Set control as follows
Fan speed - Any setting except "OFF"
Temperature - Toward WARM
Air conditioning switch "OFF"
Fan speed - Any setting except "OFF"
Temperature - To the highest temperature
Air conditioning switch "OFF"
"AUTO" switch "OFF"
Run the engine at 3,000 rpm for 5 seconds and idling for 45 seconds alternately.
Do the above operation for 7 minutes or more.
After the engine cools down, check that the coolant level is between LOW and FULL lines.
| 12. CHECK ENGINE COOLANT LEAK |
- CAUTION:
- To avoid the danger of being burned, do not remove the radiator cap sub-assembly while the engine and radiator assembly are still hot. Thermal expansion will cause hot engine coolant and steam to blow out from the radiator assembly.
Fill the radiator assembly with engine coolant, then attach a radiator cap tester.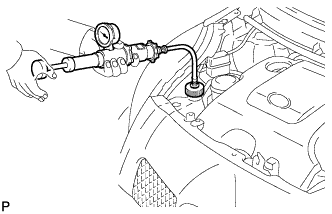
Pump it to 137 kPa (1.4 kgf/cm2, 19.9 psi), then check that the pressure does not drop.
If the pressure drops, check the hoses, radiator assembly and water pump assembly for leakage. If there are no signs or traces of external engine coolant leakage, check the heater core, cylinder block and head.
| 13. CHECK FOR FUEL LEAKAGE |
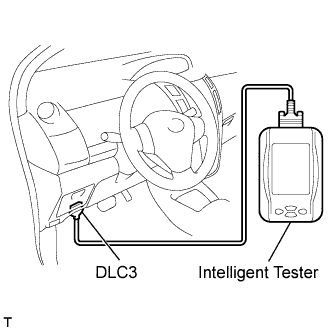 |
Connect an intelligent tester to the DLC3.
Turn the ignition switch on (IG).
Turn the tester on.
Select the following menu items: Powertrain / Engine and ECT / Active Test.
- HINT:
- Fuel pressure inside common rail pressurized to 135 MPa and engine speed increased to 2,000 rpm when ON selected.
- Above conditions preserved while test ON.
- Fuel pressure inside common rail pressurized to 135 MPa and engine speed increased to 2,000 rpm when ON selected.
| 14. CHECK ENGINE COOLANT LEAK |
- CAUTION:
- To avoid the danger of being burned, do not remove the radiator cap sub-assembly while the engine and radiator assembly are still hot. Thermal expansion will cause hot engine coolant and steam to blow out from the radiator assembly.
Fill the radiator assembly with engine coolant, then attach a radiator cap tester.
Pump it to 137 kPa (1.4 kgf/cm2, 19.9 psi), then check that the pressure does not drop.
If the pressure drops, check the hoses, radiator assembly and water pump assembly for leakage. If there are no signs or traces of external engine coolant leakage, check the heater core, cylinder block and head.
| 15. INSTALL ENGINE COVER SUB-ASSEMBLY NO. 1 |
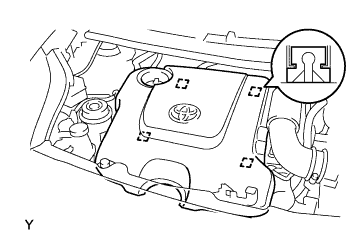 |
Engage the 4 pins and install engine cover No. 1.