DISASSEMBLY
Removal / installation · Vehicles built from Nov 2006
| 1. REMOVE ENGINE HANGER |

Remove the 2 bolts and 2 engine hangers.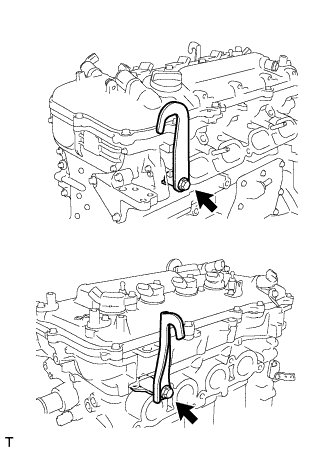

| 2. REMOVE OIL FILLER CAP SUB-ASSEMBLY |
Remove the oil filler cap.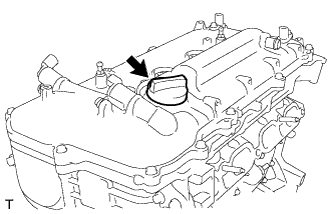
| 3. REMOVE OIL FILLER CAP GASKET |
Remove the oil filler cap gasket.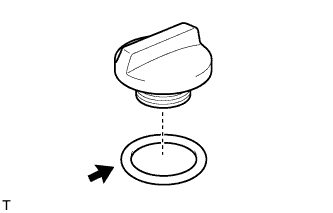
| 4. REMOVE SPARK PLUG |
Using a 14 mm socket wrench, remove the 4 spark plugs.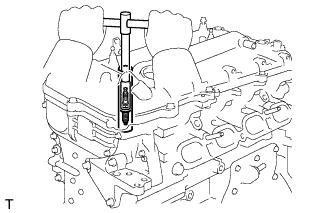
| 5. REMOVE CAMSHAFT POSITION SENSOR |
Remove the 2 bolts and 2 sensors.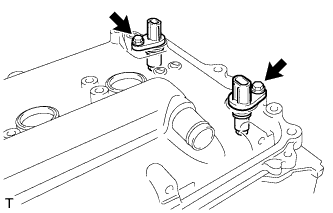
| 6. REMOVE CAMSHAFT TIMING OIL CONTROL VALVE ASSEMBLY |
Remove the 2 bolts, 2 O-rings, bracket and 2 oil control valves.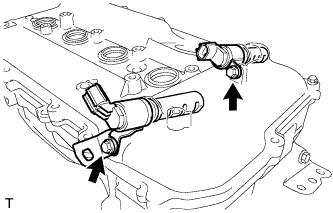
| 7. REMOVE CYLINDER HEAD COVER SUB-ASSEMBLY |
Remove the 13 bolts, seal washer and cylinder head cover.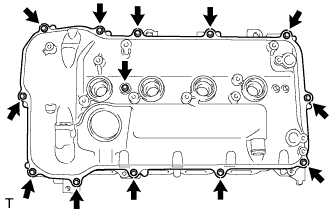
Remove the 3 gaskets from the camshaft bearing cap.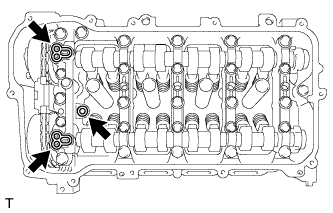
- NOTICE:
- When removing the cylinder head cover, some of the gaskets may stick to it so careful not to drop any of the gaskets into the engine.
| 8. REMOVE CYLINDER HEAD COVER GASKET |
Remove the cylinder head cover gasket.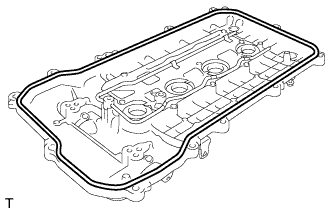
| 9. SET NO. 1 CYLINDER TO TDC / COMPRESSION |
Turn the crankshaft pulley, and align its timing notch with the "0" timing mark on the timing chain cover sub-assembly.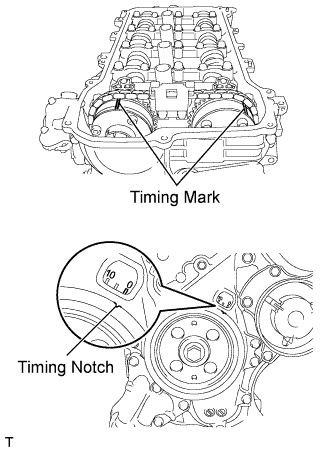
Check that timing marks on both the camshaft timing exhaust gear and camshaft timing gear are facing upward, as shown in the illustration.
- HINT:
- If not, turn the crankshaft 1 complete revolution (360°) and align the marks as above.
| 10. REMOVE CRANKSHAFT PULLEY |
Using SST, hold the pulley in place and loosen the pulley bolt.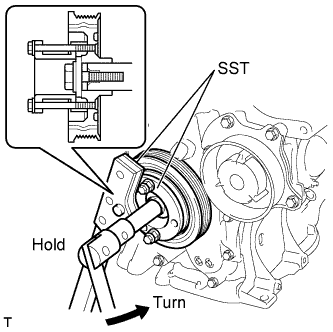
- SST
- 09213-54015
(91651-60855)
09330-00021
Using SST, remove the pulley bolt and pulley.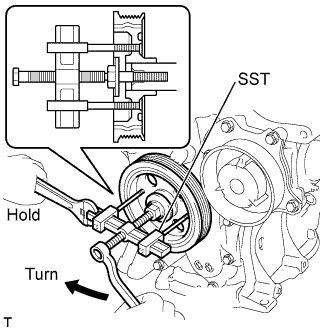
- SST
- 09950-50013
(09951-05010, 09952-05010, 09953-05020, 09954-05021)
| 11. REMOVE NO. 1 CHAIN TENSIONER ASSEMBLY |
Remove the 2 nuts, bracket, No. 1 chain tensioner assembly and gasket.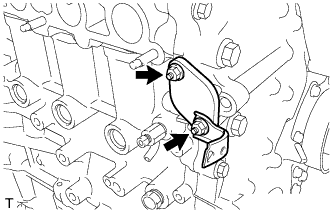
- NOTICE:
- Do not turn the crankshaft after you have removed the chain tensioner.
| 12. REMOVE CRANKSHAFT POSITION SENSOR |
Remove the bolt and crankshaft position sensor.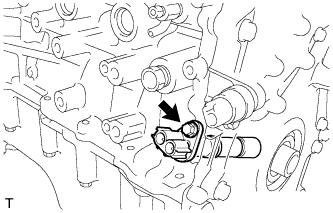
| 13. REMOVE ENGINE OIL PRESSURE SWITCH ASSEMBLY |
Using a 24 mm deep socket wrench, remove the engine oil pressure switch assembly.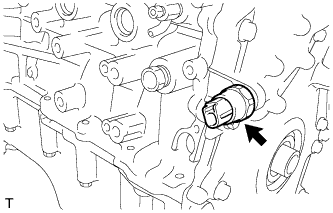
| 14. REMOVE NO. 1 TAPER SCREW PLUG |
Remove the No. 1 taper screw plug.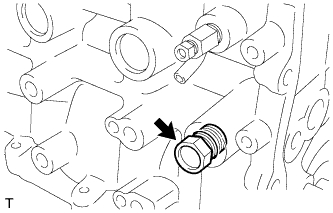
| 15. REMOVE KNOCK SENSOR |
Remove the bolt and knock sensor.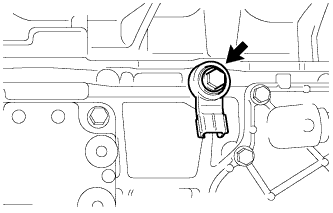
| 16. REMOVE ENGINE WATER TEMPERATURE SENSOR |
Using a 19 mm deep socket wrench, remove the engine water temperature sensor.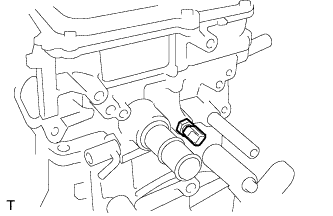
Remove the gasket from the engine water temperature sensor.
| 17. REMOVE OIL FILTER SUB-ASSEMBLY |
Using SST, remove the oil filter cap.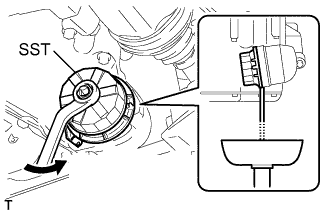
- SST
- 09228-06501
- HINT:
- Use a container to catch the draining oil. After the oil filter cap is loosened approximately 4 turns and the cap rib is facing straight down, engine oil will begin to drain from the gap between the oil filter cap and oil pan.
Remove the oil filter element and O-ring from the oil filter cap.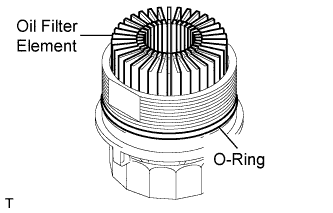
- NOTICE:
- Be sure to remove the O-ring (for the cap) by hand, without using any tools, to prevent damage to the O-ring groove on the cap.
| 18. REMOVE WATER INLET |
Remove the 2 nuts and remove the water inlet.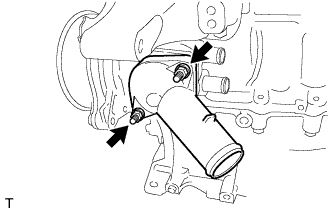
| 19. REMOVE THERMOSTAT |
Remove the thermostat from the cylinder block.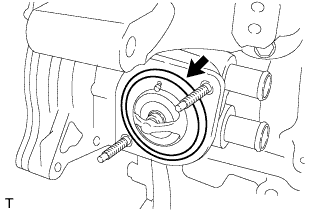
Remove the gasket from the thermostat.
| 20. REMOVE TIMING CHAIN OR BELT COVER SUB-ASSEMBLY |
Remove the 3 bolts and remove the engine mounting bracket RH.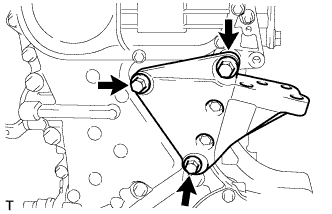
Remove the 4 bolts and remove the oil filter bracket.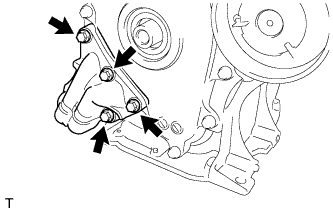
Remove the 2 O-rings from the timing chain cover sub-assembly.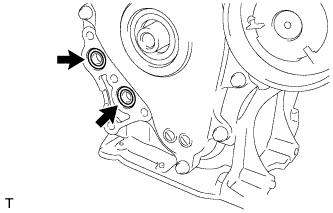
Remove the 19 bolts.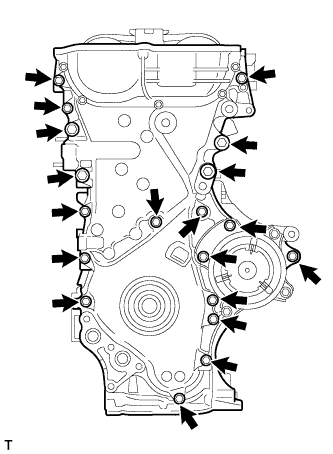
Remove the timing chain or belt cover sub-assembly by prying between the timing chain or belt cover sub-assembly and cylinder head or cylinder block with a screwdriver wrapped in protective tape.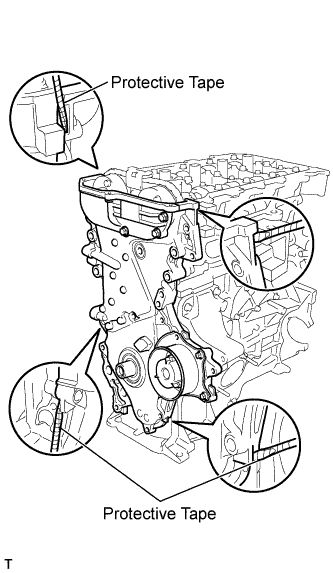
- NOTICE:
- Be careful not to damage the contact surfaces of the timing chain or belt cover sub-assembly, cylinder block and cylinder head.
Remove the 3 O-rings from the cylinder head and cylinder block.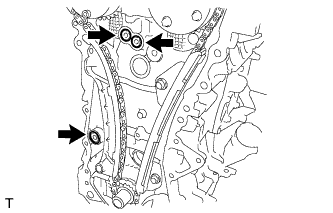
Remove the 3 bolts and the water pump assembly.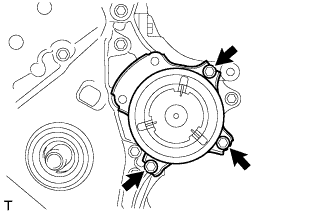
Remove the gasket from the timing chain or belt cover sub-assembly.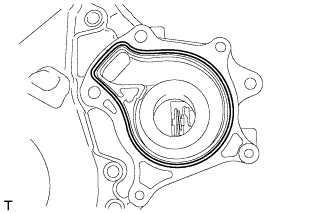
| 21. REMOVE WATER INLET HOUSING |
Remove the 3 bolts, gasket and water inlet housing.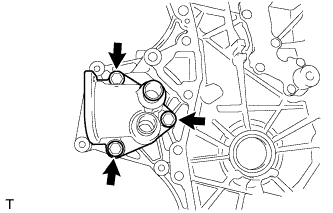
| 22. REMOVE NO. 1 GENERATOR BRACKET |
Remove the 4 bolts and generator bracket.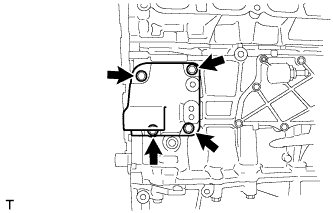
| 23. REMOVE NO. 2 CHAIN VIBRATION DAMPER |
Remove the 2 bolts and remove the No. 2 chain vibration damper.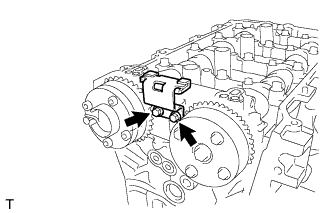
| 24. REMOVE CHAIN TENSIONER SLIPPER |
Remove the chain tensioner slipper from the cylinder block.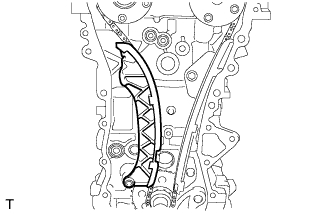
| 25. REMOVE NO. 1 CHAIN VIBRATION DAMPER |
Remove the 2 bolts and the chain vibration damper.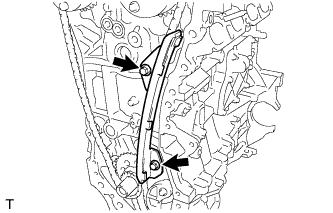
| 26. REMOVE CHAIN SUB-ASSEMBLY |
Hold the hexagonal portion of the camshaft with a wrench and turn the camshaft timing gear assembly counterclockwise to loosen the chain on the camshaft timing gears.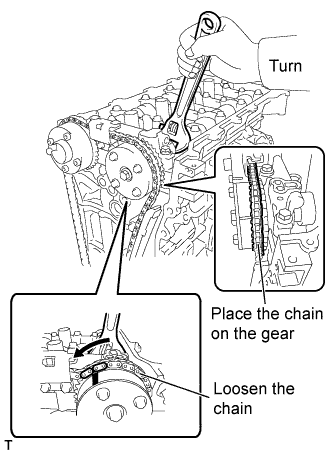
With the chain loosened, release the chain from the camshaft timing gear assembly and rest it on the camshaft timing gear assembly.
- HINT:
- Be sure to release the chain from the sprocket completely.
Turn the camshaft clockwise to return it to the original position and remove the chain.
| 27. REMOVE CRANKSHAFT TIMING GEAR OR SPROCKET |
Remove the crankshaft timing gear or sprocket.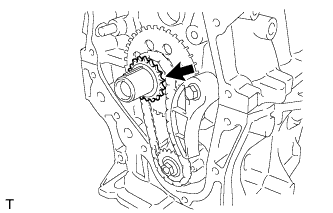
| 28. REMOVE NO. 2 CHAIN SUB-ASSEMBLY |
Turn the crankshaft 90° clockwise to align the adjusting hole of the oil pump drive shaft gear with the groove of the oil pump.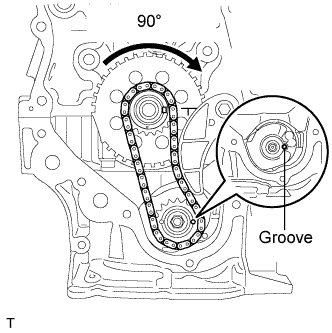
Insert a 4 mm diameter bar into the adjusting hole of the oil pump drive shaft gear to lock the gear in position, and then remove the nut.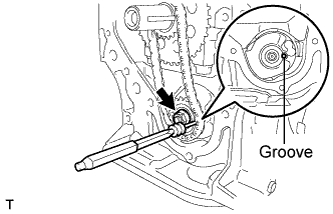
Remove the bolt, chain tensioner plate and spring.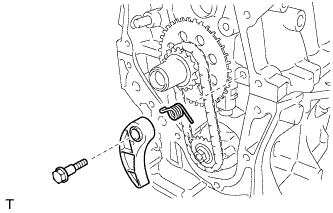
Remove the, oil pump drive shaft gear, oil pump drive gear and chain.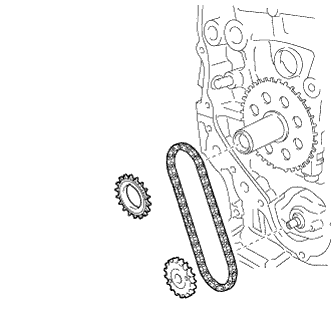
| 29. REMOVE NO. 1 CRANKSHAFT POSITION SENSOR PLATE |
Remove the No. 1 crankshaft position sensor plate.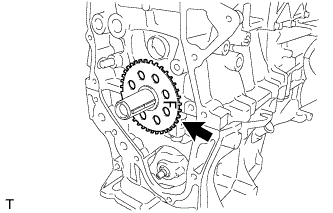
| 30. REMOVE CRANKSHAFT TIMING GEAR KEY |
Using a screwdriver, remove the 2 crankshaft timing gear keys.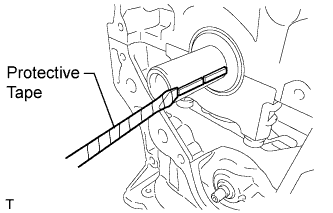
- HINT:
- Tape the screwdriver tip before use.
| 31. REMOVE CAMSHAFT BEARING CAP |
Uniformly loosen and remove the 10 bearing cap bolts in the sequence shown in the illustration.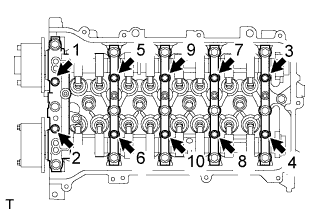
Uniformly loosen and remove the 15 bearing cap bolts in the sequence shown in the illustration.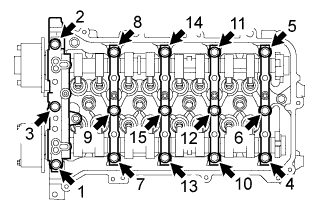
- NOTICE:
- Uniformly loosen the bolts while keeping the camshaft level.
Remove the 5 bearing caps.
- HINT:
- Arrange the removed parts in the correct order.
| 32. REMOVE NO. 1 VALVE ROCKER ARM SUB-ASSEMBLY |
Remove the 16 valve rocker arms.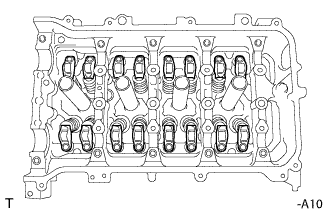
- HINT:
- Arrange the removed parts in the correct order.
| 33. REMOVE VALVE LASH ADJUSTER ASSEMBLY |
Remove the 16 valve lash adjusters from the cylinder head.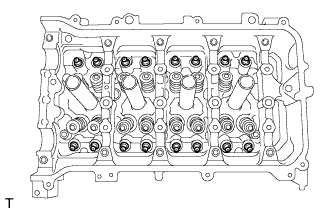
- HINT:
- Arrange the removed parts in the correct order.
| 34. REMOVE CAMSHAFT TIMING GEAR ASSEMBLY |
Check the lock of the camshaft timing gear.
Release the lock pin.
- NOTICE:
- Before removing the camshaft timing gear assembly, make sure that the lock pin has been released.
Cover the 4 oil paths of the cam journal with vinyl tape as shown in the illustration.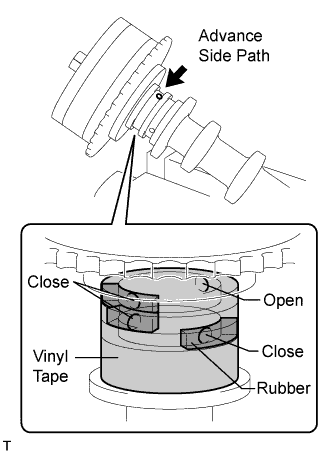
- HINT:
- There are 4 oil paths in the groove of the camshaft. Plug three of the paths with pieces of rubber.
Prick a hole in the tape on the advance side. Then prick a hole in the tape on the retard side path, on the opposite side to that of the advance side path, as shown in the illustration.
While applying approximately 150 kPa (2.0 kgf/ cm2, 22 psi) of air pressure to the oil paths, forcibly turn the camshaft timing gear assembly in the advance direction (counterclockwise).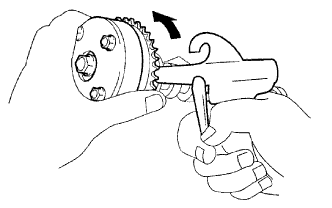
- CAUTION:
- Cover the paths with a piece of cloth when applying pressure to keep oil from splashing.
- NOTICE:
- Do not lock the camshaft timing gear assembly. If it is locked, release the lock pin again.
- HINT:
- The camshaft timing gear assembly may be turned in the advance direction without applying any force.
- If enough air pressure cannot be applied due to air leakage from the port, it may be difficult to release the lock pin.
- The camshaft timing gear assembly may be turned in the advance direction without applying any force.
Remove the vinyl tape and rubber pieces from the camshaft.
Install the camshafts.
Install the camshaft and No. 2 camshaft.
Install the camshaft bearing cap.
Check the marks and numbers on the camshaft bearing caps and place each of them in the proper position and direction as shown in the illustration.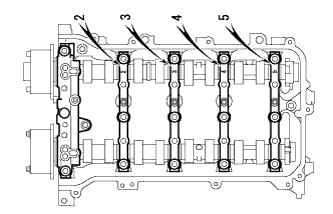
Tighten the 10 bolts in the order shown in the illustration.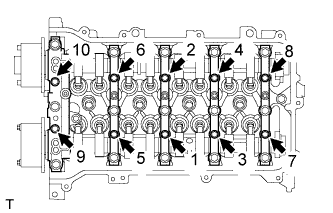
- Torque:
- 16 N*m{ 163 kgf*cm , 12 ft.*lbf }
Tighten the 15 bolts in the order shown in the illustration.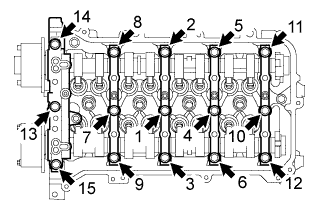
- Torque:
- 27 N*m{ 275 kgf*cm , 20 ft.*lbf }
Remove the flange bolt while holding the hexagonal portion of the camshaft, and then remove the camshaft timing gear assembly.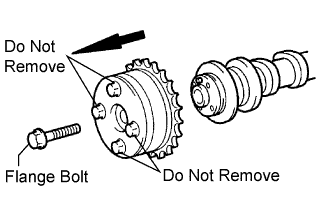
- NOTICE:
- Before removing the camshaft timing gear, make sure that the lock pin has been released.
- Be sure not to remove the other 4 bolts.
- Keep the camshaft timing gear assembly horizontal while removing it from the camshaft.
- Before removing the camshaft timing gear, make sure that the lock pin has been released.
| 35. REMOVE CAMSHAFT TIMING EXHAUST GEAR ASSEMBLY |
Remove the flange bolt while holding the hexagonal portion of the camshaft, and then remove the camshaft timing exhaust gear assembly.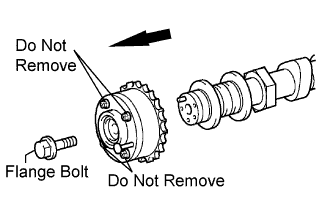
- NOTICE:
- Be sure not to remove the other 4 bolts.
- Keep the camshaft timing exhaust gear assembly horizontal while removing it from the camshaft.
- Be sure not to remove the other 4 bolts.
Uniformly loosen and remove the 10 bearing cap bolts in the sequence shown in the illustration.
Uniformly loosen and remove the 15 bearing cap bolts in the sequence shown in the illustration.
- NOTICE:
- Uniformly loosen the bolts while keeping the camshaft level.
Remove the 5 bearing caps.
- HINT:
- Arrange the removed parts in the correct order.
| 36. REMOVE CAMSHAFT |
Remove the camshaft.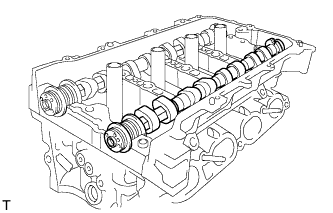
| 37. REMOVE NO. 2 CAMSHAFT |
Remove the No. 2 camshaft.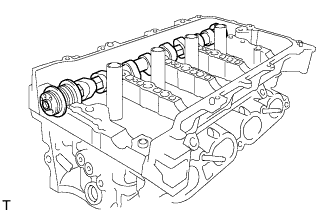
| 38. REMOVE OIL CONTROL VALVE FILTER |
Remove the oil control valve filter.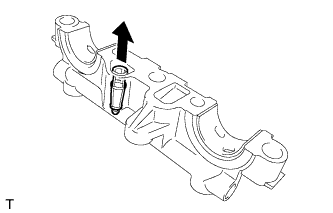
| 39. REMOVE NO. 1 CAMSHAFT BEARING |
Remove the 2 No. 1 camshaft bearings.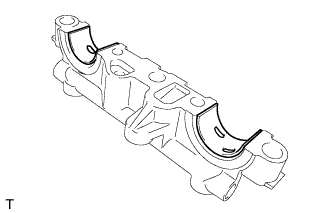
- HINT:
- Arrange the removed parts in the correct order.
| 40. REMOVE NO. 2 CAMSHAFT BEARING |
Remove the 2 No. 2 camshaft bearings.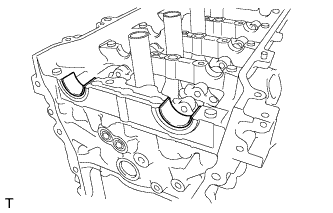
- HINT:
- Arrange the removed parts in the correct order.
| 41. REMOVE CAMSHAFT HOUSING SUB-ASSEMBLY |
Remove the 2 bolts.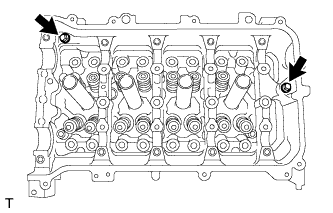
Remove the camshaft housing by prying between the cylinder head and camshaft housing with a screwdriver.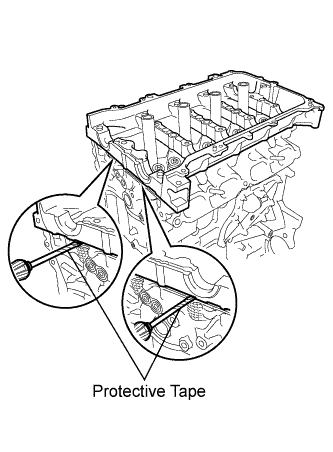
- NOTICE:
- Be careful not to damage the contact surfaces of the cylinder head and camshaft housing.
- HINT:
- Tape the screwdriver tip before use.
| 42. REMOVE CYLINDER HEAD SUB-ASSEMBLY |
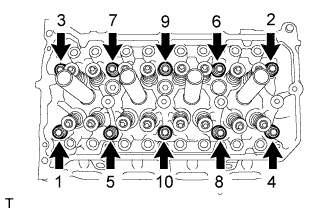 |
Using several steps, loosen and remove the 10 cylinder head bolts uniformly with a 10 mm bi-hexagon wrench in the sequence shown in the illustration.
Remove the 10 cylinder head bolts and the plate washers.- NOTICE:
- Do not drop the washers into the cylinder head.
- Head warpage or cracking could result from removing bolts in the wrong order.
- Do not drop the washers into the cylinder head.
Remove the cylinder head sub-assembly.
| 43. REMOVE CYLINDER HEAD GASKET |
| 44. REMOVE CYLINDER BLOCK WATER DRAIN COCK SUB-ASSEMBLY |
Remove the water drain cock plug from the water drain cock assembly.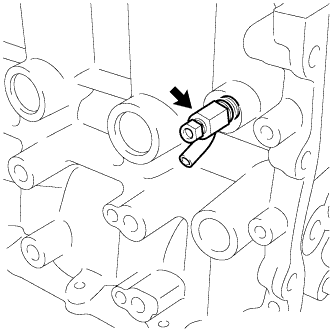
Remove the water drain cock assembly from the cylinder block.
| 45. REMOVE VENTILATION VALVE SUB-ASSEMBLY |
Remove the ventilation valve.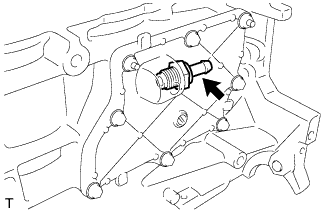
| 46. REMOVE OIL PAN DRAIN PLUG |
Remove the oil pan drain plug and gasket.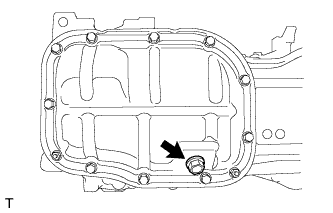
| 47. REMOVE NO. 2 OIL PAN SUB-ASSEMBLY |
Remove the 10 bolts and 2 nuts.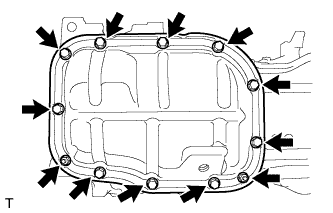
Install the blade of SST between the No. 2 oil pan sub-assembly and stiffening crankcase assembly, and cut off the applied sealer and remove No. 2 oil pan sub-assembly.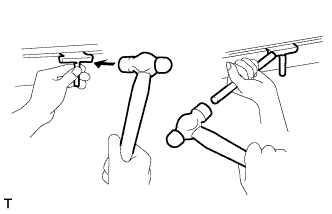
- SST
- 09032-00100
- NOTICE:
- Do not damage the No. 2 oil pan sub-assembly or stiffening crankcase assembly.
| 48. REMOVE OIL PUMP ASSEMBLY |
Remove the 3 bolts and remove the oil pump assembly.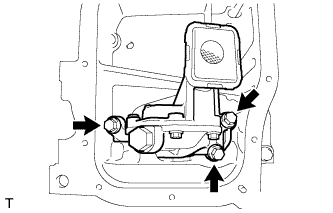
| 49. REMOVE STIFFENING CRANKCASE ASSEMBLY |
Remove the 11 bolts.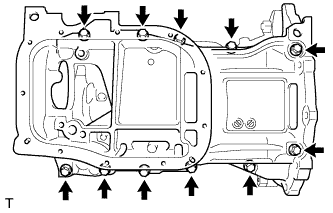
Using a screwdriver with its tip wrapped in protective tape, remove the crankcase by prying between the crankcase and cylinder block.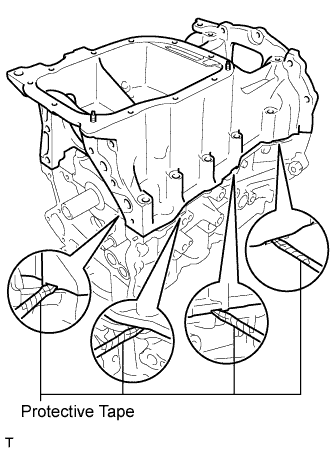
- NOTICE:
- Be careful not to damage the contact surfaces of the crankcase and cylinder block.