FRONT BRAKE (for Hatchback) > INSTALLATION |
| 1. INSTALL FRONT DISC |
|
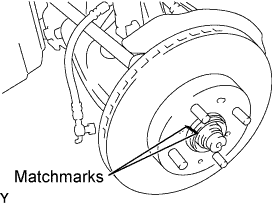
Align the matchmarks of the disc and axle hub and install the disc.
| 2. INSTALL FRONT DISC BRAKE CYLINDER MOUNTING |
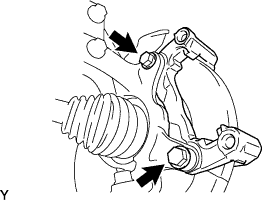 |
Install the disc brake cylinder mounting onto the steering knuckle with the 2 bolts.
| 3. INSTALL NO. 1 BUSH DUST BOOT |
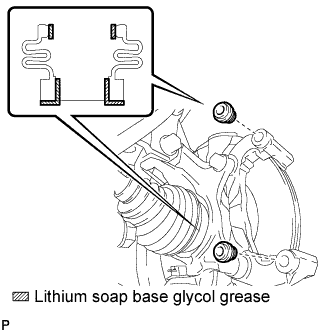 |
Apply lithium soap base glycol grease to 2 new dust boots.
Install the 2 dust boots onto the disc brake cylinder mounting.
| 4. INSTALL FRONT DISC BRAKE CYLINDER SLIDE BUSH |
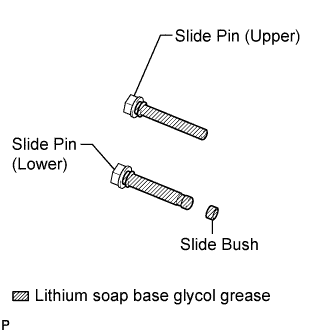 |
Apply lithium soap base glycol grease to the slide pins and a new slide bush, as shown in the illustration.
Install the slide bush onto the slide pin (lower).
| 5. INSTALL FRONT DISC BRAKE CYLINDER SLIDE PIN |
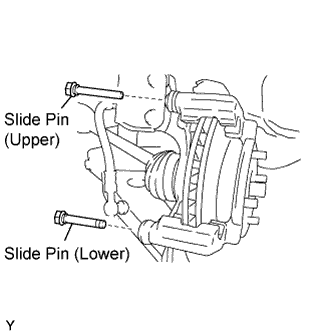 |
Install the slide pin (upper) and slide pin (lower) onto the cylinder mounting.
| 6. INSTALL FRONT DISC BRAKE PAD SUPPORT PLATE |
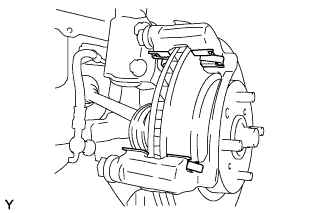 |
Install the 4 disc brake pad support plates onto the disc brake cylinder mounting.
| 7. INSTALL NO. 1 PAD WEAR INDICATOR PLATE |
Install the indicator plates onto the upper side of the brake pad.
| 8. INSTALL FRONT ANTI SQUEAL SHIM KIT |
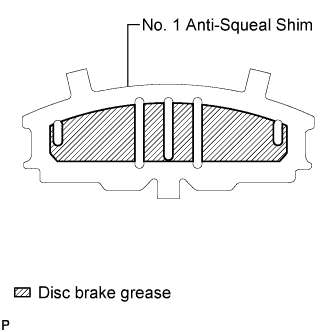 |
Apply disc brake grease to both sides of each No. 1 anti-squeal shim.
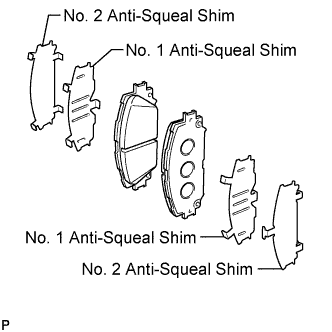 |
Install the anti squeal shims onto each brake pad.
| 9. INSTALL FRONT DISC BRAKE PAD KIT (PAD ONLY) |
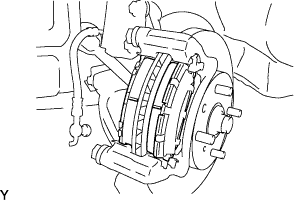 |
Install the 2 disc brake pads onto the disc brake cylinder mounting.
| 10. INSTALL DISC BRAKE CYLINDER ASSEMBLY |
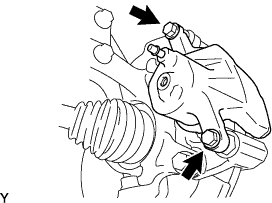 |
Install the disc brake cylinder onto the disc brake cylinder mounting with the 2 bolts.
| 11. CONNECT FRONT FLEXIBLE HOSE |
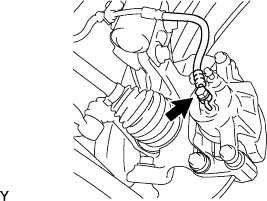 |
Connect the flexible hose with the union bolt and a new gasket.
| 12. FILL RESERVOIR WITH BRAKE FLUID |
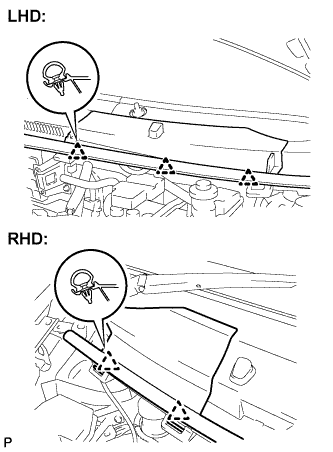 |
LHD:
Disengage the 3 clips and separate the hood to cowl top seal.
Remove the cowl top ventilator louver.
RHD:
Disengage the 2 clips and separate the hood to cowl top seal.
Remove the cowl top ventilator louver.
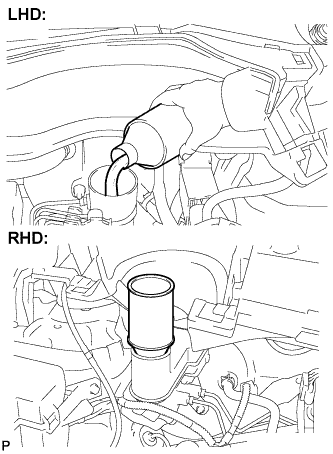 |
Set the brake fluid can upside down on the reservoir.
| 13. BLEED MASTER CYLINDER |
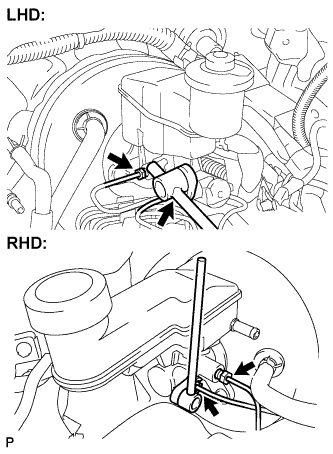 |
Using a union nut wrench (10 mm), disconnect the brake tubes from the master cylinder.
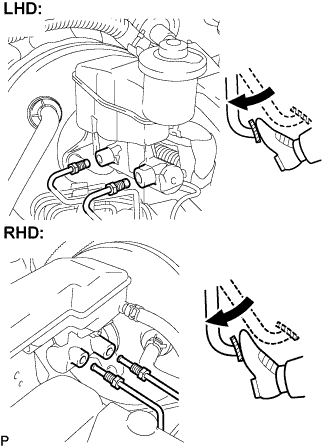 |
Slowly depress the brake pedal and hold it there (Step A).
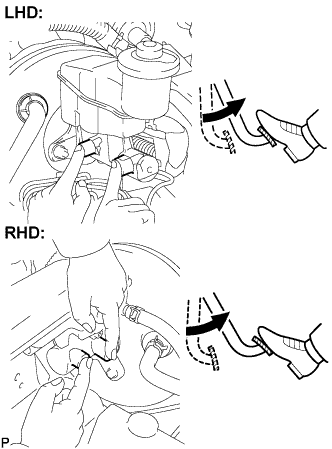 |
Block the outer holes with your fingers, and release the brake pedal (Step B).
Repeat steps A and B 3 or 4 times.
|
Using a union nut wrench (10 mm), connect the brake tubes to the master cylinder.
| 14. BLEED BRAKE LINE |
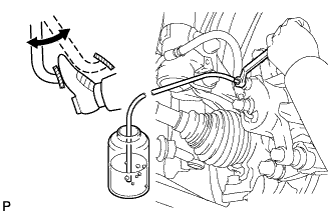 |
Connect the vinyl tube to the bleeder plug.
Depress the brake pedal several times, then loosen the bleeder plug with the pedal depressed (Step C).
At the point where the fluid stops coming out, tighten the bleeder plug, then release the brake pedal (Step D).
Repeat steps C and D until all the air in the fluid is completely bled out.
Tighten the bleeder plug.
Repeat the above procedure to bleed the air out of the brake line for each wheel.
| 15. BLEED BRAKE ACTUATOR (w/ VSC) |
Depress the brake pedal more than 20 times with the engine off.
Connect the intelligent tester to the DLC3, and turn the ignition switch to ON.
Select "Air Bleeding" on the intelligent tester.
Bleed the air out of the brake line when Step 1:
Increase appears on the intelligent tester display.
|
Connect the vinyl tube to either one of the bleeder plugs.
Depress the brake pedal several times, and then loosen the bleeder plug connected to the vinyl tube with the pedal depressed (Step E).
When fluid stops coming out, tighten the bleeder plug and release the brake pedal (Step F).
Repeat Steps E and F until all the air in the fluid is completely bled out.
Tighten the bleeder plug completely.
Repeat the above procedure for each wheel to bleed the air out of the brake line.
Bleed the air out of the suction line when Step 2:
Inhalation appears on the intelligent tester display.
Connect the vinyl tube to the bleeder plug at the right front wheel or the right rear wheel and loosen the bleeder plug.
Operate the brake actuator to bleed the air using the intelligent tester (Step G).
Check if the operation has stopped by referring to the intelligent tester display and tighten the bleeder plug (Step H).
Repeat Steps G and H until all the air in the fluid is completely bled out.
Tighten the bleeder plug.
Repeat the above procedure for the other wheels to bleed the air out of the brake line.
Bleed the air out of the pressure reduction line when Step 3: Decrease appears on the intelligent tester display.
Connect a vinyl tube to either one of the bleeder plugs.
Loosen the bleeder plug (Step I).
Using the intelligent tester, operate the brake actuator assembly, completely depress the brake pedal and hold it there (Step J).
Tighten the bleeder plug, and then release the brake pedal (Step K).
Repeat Steps I to K until all the air in the fluid is completely bled out.
Tighten the bleeder plug.
Repeat the above procedure for the other wheels to bleed the air out of the brake line.
Bleed the air out of the brake line again when Step 4: Increase appears on the intelligent tester display.
|
Connect the vinyl tube to either one of the bleeder plugs.
Depress the brake pedal several times, and then loosen the bleeder plug connected to the vinyl tube with the pedal depressed (Step L).
When fluid stops coming out, tighten the bleeder plug, then release the brake pedal (Step M).
Repeat Steps L and M until all the air in the fluid is completely bled out.
Tighten the bleeder plug.
Repeat the above procedure for the other wheels to bleed the air out of the brake line.
Make sure that the air bleeding is complete by referring to the intelligent tester display and turn off the intelligent tester.
Disconnect the intelligent tester from the DLC3.
Turn the ignition switch off.
| 16. CHECK FLUID LEVEL IN RESERVOIR |
Check the fluid level and add fluid if necessary.
| 17. CHECK FOR BRAKE FLUID LEAKAGE |
| 18. INSTALL FRONT WHEEL |