Home › BODY ELECTRICAL › AUDIO / VISUAL › RADIO ANTENNA CORD (for Sedan)

RADIO ANTENNA CORD (for Sedan) > INSTALLATION

for Preparation Click here


1. INSTALL NO. 2 ANTENNA CORD SUB-ASSEMBLY


  1. w/ Curtain Shield Airbag:

    1. Install the antenna cord positioning tapes into the 4 claws of the front and rear side rail spacers.

    2. Align the antenna cord positioning tapes with the markings on the roof headlining.


    3. Install the antenna cord onto the roof headlining with 8 new pieces of tape.
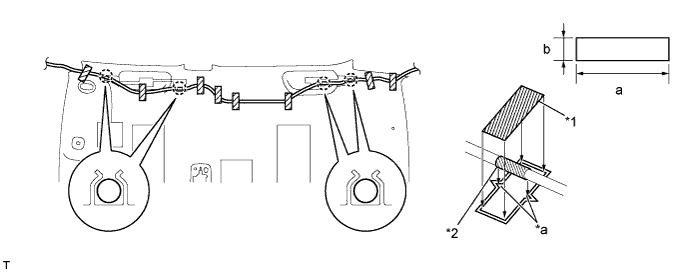

      B138588E02


      Text in Illustration 
      *1
      Tape
      *2
      Positioning Tape
      *a
      Marking
      -
      -
      Tape size: 
      Mark
      Measurement
      a
      80 mm (3.15 in.)
      b
      20 mm (0.787 in.)

      NOTICE:
      1. Apply the tape securely in place.
      2. Do not touch the adhesive surface when applying the tape to prevent adhesion failure.
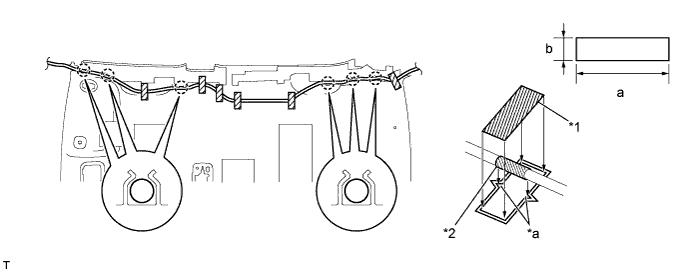


  1. w/o Curtain Shield Airbag:

    1. Install the antenna cord positioning tapes into the 6 claws of the front and rear side rail spacers.

    2. Align the antenna cord positioning tapes with the markings on the roof headlining.


    3. Install the antenna cord onto the roof headlining with 6 new pieces of tape.


      B138590E02


      Text in Illustration 
      *1
      Tape
      *2
      Positioning Tape
      *a
      Marking
      -
      -
      Tape size: 
      Mark
      Measurement
      a
      80 mm (3.15 in.)
      b
      20 mm (0.787 in.)

      NOTICE:
      1. Apply the tape securely in place.
      2. Do not touch the adhesive surface when applying the tape to prevent adhesion failure.


2. INSTALL ANTENNA CORD SUB-ASSEMBLY
  1. for LHD:

    1. Install the antenna cord with the 5 clamps

    2. Connect the antenna amplifier connector.

    3. Insert the hook into the body hole and install the bracket with the bolt.

  1. for RHD:

    1. Install the antenna cord with the 4 clamps

    2. Connect the antenna amplifier connector.

    3. Insert the hook into the body hole and install the bracket with the bolt.


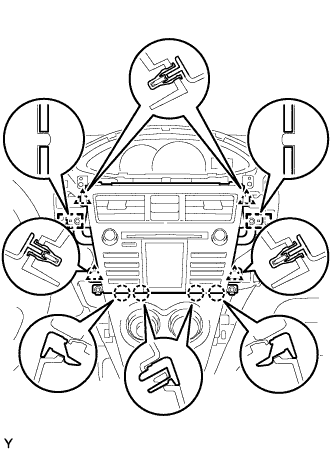
3. INSTALL RADIO RECEIVER ASSEMBLY (for Integrated with Panel)
  1. Connect the plug.

  1. Connect the 3 radio connectors.


    E223355
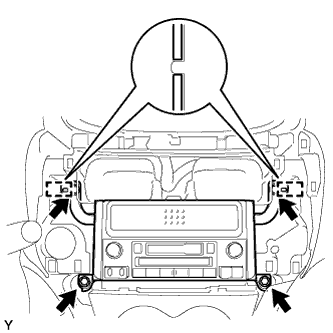
  1. Align the 2 bosses of the instrument panel with the hole in the radio bracket.

  1. Engage the 4 clips and 4 claws and install the radio receiver.

  1. Tighten the 4 bolts.

  1. Connect the hazard warning signal switch connector.


4. INSTALL RADIO RECEIVER ASSEMBLY (except Integrated with Panel)
  1. Connect the plug.

  1. Connect the 2 radio connectors.


    E223356
  1. Align the 2 bosses of the instrument panel with the hole in the radio bracket.

  1. Install the radio receiver with the 4 bolts.


5. INSTALL INSTRUMENT CLUSTER CENTER FINISH PANEL SUB-ASSEMBLY (except Integrated with Panel)
  1. Engage the 2 claws and 4 clips and install the instrument cluster finish panel center.


6. INSTALL ROOF HEADLINING ASSEMBLY
(Click here)