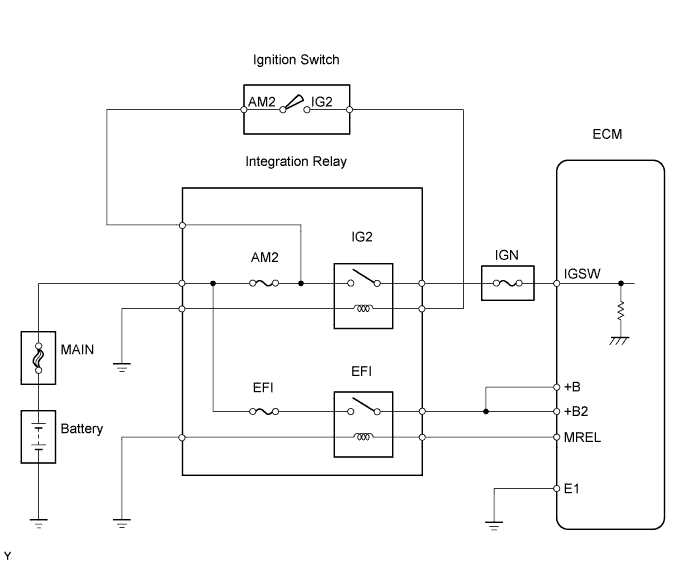
SFI SYSTEM > ECM Power Source Circuit |
| 1.INSPECT INTEGRATION NO.1 RELAY (INTEGRATION RELAY - BODY GROUND) |
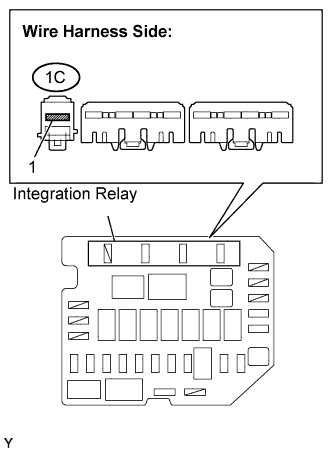 |
Remove the integration relay from the engine room relay block.
Measure the voltage between the terminal of the integration relay and the body ground.
| Tester Connections | Specified Conditions |
| Engine room relay block (1C-1) - Body ground | 9 to 14 V |
Reinstall the integration relay.
|
| ||||
| OK | |
 |
| 2.INSPECT INTEGRATION NO.1 RELAY (EFI RELAY AND IG2 RELAY) |
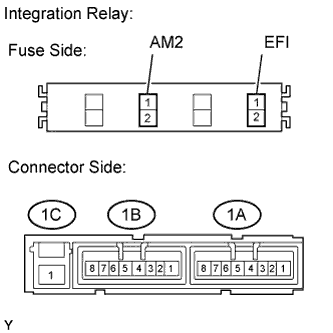 |
Remove the integration relay from the engine room relay block.
Inspect the EFI fuse and the AM2 fuse.
Remove the EFI fuse and AM2 fuse from the integration relay.
Check the EFI fuse and AM2 fuse resistance.
Reinstall the EFI fuse and the AM2 fuse.
Inspect the EFI relay and the IG2 relay.
Check the resistance between the terminals shown below.
| Tester Connections | Specified Conditions |
| 1C-1 - 1A-4 | 10 kΩ or higher |
| Below 1 Ω (when battery voltage is applied to terminals 1A-2 and 1A-3) | |
| 1C-1 - 1B-4 | 10 kΩ or higher |
| Below 1 Ω (when battery voltage is applied to terminals 1A-2 and 1A-3) | |
| 1C-1 - 1B-1 | Below 1 Ω |
Reinstall the integration relay.
|
| ||||
| OK | |
|
| 3.CHECK HARNESS AND CONNECTOR (+B, +B2 AND MREL CIRCUIT) |
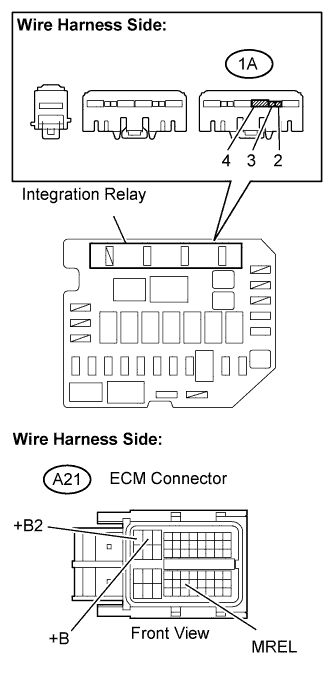 |
Check the harness and the connectors between the integration relay and the ECM.
Remove the integration relay from the engine room relay block.
Disconnect the A21 ECM connector.
Check the resistance.
| Tester Connections | Specified Conditions |
| MREL (A21-44) - Engine room relay block (1A-2) | Below 1 Ω |
| +B (A21-2) - Engine room relay block (1A-4) | |
| +B2 (A21-1) - Engine room relay block (1A-4) |
| Tester Connections | Specified Conditions |
| MREL (A21-44) or Engine room relay block (1A-2) - Body ground | 10 kΩ or higher |
| +B (A21-2) or Engine room relay block (1A-4) - Body ground | |
| +B2 (A21-1) or Engine room relay block (1A-4) - Body ground |
Check the harness and the connectors between the integration relay and the body ground.
Check the resistance.
| Tester Connections | Specified Conditions |
| Engine room relay block (1A-3) - Body ground | Below 1 Ω |
Reinstall the integration relay.
Reconnect the ECM connector.
|
| ||||
| OK | |
|
| 4.CHECK HARNESS AND CONNECTOR (ECM - BODY GROUND) |
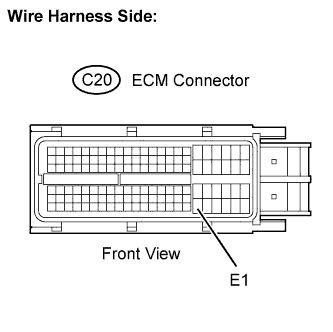 |
Disconnect the C20 ECM connector.
Check the resistance.
| Tester Connections | Specified Conditions |
| E1 (C20-104) - Body ground | Below 1 Ω |
Reconnect the ECM connector.
|
| ||||
| OK | |
|
| 5.INSPECT ECM (IGSW VOLTAGE) |
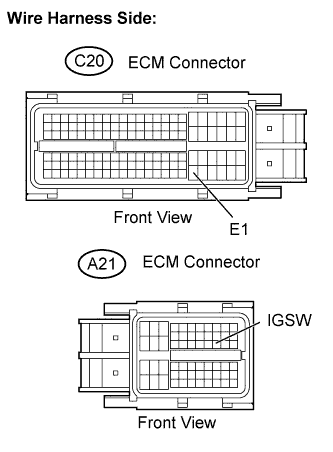 |
Disconnect the C20 and A21 ECM connectors.
Turn the ignition switch to ON.
Measure the voltage between the terminals of the C20 and A21 ECM connectors.
| Tester Connections | Specified Conditions |
| IGSW (A21-28) - E1 (C20-104) | 9 to 14 V |
Reconnect the ECM connectors.
|
| ||||
| NG | |
|
| 6.INSPECT FUSE (IGN FUSE) |
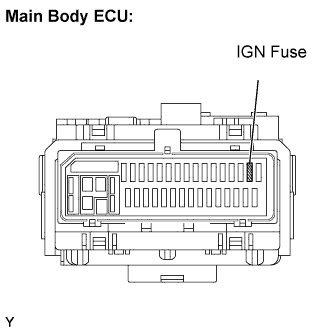 |
Remove the IGN fuse from the main body ECU.
Check the IGN fuse resistance.
Reinstall the IGN fuse.
|
| ||||
| OK | |
|
| 7.CHECK HARNESS AND CONNECTOR (INTEGRATION RELAY - ECM, INTEGRATION RELAY - BODY GROUND) |
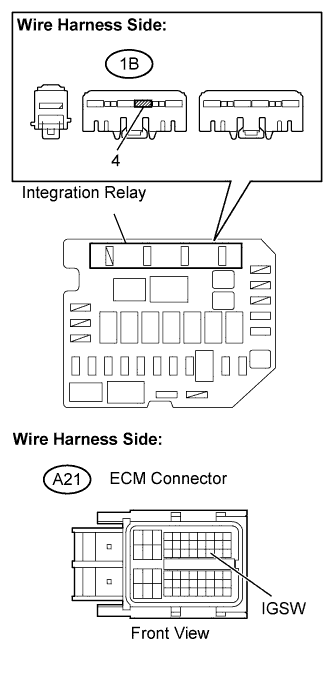 |
Remove the integration relay from the engine room relay block.
Disconnect the A21 ECM connector.
Check the resistance.
| Tester Connections | Specified Conditions |
| Engine room relay block (1B-4) - IGSW (A21-28) | Below 1 Ω |
| Tester Connections | Specified Conditions |
| Engine room relay block (1B-4) or IGSW (A21-28) - Body ground | 10 kΩ or higher |
Reinstall the integration relay.
Reconnect the ECM connector.
|
| ||||
| OK | |
|
| 8.CHECK HARNESS AND CONNECTOR (INTEGRATION RELAY - IGNITION SWITCH ASSEMBLY) |
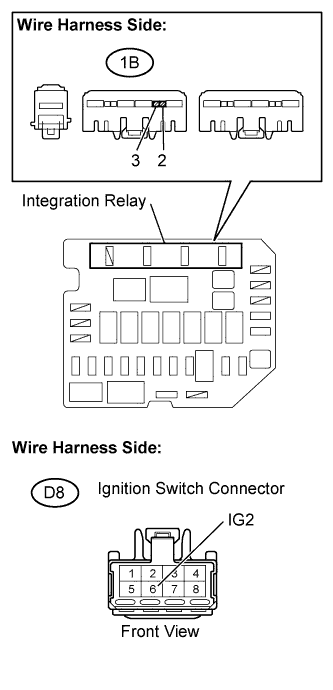 |
Check the harness and the connectors between the integration relay and the ignition switch.
Remove the integration relay from the engine room relay block.
Disconnect the D8 ignition switch connector.
Check the resistance.
| Tester Connections | Specified Conditions |
| Engine room relay block (1B-2) - IG2 (D8-6) | Below 1 Ω |
| Tester Connections | Specified Conditions |
| Engine room relay block (1B-2) or IG2 (D8-6) - Body ground | 10 kΩ or higher |
Check the harness and the connectors between the integration relay and the body ground.
Check the resistance.
| Tester Connections | Specified Conditions |
| Engine room relay block (1B-3) - Body ground | Below 1 Ω |
Reinstall the integration relay.
Reconnect the ignition switch connector.
|
| ||||
| OK | |
|
| 9.INSPECT IGNITION OR STARTER SWITCH ASSEMBLY |
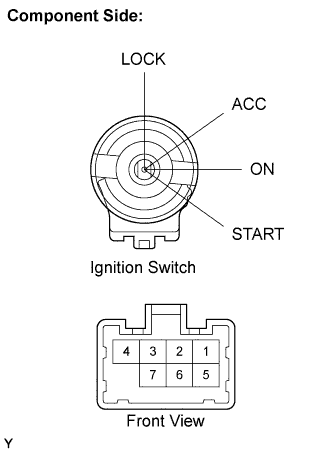 |
Disconnect the D8 ignition switch connector.
Check the resistance between the terminals shown below.
| Key Positions | Tester Connections | Specified Conditions |
| LOCK | - | 10 kΩ or higher |
| ACC | 2 - 4 | Below 1 Ω |
| ON | 1 - 2 - 4 | |
| 5 - 6 | ||
| START | 1 - 3 - 4 | |
| 5 - 6 - 7 |
Reconnect the ignition switch connector.
|
| ||||
| OK | ||
 | ||
| ||
