Home › BODY › EXTERIOR › FRONT DOOR WINDOW FRAME MOULDING (for Hatchback)

FRONT DOOR WINDOW FRAME MOULDING (for Hatchback) > INSTALLATION

for Preparation Click here


HINT:
The procedure described below is for the LH side. Use the same procedure for both the RH and LH sides, unless otherwise specified.


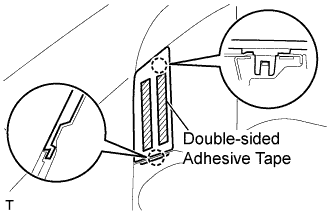
1. INSTALL FRONT DOOR WINDOW FRAME REAR MOULDING (for 3 Door)


    B114606E01
  1. Clean the attachment surface.

    1. Using an infrared light, heat the adhesive remaining on the body.

      NOTICE:
      Do not burn yourself with the heated body or infrared light.

    2. Using a shop rag or piece of cloth, rub the remaining adhesive off the body.

    3. Using a non-residue solvent, clean the attachment surface.
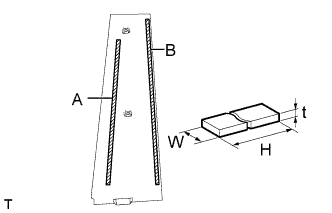
  1. Apply new double-sided adhesive tape to the front door window frame rear moulding.
    Tape size: 
    Area
    t
    W
    H
    A
    0.8 mm (0.032 in.)
    5 mm (0.197 in.)
    340 mm (13.386 in.)
    B
    0.8 mm (0.032 in.)
    5 mm (0.197 in.)
    376 mm (14.803 in.)


    B114607
  1. Engage the 2 clips and the claw and install the front door window frame rear moulding.


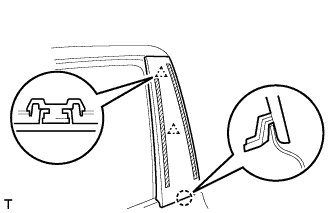
2. INSTALL FRONT DOOR WINDOW FRAME FRONT MOULDING


    B127706E01
  1. Clean the attachment surface.

    1. Using an infrared light, heat the adhesive remaining on the body.

      NOTICE:
      Do not burn yourself with the heated body or infrared light.

    2. Using a shop rag or piece of cloth, rub the remaining adhesive off the body.

    3. Using a non-residue solvent, clean the attachment surface.
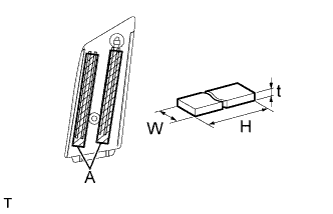
  1. Apply new double-sided adhesive tape to the front door window frame front moulding.
    Tape size: 
    Area
    t
    W
    H
    A
    1.2 mm (0.047 in.)
    7 mm (0.276 in.)
    88 mm (3.465 in.)


    B127705E01
  1. Engage the 2 clips and the claw and install the front door window frame front moulding.