BRAKE BOOSTER (for Sedan LHD) > INSTALLATION |
| 1. INSTALL BRAKE VACUUM CHECK VALVE ASSEMBLY |
|
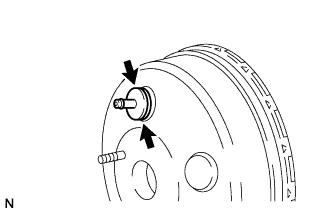
Install the grommet onto the brake booster.
Install the vacuum check valve onto the brake booster.
| 2. INSTALL BRAKE BOOSTER |
Provisionally install the push rod clevis onto the brake booster.
Install a new gasket onto the brake booster.
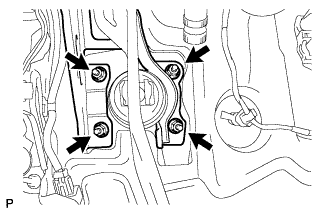 |
Install the brake booster with the 4 nuts.
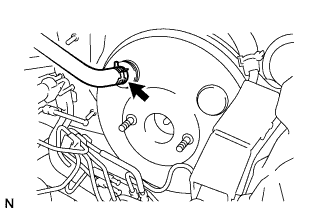 |
Connect the vacuum hose to the vacuum check valve with the clip.
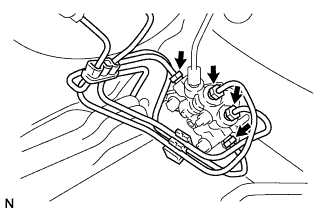 |
w/o ABS:
Using SST, install the brake tube assembly onto the proportioning valve.
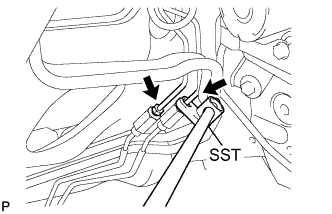 |
Using SST, install the 2 brake tubes onto the brake tube No. 1 way.
| 3. INSTALL BRAKE MASTER CYLINDER PUSH ROD CLEVIS |
Apply lithium soap base glycol grease to the push rod pin.
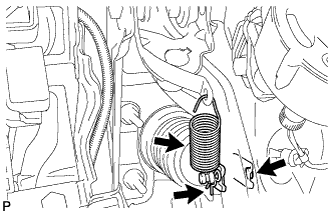 |
Install the push rod clevis with the push rod pin and clip.
Install the brake pedal return spring.
| 4. INSPECT AND ADJUST BRAKE BOOSTER PUSH ROD |
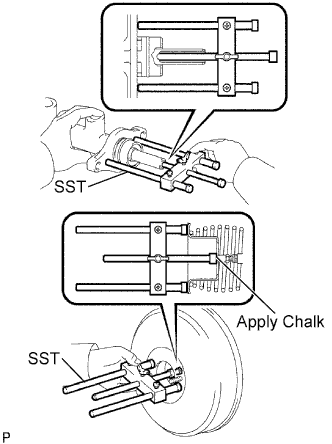 |
Set SST on the master cylinder and lower the rod of SST until it just touches the piston.
Apply chalk to the flat tip of the SST rod. Turn SST upside down and measure the clearance between the brake booster push rod and SST.
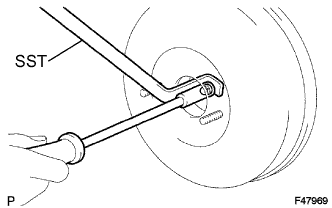 |
If the clearance is not within the standard, adjust the length by holding the rod using SST and turning the tip of the rod using a 7 mm socket driver.
| 5. INSTALL BRAKE MASTER CYLINDER SUB-ASSEMBLY |
Install a new O-ring onto the brake master cylinder sub-assembly.
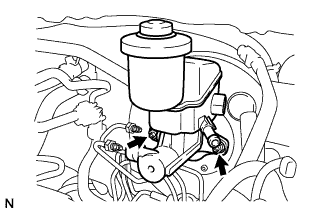 |
w/ ABS:
Install the brake master cylinder sub-assembly with the 2 nuts.
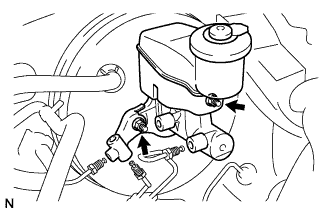 |
w/o ABS:
Install the brake master cylinder sub-assembly and brake tube way with the 2 nuts.
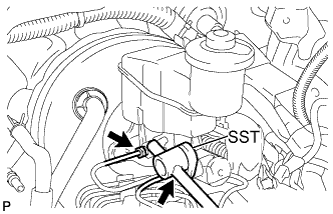 |
Using SST, install the 2 brake tubes onto the brake master cylinder sub-assembly.
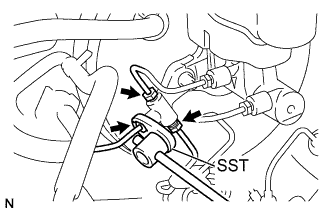 |
w/o ABS:
Using SST, install the 3 brake tubes to the brake tube way.
Connect the brake fluid level warning switch connector.
| 6. CONNECT CLUTCH RESERVOIR TUBE (for Manual Transaxle) |
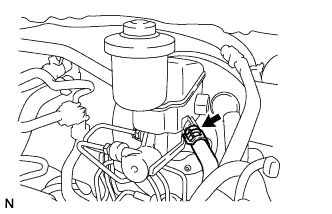 |
Connect the reservoir tube with the clip.
| 7. INSTALL BRAKE ACTUATOR (w/ ABS) |
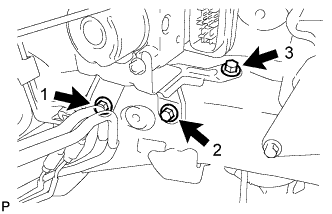 |
Provisionally install the actuator bracket with the 3 bolts in the sequence shown in the illustration.
Tighten the 3 bolts in the sequence shown in the illustration.
Connect a new brake tube clamp.
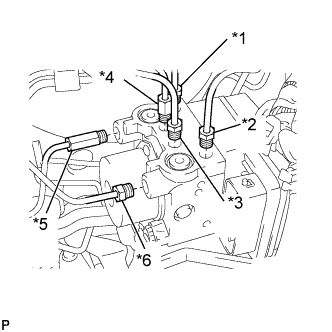 |
Using a union nut wrench (10 mm), install each brake tube into the correct position on the actuator, as shown in the illustration.
| *1 | To Front Wheel RH |
| *2 | To Front Wheel LH |
| *3 | To Rear Wheel RH |
| *4 | To Rear Wheel LH |
| *5 | From Master Cylinder |
| *6 | From Master Cylinder |
Using a union nut wrench (10 mm), install the 2 brake tubes onto the brake master cylinder.
Using a union nut wrench (10 mm), install the 2 brake tubes onto the brake tube No. 1 way.
Using a union nut wrench (10 mm), install the brake tube onto the front flexible hose.
Connect the brake actuator connector.
| 8. INSTALL BATTERY CARRIER |
| 9. INSTALL BATTERY TRAY |
| 10. INSTALL BATTERY |
| 11. INSTALL INSTRUMENT PANEL UNDER TRAY |
Engage the 6 claws and install the instrument panel under tray.
Install the 2 <A> screws.
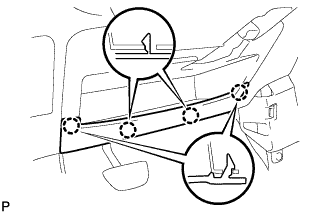 |
Engage the 4 claws and install the instrument panel under tray.
| 12. INSTALL COWL TOP PANEL OUTER |
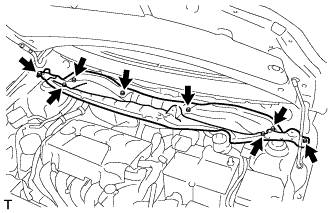 |
Install the cowl top panel outer with the 8 bolts.
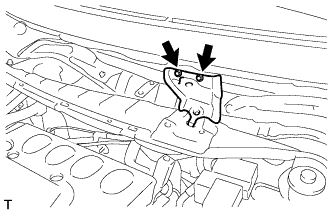 |
Install the cowl top to cowl inner brace with the 2 bolts.
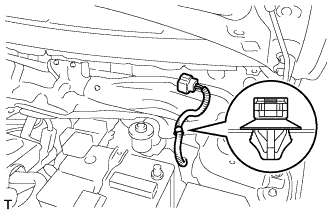 |
Connect the wire harness clamp.
| 13. INSTALL FRONT AIR SHUTTER SEAL |
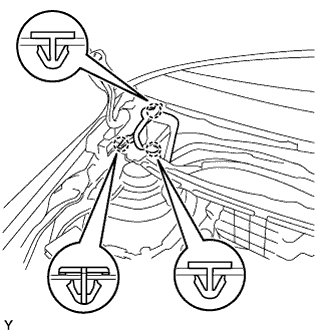 |
Engage the 3 claws to install the front air shutter seal.
| 14. INSTALL FRONT WIPER MOTOR AND LINK |
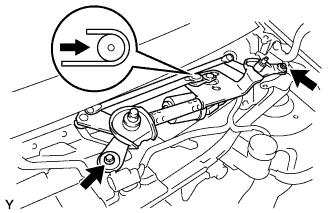 |
Connect the connector.
Slide the wiper link as shown in the illustration and engage the rubber pin with the body.
Install the front wiper motor and link with the 2 bolts.
| 15. INSTALL COWL TOP VENTILATOR LOUVER SUB-ASSEMBLY |
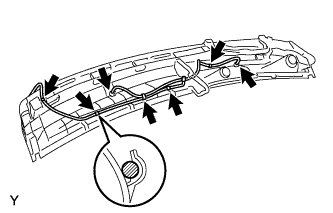 |
Connect the washer hoses.
Engage the 5 hooks.
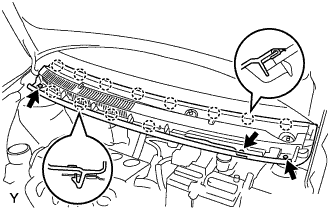 |
Engage the 8 hooks and the 4 claws.
Install the cowl top ventilator louver sub-assembly with the 3 clips.
| 16. INSTALL COWL SIDE VENTILATOR SUB-ASSEMBLY LH |
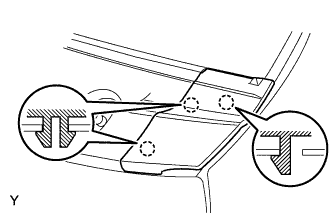 |
Engage the 3 claws and install the cowl side ventilator sub-assembly LH.
| 17. INSTALL COWL SIDE VENTILATOR SUB-ASSEMBLY RH |
| 18. INSTALL FRONT WIPER ARM AND BLADE ASSEMBLY LH |
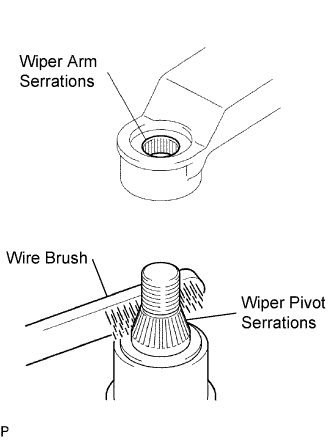 |
Scrape any metal powder off the serrated part of the wiper arm with a round file or the equivalent (when reinstalling).
Clean the wiper pivot serrations with a wire brush.
Operate the wiper, then stop the windshield wiper motor in the automatic stop position.
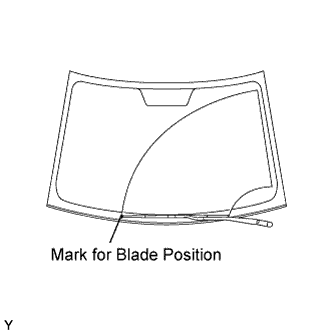 |
Align the blade tip with the mark on the windshield glass, as shown in the illustration.
Tighten the nut of the front wiper arm.
| 19. INSTALL FRONT WIPER ARM AND BLADE ASSEMBLY RH |
|
Scrape any metal powder off the serrated part of the wiper arm with a round file or the equivalent (when reinstalling).
Clean the wiper pivot serrations with a wire brush.
Operate the wiper, then stop the windshield wiper motor in the automatic stop position.
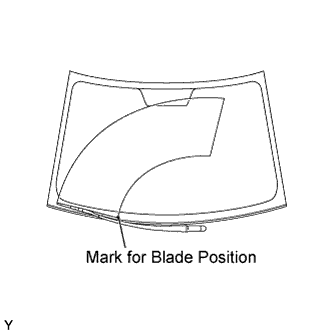 |
Align the blade tip with the mark on the windshield glass, as shown in the illustration.
Tighten the nut of the front wiper arm.
| 20. INSTALL FRONT WIPER ARM HEAD CAP |
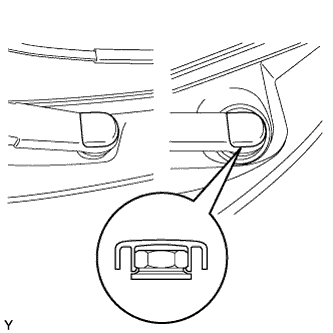 |
Engage the claw and install the 2 front wiper arm head caps.
| 21. CONNECT CABLE TO NEGATIVE BATTERY TERMINAL |
| 22. FILL RESERVOIR WITH BRAKE FLUID |
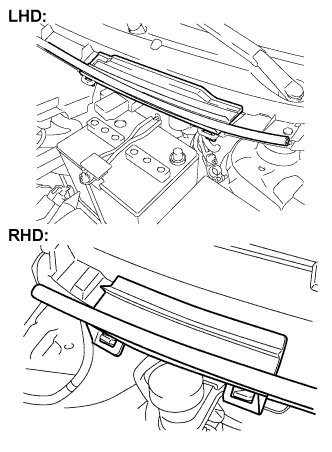 |
Remove the cowl top No. 2 ventilator louver center.
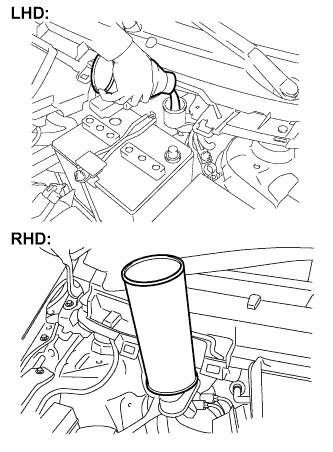 |
Set the brake fluid can upside down on the reservoir.
| 23. BLEED MASTER CYLINDER |
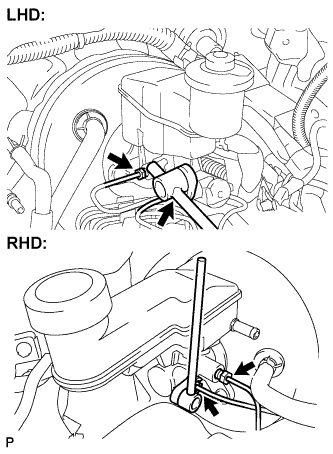 |
Using a union nut wrench (10 mm), disconnect the brake tubes from the master cylinder.
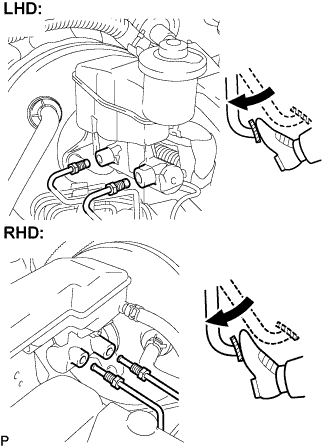 |
Slowly depress the brake pedal and hold it there (Step A).
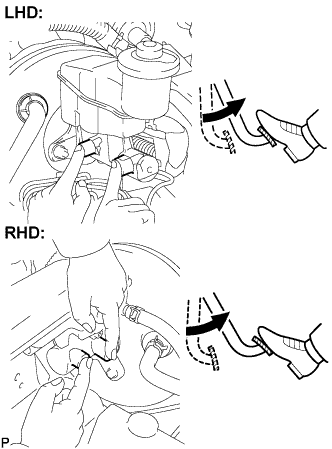 |
Block the outer holes with your fingers, and release the brake pedal (Step B).
Repeat steps A and B 3 or 4 times.
|
Using a union nut wrench (10 mm), connect the brake tubes to the master cylinder.
| 24. BLEED BRAKE LINE |
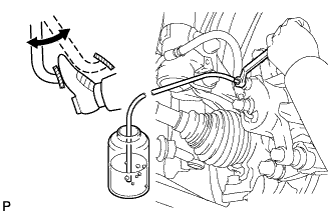 |
Connect the vinyl tube to the bleeder plug.
Depress the brake pedal several times, then loosen the bleeder plug with the pedal depressed (Step C).
At the point where the fluid stops coming out, tighten the bleeder plug, then release the brake pedal (Step D).
Repeat steps C and D until all the air in the fluid is completely bled out.
Tighten the bleeder plug.
Repeat the above procedure to bleed the air out of the brake line for each wheel.
| 25. CHECK FLUID LEVEL IN RESERVOIR |
Check the fluid level and add fluid if necessary.
| 26. CHECK FOR BRAKE FLUID LEAKAGE |
| 27. INSPECT AND ADJUST BRAKE PEDAL |
Remove the instrument panel under tray .
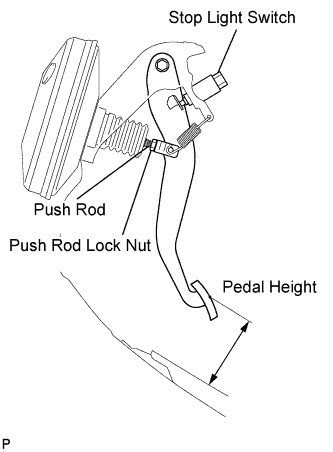 |
Inspect the brake pedal height.
| w/ABS | w/o ABS |
| 107.3 to 117.3 mm (4.224 to 4.618 in.) | 107.8 to 117.8 mm (4.244 to 4.638 in.) |
Adjust the brake pedal height.
Disconnect the connector from the stop light switch.
Turn the stop light switch counterclockwise, and remove the stop light switch.
Loosen the push rod lock nut.
Adjust the pedal height by turning the pedal push rod.
| w/ABS | w/o ABS |
| 107.3 to 117.3 mm (4.224 to 4.618 in.) | 107.8 to 117.8 mm (4.244 to 4.638 in.) |
Tighten the push rod lock nut.
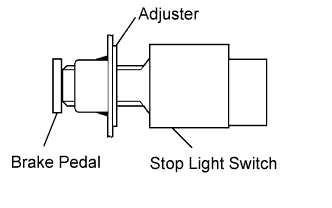 |
Insert the stop light switch into the adjuster until it just touches the brake pedal.
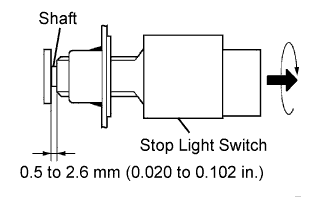 |
Make a quarter turn clockwise to install the stop light switch.
Check the stop light switch clearance.
Connect the connector to the stop light switch.
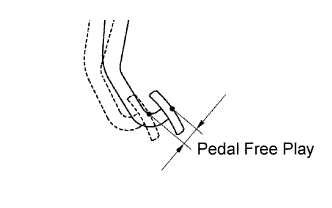 |
Inspect the brake pedal free play.
Stop the engine and depress the brake pedal several times until there is no vacuum left in the booster.
Push in the pedal until the beginning of the resistance is felt. Measure the distance as shown.
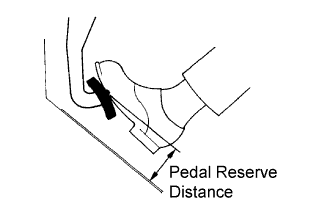 |
Inspect the brake pedal reserve distance.
Release the parking brake lever. With the engine running, depress the pedal and measure the pedal reserve distance as shown.
| LHD | RHD | |
| w/ ABS | More than 73 mm (2.87 in.) | More than 74 mm (2.91 in.) |
| w/o ABS | More than 70 mm (2.75 in.) | - |
Install the instrument panel under tray .