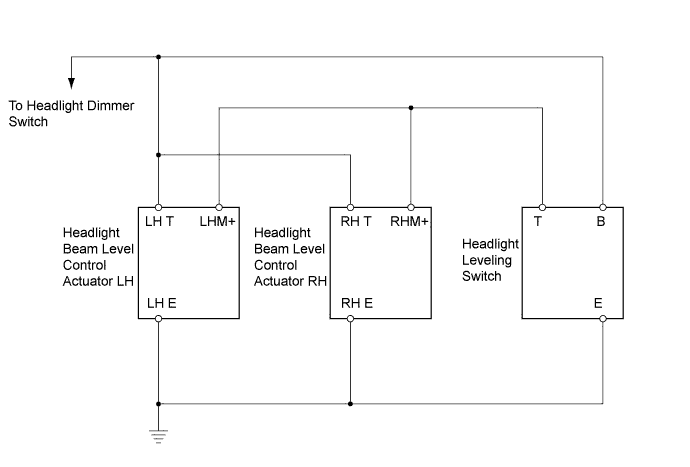
LIGHTING SYSTEM > Headlight Beam Level Control Actuator Circuit |
| 1.INSPECT HEADLIGHT LEVELING SWITCH |
 |
Hatchback:
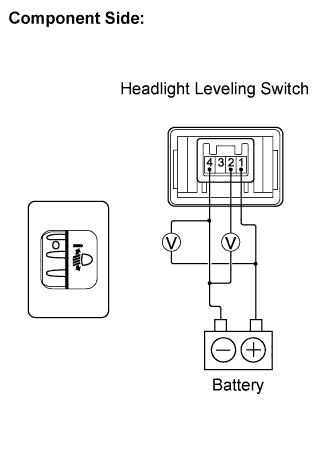
Remove the D52 headlight leveling switch.
Connect the positive (+) battery lead to terminal 1 and the negative (-) battery lead to terminal 4.
Check the ratio which is obtained by dividing the voltage between terminals 2 and 4 by the voltage between 1 and 4. The voltages must be measured using a voltmeter.
| Tester Connection | Switch Position | Specified Condition |
| 1 (B) - 4 (E) 2 (T) - 4 (E) | 0 | 0.87 to 0.93 |
| 1 (B) - 4 (E) 2 (T) - 4 (E) | 1 | 0.76 to 0.82 |
| 1 (B) - 4 (E) 2 (T) - 4 (E) | 2 | 0.66 to 0.72 |
| 1 (B) - 4 (E) 2 (T) - 4 (E) | 3 | 0.55 to 0.61 |
| 1 (B) - 4 (E) 2 (T) - 4 (E) | 4 | 0.44 to 0.50 |
| 1 (B) - 4 (E) 2 (T) - 4 (E) | 5 | 0.34 to 0.40 |
Reinstall the headlight leveling switch.
|
Sedan:
Remove the D52 headlight leveling switch.
Connect the positive (+) battery lead to terminal 1 and the negative (-) battery lead to terminal 4.
Check the ratio which is obtained by dividing the voltage between terminals 2 and 4 by the voltage between 1 and 4. The voltages must be measured using a voltmeter.
| Tester Connection | Switch Position | Specified Condition |
| 1 (B) - 4 (E) 2 (T) - 4 (E) | 0 | 0.87 to 0.93 |
| 1 (B)- 4 (E) 2 (T) - 4 (E) | 0.5 | 0.79 to 0.85 |
| 1 (B) - 4 (E) 2 (T) - 4 (E) | 1 | 0.71 to 077 |
| 1 (B) - 4 (E) 2 (T) - 4 (E) | 1.5 | 0.63 to 0.69 |
| 1 (B) - 4 (E) 2 (T) - 4 (E) | 2 | 0.55 to 0.61 |
| 1 (B) - 4 (E) 2 (T) - 4 (E) | 2.5 | 0.47 to 0.533 |
| 1 (B) - 4 (E) 2 (T) - 4 (E) | 3 | 0.39 to 0.45 |
| 1 (B) - 4 (E) 2 (T) - 4 (E) | 3.5 | 0.31 to 0.37 |
| 1 (B) - 4 (E) 2 (T) - 4 (E) | 4 | 0.23 to 0.29 |
| 1 (B) - 4 (E) 2 (T) - 4 (E) | 4.5 | 0.15 to 0.21 |
| 1 (B) - 4 (E) 2 (T) - 4 (E) | 5 | 0.07 to 0.13 |
Reinstall the headlight leveling switch.
|
| ||||
| OK | |
 |
| 2.CHECK HARNESS AND CONNECTOR (HEADLIGHT DIMMER SWITCH ASSEMBLY - HEADLIGHT LEVELING SWITCH) |
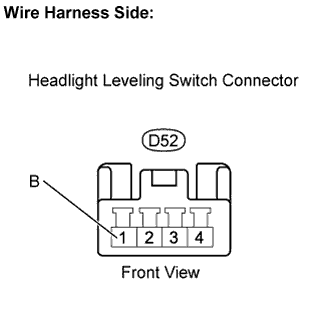 |
Disconnect the D52 headlight leveling switch connector.
measure the voltage.
| Tester Connection | Condition | Specified Condition |
| D52-1 (B) - Body ground | Ignition switch ON Light control switch in TAIL or HEAD position | 10 to 14 V |
Reconnect the headlight leveling switch connector.
|
| ||||
| OK | |
|
| 3.INSPECT HEADLIGHT BEAM LEVEL CONTROL ACTUATOR |
Hatchback:
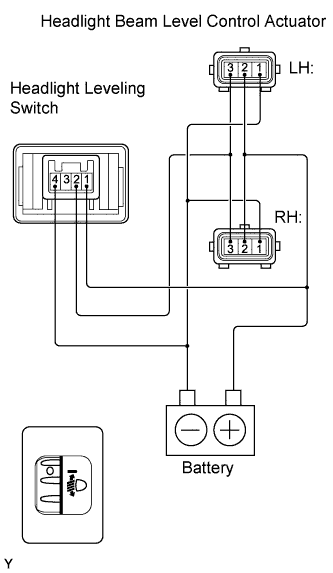 |
Disconnect the B14 and B15 headlight beam level control actuator connectors.
Connect the positive (+) battery lead to headlight leveling switch terminal 1 and the negative (-) battery lead to headlight leveling switch terminal 4.
Connect the positive (+) battery lead to headlight beam level control actuator terminal 2 and the negative (-) battery lead to headlight beam level control actuator terminal 1.
Connect headlight leveling switch terminal 2 and headlight beam level control actuator terminal 3 using a lead wire.
Check the headlight beam level control actuator operation when the headlight leveling switch is operated.
Reconnect the headlight beam level control actuator connectors.
Sedan:
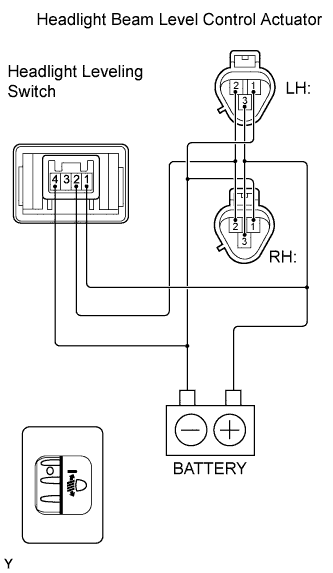 |
Disconnect the B20 and B21 headlight beam level control actuator connectors.
Connect the positive (+) battery lead to headlight leveling switch terminal 1 and the negative (-) battery lead to headlight leveling switch terminal 4.
Connect the positive (+) battery lead to headlight beam level control actuator terminal 3 and the negative (-) battery lead to headlight beam level control actuator terminal 1.
Connect headlight leveling switch terminal 2 and headlight beam level control actuator terminal 2 using a lead wire.
Check the headlight beam level control actuator operation when the headlight leveling switch is operated.
Reconnect the headlight beam level control actuator connectors.
|
| ||||
| OK | |
|
| 4.CHECK HARNESS AND CONNECTOR (DIMMER SWITCH - HEADLIGHT BEAM LEVEL CONTROL ACTUATOR) |
Hatchback:
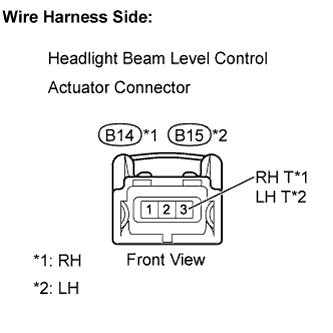 |
Disconnect the B14 and B15 headlight beam level control actuator connectors.
Measure the voltage.
| Tester Connection | Condition | Specified Condition |
| B14-3 (RH T) - Body ground | Ignition switch ON Light control switch in TAIL or HEAD position | 0 V → 10 to 14 V |
| B15-3 (LH T) - Body ground | Ignition switch ON Light control switch in TAIL or HEAD position | 0 V → 10 to 14 V |
Reconnect the headlight beam level control actuator connectors.
Sedan:
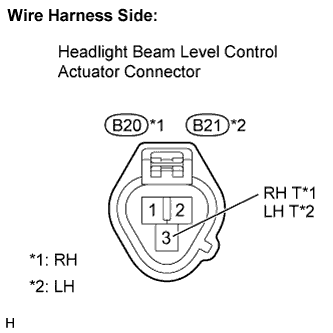 |
Disconnect the B20 and B21 headlight beam level control actuator connectors.
Measure the voltage.
| Tester Connection | Condition | Specified Condition |
| B20-3 (RH T) - Body ground | Ignition switch ON Light control switch in TAIL or HEAD position | 0 V → 10 to 14 V |
| B21-3 (LH T) - Body ground | Ignition switch ON Light control switch in TAIL or HEAD position | 0 V → 10 to 14 V |
Reconnect the headlight beam level control actuator connectors.
|
| ||||
| OK | |
|
| 5.CHECK HARNESS AND CONNECTOR (SWITCH - HEADLIGHT BEAM LEVEL CONTROL ACTUATOR) |
Hatchback:
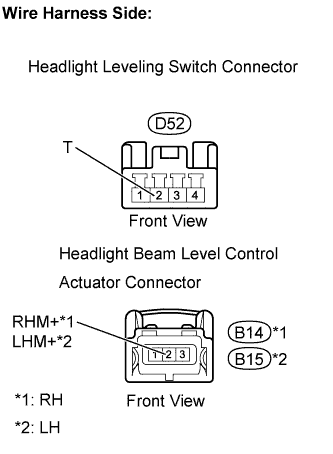 |
Disconnect the D52 headlight leveling switch connector.
Disconnect the B14 and B15 headlight beam level control actuator connectors.
Measure the resistance.
| Tester Connection | Specified Condition |
| D52-2 (T) - B14-2 (RHM+) | Below 1 Ω |
| D52-2 (T) - B15-2 (LHM+) | Below 1 Ω |
| D52-2 (T) or B14-2 (RHM+) - Body ground | 10 kΩ or higher |
| D52-2 (T) or B15-2 (LHM+) - Body ground | 10 kΩ or higher |
Reconnect the headlight leveling switch connector.
Reconnect the headlight beam level control actuator connectors.
Sedan:
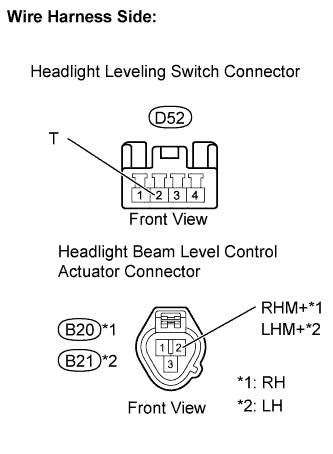 |
Disconnect the D52 headlight leveling switch connector.
Disconnect the B20 and B21 headlight beam level control actuator connectors.
Measure the resistance.
| Tester Connection | Specified Condition |
| D52-2 (T) - B20-2 (RHM+) | Below 1 Ω |
| D52-2 (T) - B21-2 (LHM+) | Below 1 Ω |
| D52-2 (T) or B20-2 (RHM+) - Body ground | 10 kΩ or higher |
| D52-2 (T) or B21-2 (LHM+) - Body ground | 10 kΩ or higher |
Reconnect the headlight leveling switch connector.
Reconnect the headlight beam level control actuator connectors.
|
| ||||
| OK | |
|
| 6.CHECK HARNESS AND CONNECTOR (HEADLIGHT LEVELING SWITCH - BODY GROUND) |
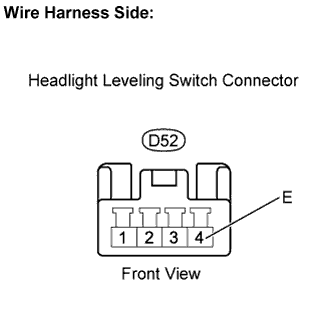 |
Disconnect the D52 headlight leveling switch connector.
Measure the resistance.
| Tester Connection | Specified Condition |
| D52-4 (E) - Body ground | Below 1 Ω |
Reconnect the headlight leveling switch connector.
|
| ||||
| OK | ||
 | ||
| ||
