 |
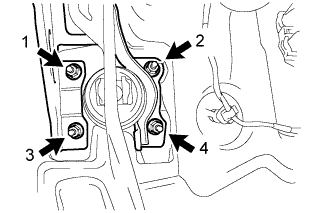
Tighten the 4 nuts in the order shown in the illustration.
- Torque:
- 9.0 N*m{ 92 kgf*cm , 80 in.*lbf }
BRAKE PEDAL > INSTALLATION |
| 1. INSTALL BRAKE PEDAL SUPPORT SUB-ASSEMBLY (for LHD) |
Temporarily install the pedal support with the bolt and 4 nuts.
|
Tighten the 4 nuts in the order shown in the illustration.
Tighten the bolt.
| 2. INSTALL BRAKE PEDAL SUPPORT SUB-ASSEMBLY (for RHD) |
Temporarily install the pedal support with the bolt and 4 nuts.
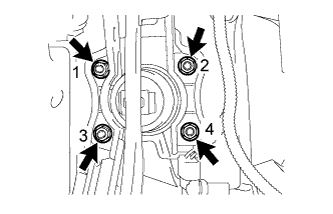 |
Tighten the 4 nuts in the order shown in the illustration.
Tighten the bolt.
Install the wire harness clamp.
| 3. INSTALL NO. 2 STEERING INTERMEDIATE SHAFT ASSEMBLY (for LHD) |
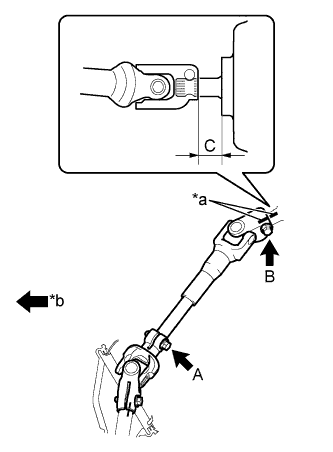 |
Align the matchmarks on the No. 2 steering intermediate shaft assembly and the steering column assembly and provisionally install them with the bolt.
| *a | Matchmark |
| *b | Front of the Vehicle |
Tighten the bolt B while aligning the No. 2 steering intermediate shaft assembly with the position C as shown in the illustration.
Tighten bolt A.
| 4. INSTALL BRAKE MASTER CYLINDER PUSH ROD CLEVIS |
Apply lithium soap base glycol grease to the push rod pin.
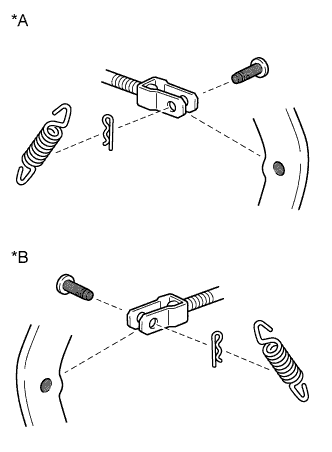 |
Install the push rod clevis with the push rod pin and a new clip.
| *A | for LHD |
| *B | for RHD |
 | Apply Lithium Soap Base Glycol Grease |
Install the brake pedal return spring.
| 5. INSTALL STOP LIGHT SWITCH ASSEMBLY |
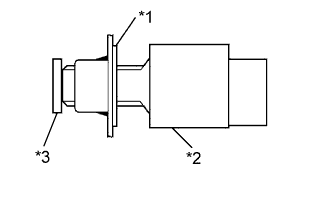 |
Insert the stop light switch into the adjuster until it just touches the brake pedal.
| *1 | Adjuster |
| *2 | Stop Light Switch Assembly |
| *3 | Brake Pedal |
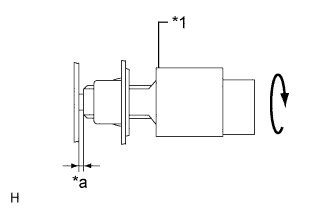 |
Make a quarter turn clockwise to install the stop light switch.
| *1 | Stop Light Switch Assembly |
| *a | Stop Light Switch Clearance |
Check the stop light switch clearance.
Engage the harness clamp to the pedal support.
Connect the connector to the stop light switch.
| 6. INSTALL LOWER INSTRUMENT PANEL FINISH PANEL (w/o Knee Airbag) |
for LHD:
Engage the 5 claws and 2 clips and install the instrument panel finish panel.
for RHD:
Engage the 6 claws and 2 clips and install the instrument panel finish panel.
| 7. INSTALL LOWER NO. 1 INSTRUMENT PANEL AIRBAG ASSEMBLY (w/ Knee Airbag) |
| 8. INSTALL LOWER NO. 2 INSTRUMENT PANEL FINISH PANEL (for LHD) |
Engage the 2 claws and 5 clips and install the instrument panel finish panel.
| 9. INSTALL NO. 1 INSTRUMENT PANEL UNDER COVER SUB-ASSEMBLY |
Engage the guide and the claw.
Install the instrument panel under cover with the 2 <A> screws.
| 10. INSTALL COMBINATION METER ASSEMBLY |
| 11. INSPECT AND ADJUST BRAKE PEDAL |