Home › Drivetrain · U441E AUTOMATIC TRANSMISSION / TRANSAXLE › SHIFT LEVER

SHIFT LEVER > INSPECTION

for Preparation Click here


1. INSPECT SHIFT LOCK CONTROL ECU


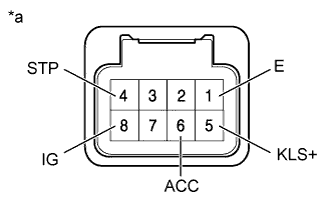
    C197449E09
  1. Measure the voltage according to the value(s) in the table below.
    Text in Illustration 
    *a
    Component with harness connected
    (Shift Lock Control ECU)

    NOTICE:
    Do not disconnect the shift lock control ECU connector.

    Standard Voltage:
    Tester Connection
    Switch Condition
    Specified Condition
    4 (STP) - 1 (E)
    Brake pedal depressed
    11 to 14 V
    Brake pedal released
    Below 1 V
    5 (KLS+) - 1 (E)
    1. Ignition switch ACC and shift lever in P
    Below 1 V
    2. Ignition switch ACC and shift lever not in P
    (Within approx. 1 second)
    7.5 to 10.5 V
    3. Ignition switch ACC and shift lever not in P
    (After approx. 1 second)
    6 to 9 V
    6 (ACC) - 1 (E)
    Ignition switch ACC
    11 to 14 V
    Ignition switch ON
    11 to 14 V
    Ignition switch off
    Below 1 V
    8 (IG) - 1 (E)
    Ignition switch ON
    11 to 14 V
    Ignition switch off
    Below 1 V
    If the result is not as specified and there are no problems with the wire harness, replace the shift lock control ECU.

  1. Measure the resistance according to the value(s) in the table below.

    NOTICE:
    Do not disconnect the shift lock control ECU connector.

    Standard Resistance:
    Tester Connection
    Condition
    Specified Condition
    1 (E) - Body ground
    When battery voltage not applied
    Below 1 Ω

    If the result is not as specified and there are no problems with the wire harness, replace the shift lock control ECU.


2. INSPECT TRANSMISSION CONTROL SWITCH


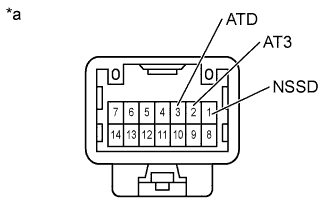
    C197451E15
  1. Measure the resistance according to the value(s) in the table below when the shift lever is moved to each position.
    Text in Illustration 
    *a
    Component without harness connected
    (Transmission Control Switch)

    Standard Resistance:
    Tester Connection
    Shift Lever Position
    Specified Condition
    1 (NSSD) - 2 (AT3)
    3 and 2
    Below 1 Ω
    Except 3 and 2
    10 kΩ or higher
    1 (NSSD) - 3 (ATD)
    Except 3 and 2
    Below 1 Ω
    3 and 2
    10 kΩ or higher

    If the result is not as specified, replace the shift lock control unit.


3. INSPECT SHIFT LOCK SOLENOID
  1. Disconnect the shift lock solenoid connector.


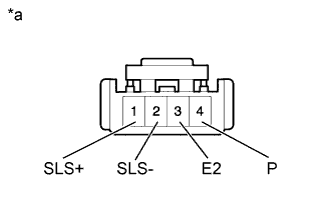
    C197452E10
  1. Measure the resistance according to the value(s) in the table below when the shift lever is moved to each position.
    Text in Illustration 
    *a
    Component without harness connected
    (Shift Lock Solenoid)

    Standard Resistance:
    Tester Connection
    Shift Lever Position
    Specified Condition
    4 (P) - 3 (E2)
    P
    10 kΩ or higher
    Except P
    Below 1 Ω

    If the result is not as specified, replace the shift lock control unit.

  1. Measure the resistance according to the value(s) in the table below.

    Standard Resistance:
    Tester Connection
    Condition
    Specified Condition
    1 (SLS+) - 2 (SLS-)
    When battery voltage not applied
    112 Ω

    If the result is not as specified, replace the shift lock control unit.