Home › Vehicle Exterior › LIGHTING (EXT) › AUTOMATIC LIGHT CONTROL SENSOR

AUTOMATIC LIGHT CONTROL SENSOR > ON-VEHICLE INSPECTION

for Preparation Click here


1. INSPECT AUTOMATIC LIGHT CONTROL SENSOR
  1. Disconnect the automatic light control sensor connector.


    E222418E02
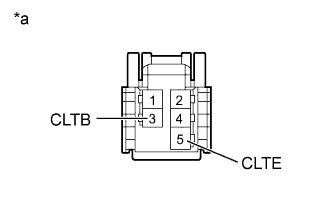
  1. Measure the voltage according to the value(s) in the table below.
    Text in Illustration 
    *a
    Front view of wire harness connected
    (to Automatic Light Control Sensor)

    Standard Voltage:
    Tester Connection
    Switch Condition
    Specified Condition
    3 (CLTB) - 5 (CLTE)
    Ignition switch off
    Below 1 V
    Ignition switch on
    11 to 14 V
    If the result is not as specified, repair or replace the wire harness or connector.

  1. Measure the resistance according to the value(s) in the table below.

    Standard Resistance:
    Tester Connection
    Condition
    Specified Condition
    5 (CLTE) -Body ground
    Always
    Below 1 Ω

    If the result is not as specified, repair or replace the wire harness or connector.

  1. Reconnect the automatic light control sensor connector.


    E222419E02
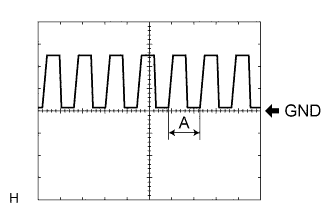
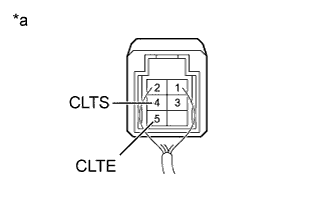
  1. Connect an oscilloscope to the automatic light control sensor connector.
    Text in Illustration 
    *a
    Rear view of wire harness connector
    (to Automatic Light Control Sensor)


    B113714E01
  1. Check the waveform.

    OK:
    Tester Connection
    Tool Setting
    Condition
    Specified Condition
    4 (CLTS) - 5 (CLTE)
    5 V/DIV., 5 ms./DIV
    Ignition switch ON, light control switch in AUTO
    Correct waveform is as shown

    HINT:
    If the ambient light becomes brighter, width A becomes narrower.

    If the result is not as specified, replace the automatic light control sensor.