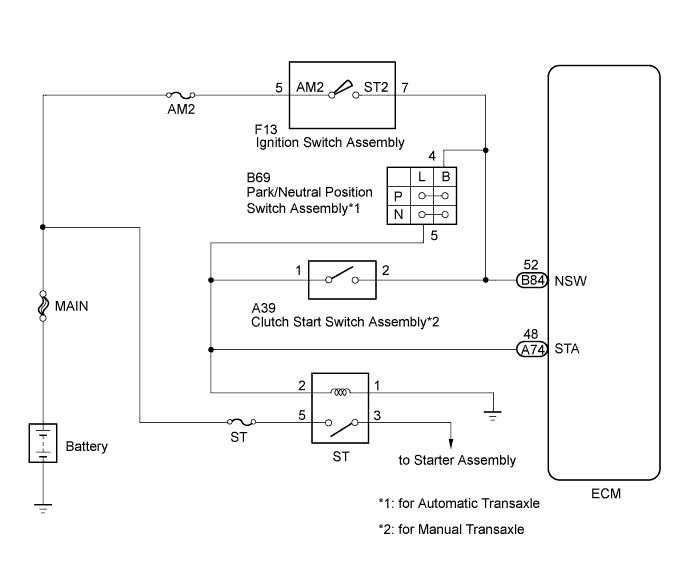
1NZ-FE SFI SYSTEM > Starter Signal Circuit |
| 1.CHECK WHETHER ENGINE CAN BE CRANKED |
Check if engine can be cranked.
| Result | Proceed to |
| Engine cannot be cranked | A |
| Engine can be cranked | B |
|
| ||||
| A | |
 |
| 2.READ VALUE USING INTELLIGENT TESTER (STARTER SIGNAL) |
Connect the intelligent tester to the DLC3.
Turn the ignition switch to ON.
Turn the tester on.
Enter the following menus: Powertrain / Engine and ECT / Data List / Starter Signal.
Check the result when the ignition switch is turned to ON and the engine starts.
| Ignition Switch Position | Starter Signal |
| ON | OFF |
| START | ON |
| Result | Proceed to |
| Outside standard range (for manual transaxle) | A |
| Outside standard range (for automatic transaxle) | B |
| Within standard range (for manual transaxle) | C |
| Within standard range (for automatic transaxle) | D |
|
| ||||
|
| ||||
|
| ||||
| A | |
|
| 3.INSPECT CLUTCH START SWITCH ASSEMBLY |
Inspect the clutch start switch assembly (Click here).
|
| ||||
| OK | |
|
| 4.INSPECT IGNITION SWITCH ASSEMBLY |
Inspect the ignition switch assembly (Click here).
|
| ||||
| OK | |
|
| 5.CHECK HARNESS AND CONNECTOR (IGNITION SWITCH ASSEMBLY - CLUTCH START SWITCH ASSEMBLY - ECM) |
Disconnect the ignition switch assembly connector.
Disconnect the clutch start switch assembly connector.
Disconnect the ECM connector.
Measure the resistance according to the value(s) in the table below.
| Tester Connection | Condition | Specified Condition |
| F13-7 (ST2) - A39-2 | Always | Below 1 Ω |
| F13-7 (ST2) - A84-52 (NSW) | Always | Below 1 Ω |
| F13-7 (ST2) or A39-2 - Body ground | Always | 10 kΩ or higher |
| F13-7 (ST2) or A84-52 (NSW) - Body ground | Always | 10 kΩ or higher |
|
| ||||
| OK | |
|
| 6.CHECK HARNESS AND CONNECTOR (CLUTCH START SWITCH ASSEMBLY -ECM - ST RELAY) |
Remove the ST relay from the engine room relay block.
Disconnect the ECM connector.
Disconnect the clutch start switch assembly connector.
Measure the resistance according to the value(s) in the table below.
| Tester Connection | Condition | Specified Condition |
| ST relay terminal 2 - A74-48 (STA) | Always | Below 1 Ω |
| ST relay terminal 2 - A39-1 | Always | Below 1 Ω |
| A74-48 (STA), A39-1 or ST relay terminal - Body ground | Always | 10 kΩ or higher |
| Result | Proceed to |
| NG | A |
| OK | B |
|
| ||||
| A | ||
 | ||
| ||
| 7.INSPECT PARK/NEUTRAL POSITION SWITCH ASSEMBLY |
Inspect the park/neutral position switch assembly (Click here).
|
| ||||
| OK | |
|
| 8.INSPECT IGNITION SWITCH ASSEMBLY |
Inspect the ignition switch assembly (Click here).
|
| ||||
| OK | |
|
| 9.CHECK HARNESS AND CONNECTOR IGNITION SWITCH ASSEMBLY - PARK/NEUTRAL POSITION SWITCH ASSEMBLY |
Disconnect the ignition switch assembly connector.
Disconnect the park/neutral position switch assembly connector.
Disconnect the ECM connector.
Measure the resistance according to the value(s) in the table below.
| Tester Connection | Condition | Specified Condition |
| F13-7 (ST2) - B69-4 (B) | Always | Below 1 Ω |
| F13-7 (ST2) - B84-52 (NSW) | Always | Below 1 Ω |
| F13-7 (ST2) or B69-4 (B) - Body ground | Always | 10 kΩ or higher |
| F13-7 (ST2) or B84-52 (NSW) - Body ground | Always | 10 kΩ or higher |
|
| ||||
| OK | |
|
| 10.CHECK HARNESS AND CONNECTOR (PARK/NEUTRAL POSITION SWITCH ASSEMBLY - ECM - ST RELAY) |
Remove the ST relay from the engine room relay block.
Disconnect the ECM connector.
Disconnect the park/neutral position switch assembly connector.
Measure the resistance according to the value(s) in the table below.
| Tester Connection | Condition | Specified Condition |
| ST relay terminal 2 - A74-48 (STA) | Always | Below 1 Ω |
| ST relay terminal 2 - B69-5 (L) | Always | Below 1 Ω |
| A74-48 (STA) or B69-5 (L) - Body ground | Always | 10 kΩ or higher |
|
| ||||
| OK | |
|
| 11.INSPECT BATTERY |
Check that the battery is not depleted.
|
| ||||
| OK | |
|
| 12.CHECK BATTERY TERMINAL |
check that the battery terminals are not loose or corroded.
|
| ||||
| OK | ||
| ||
| ||
| 13.READ VALUE USING INTELLIGENT TESTER |
Connect the intelligent tester to the DLC3.
Turn the ignition switch to ON.
Turn the tester on.
Enter the following menus: Powertrain / Engine and ECT / Data List / Starter Signal.
Check the value displayed on the tester when the ignition switch is turned to the ON and START positions.
| Ignition Switch Position | Starter Signal |
| ON | OFF |
| START | ON |
|
| ||||
| OK | ||
| ||
| ||
| 14.CHECK HARNESS AND CONNECTOR (ECM - ST RELAY) |
Remove the ST relay from the engine room relay block.
Disconnect the ECM connector.
Measure the resistance according to the value(s) in the table below.
| Tester Connection | Condition | Specified Condition |
| A84-48 (STA) - 2 (ST relay) | Always | Below 1 Ω |
|
| ||||
| OK | ||
| ||
| ||

