MECHANISM-SHIFT
DESCRIPTION
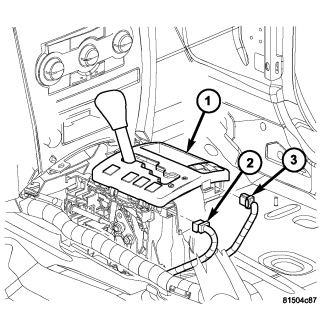
The automatic transmission is operated with the help of a shift lever assembly (SLA) (1) located in the floor console. There are four positions to which the selection lever can be shifted: P, R, N, D. In addition, the selector lever can be moved sideways (+/-) in position "D" to adjust the shift range.
All selector lever positions are identified by the SLA and transmitted by a shift cable to the selector shaft in the transmission.
The SLA is comprised of the following functions:
- Key lock: Depending on the selector lever position, the ignition cylinder is locked/unlocked, i.e., the ignition key can be removed only if the selector lever is in position "P". A park lock cable is used to perform this function.
- Park lock: The selector lever is not released from postion "P" until the brake pedal has been applied and the ignition key is in ”ACC” or ON” positions. Shift lock is controlled by the brake light switch in conjunction with a locking solenoid in the SLA. As soon as the brake pedal is applied firmly, the locking solenoid is de-energized to unlock the selector lever.
OPERATION
With the selector lever in position "D", the transmission control module (TCM) automatically shifts the gears that are best-suited to the current operating situation. This means that shifting of gears is continuously adjusted to current driving and operating conditions in line with the selected shift range and the accelerator pedal position. Starting off is always performed in 1st gear.
The current selector lever position or, if the shift range has been limited, the current shift range is indicated in the instrument cluster display.
The permissible shifter positions and transmission operating ranges are:
- P = Parking lock and engine starting.
- R = Reverse.
- N = Neutral and engine starting (no power is transmitted to the axles).
- D = The shift range includes all forward gears.
The shift range can be adjusted to the current operating conditions by tipping the selector lever to the left-hand side ("-") or the right-hand side ("+") when in position "D". If the shift range is limited, the display in the instrument cluster indicates the selected shift range and not the currently engaged gear.
- 5= Shift range is limited to overdrive
- 4= Shift range is limited to 4th gear.
- 3= Shift range is limited to 3rd gear.
- 2= Shift range is limited to 2nd gear.
- 1= Shift range is limited to 1st gear.
Tipping the shift lever will have the following results:
- Tipping the selector lever toward "-" one time after another: The shift range is reduced in descending sequence by one gear each time, i.e., from D - 4 - 3 - 2 - 1. If the selected limitation of the shift range would result in a downshift causing excessive engine speed, the shifting is not executed and the engaged gear as well as the shift range remain unchanged. This is to prevent the engine from overspeeding. Engine retardation is low with the selector lever in position "D". To make use of the full braking power of the engine, "manual" downshifting by tipping the lever towards the left-hand side is recommended. If this has been done, subsequent upshifting must be carried out manually as well.
- Tipping the selector lever toward "-" and holding it in this position: The currently engaged gear in range "D" is indicated in the instrument cluster display and the shift range is limited to this gear.
- Tipping the selector lever toward "+" one time after another: The shift range is increased by one gear each time and the increased shift range is displayed in the instrument cluster; possibly, the transmission upshifts to a faster gear.
- Tipping the selector lever toward "+" several times: The shift range is increased by one gear each time the lever is tipped until the shift range ends up in "D".
- Tipping the selector lever toward "+" and holding it in this position: The shift range is extended immediately to "D", shift ranges are indicated in ascending sequence; possibly, the transmission upshifts to a faster gear due to the extension of the shift range.
REMOVAL
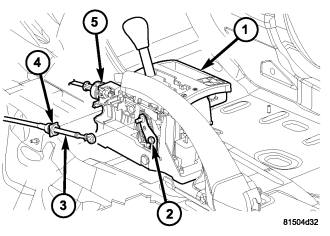
1. Remove any necessary console parts for access to shift lever assembly and shifter cables. (Refer to 23 - BODY/INTERIOR/FLOOR CONSOLE - REMOVAL)
2. If necessary, remove the bolts holding the shield, covering the gearshift and park lock cables, to the shifter assembly and remove the shield.
3. Shift transmission into PARK.
4. Disconnect the transmission shift cable (3) at shift lever (1).
5. Remove the shift cable retainer (4) from the notch in the shifter assembly.
6. Verify the key is in the LOCK position and disconnect the park lock cable (5) from the shifter mechansim cam and the notch in the shifter assembly.
7. Disengage all wiring connectors (2, 3) from the shifter assembly (1).
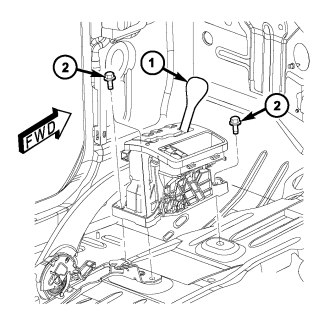
8. Remove all bolts (2) holding the shifter assembly (1) to the floor pan .
9. Remove the shifter assembly (1) from the vehicle.
INSTALLATION
1. Install shifter assembly (1) in position on the floor pan.
2. Install the bolts (2) to hold the shifter assembly (1) onto the floor pan. Tighten bolts to 12 N·m (105 in.lbs.).
3. Place the floor shifter lever in PARK position.
4. Loosen the adjustment nut (2) on the shifter assembly (1).
5. Install the gearshift cable (3) to the shift lever pin.
6. Install the park lock cable (5) to the shift mechanism cam and the notch in the shifter assembly.
7. Verify that the key is in the LOCK position and remains there until the cable is fully adjusted.
8. Verify that the park lock cable adjustment tab is pulled upward to the unlocked position.
9. Install the wiring harness connectors (3) to the shifter assembly (1).
10. Verify that the shift lever is in the PARK position.
11. Tighten the adjustment screw to 30 N·m (265 in.lbs.).
12. Verify that the key in the LOCK position and the shifter is in PARK.
13. Push downward on the park lock cable adjustment tab to lock the adjustment.
14. Verify correct shifter, park lock, and BTSI operation.
15. If necessary, install the shield, covering the gearshift and park lock cables, to the shifter assembly and install the bolts to hold the shield to the shifter assembly.
16. Install any console parts removed for access to shift lever assembly and shift cables. (Refer to 23 - BODY/INTERIOR/FLOOR CONSOLE - INSTALLATION)