SEAL-OUTPUT SHAFT
REMOVAL
1. For 2WD transmissions;
NOTE: When removing the propeller shaft flange be certain the shim remains on the output shaft.
a. Remove the propeller shaft (Refer to 3 - DIFFERENTIAL & DRIVELINE/PROPELLER SHAFT/PROPELLER SHAFT - REMOVAL). Move propeller shaft to the right and tie up.
b. Remove the nut, with a 30 mm 12 point socket, holding the propeller shaft flange to the output shaft and remove the flange.
2. For 4WD transmissions:
a. Remove the transfer case (Refer to 21 - TRANSMISSION/TRANSFER CASE - REMOVAL).
b. Remove the bolts holding the transfer case adapter housing onto the transmission case.
NOTE: When removing the transfer case adapter housing be certain the shim remains on the output shaft.
c. Remove the transfer case adapter housing from the transmission case.
d. Remove the bolt holding the output shaft extension to the output shaft.
e. Remove the output shaft extension from the output shaft.
3. Remove the output shaft seal with suitable screw and slide hammer.
INSTALLATION
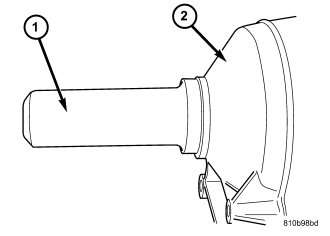
1. Position the new output shaft seal over the output shaft and against the transmission case.
2. Use Seal Installer 8902A (1) to install the seal.
3. For 4WD transmissions:
NOTE: When installing the transfer case adapter housing be certain the shim remained on the output shaft.
a. Install the output shaft extension onto the output shaft.
b. Install the bolt to hold the output shaft extension to the output shaft. Torque the bolt to 200 N·m (148 ft.lbs.).
c. Install the transfer case adapter housing onto the transmission case.
d. Install the bolts to hold the transfer case adapter housing onto the transmission case. Torque the bolt to 20 N·m (177 in.lbs.).
e. Install the transfer case (Refer to 21 - TRANSMISSION/TRANSFER CASE - INSTALLATION).
NOTE: When installing the propeller shaft flange be certain the shim remained on the output shaft.
4. For 2WD transmissions, install the propeller shaft flange onto the output shaft and install an new flange nut. Tighten the flange nut, with a 30 mm 12 point socket, to 200 N·m (148 ft.lbs.).
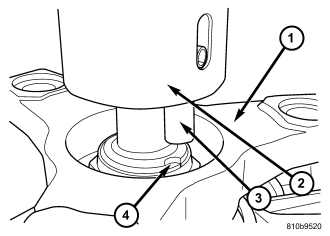
5. Place the Staking Tool 9078 and Driver Handle C-4171 onto the output shaft.
6. Rotate the Staking Tool 9078 (2) until the alignment pin (3) engages the output shaft notch (4).
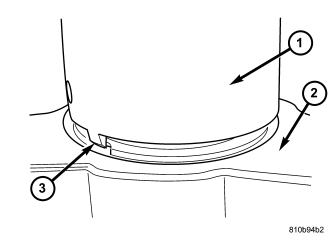
7. Press downward on the staking tool until the staking pin contacts the output shaft nut flange .
8. Strike the Driver handle C-4171 with a suitable hammer until the output shaft nut is securely staked to the output shaft.
9. For 2WD transmissions, install the propeller shaft (Refer to 3 - DIFFERENTIAL & DRIVELINE/PROPELLER SHAFT/PROPELLER SHAFT - INSTALLATION).